Notice: This Wiki is now read only and edits are no longer possible. Please see: https://gitlab.eclipse.org/eclipsefdn/helpdesk/-/wikis/Wiki-shutdown-plan for the plan.
EDT:Tutorial: RUI With Database Introduction
Access a database with EGL Rich UI
| < Previous | Next > |
Contents
Introduction
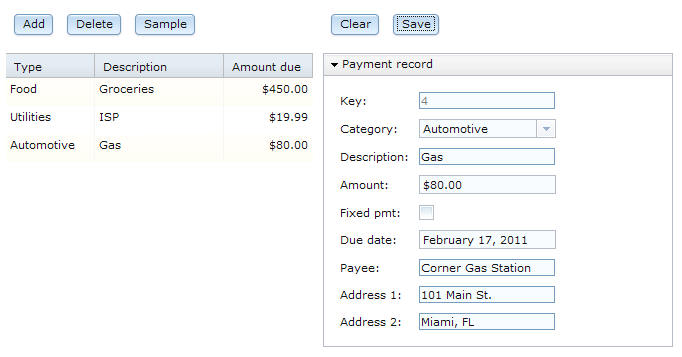
The following image shows the main page of the application that you will create:
The web page displays all rows in a database table and lets the user update each one. In addition, the user can add and delete rows.
The technology for developing the web page with EGL Rich UI involves several steps:
- You write the code.
- You generate the code and deploy it to another project in the workbench. At that point, the code that is destined for a browser is in HTML and JavaScript format; but other code is in Java format, as described later.
- You deploy all the code to a server such as Apache Tomcat.
- The server transmits the HTML and JavaScript code to the user's browser.
- The application both presents data to the user and accesses services that run remotely on a server.
A main benefit of EGL Rich UI is that users can interact with a responsive, local-running web application even as services do background work such as accessing a database.
In this tutorial, the Rich UI application accesses a service that you write and deploy along with the Rich UI application. This kind of service is called an EGL dedicated service. In general, you can use a dedicated service to do tasks that other EGL-generated Java services can do, such as accessing a database or file system. However, the dedicated service is not available to other code unless you redeploy it as an EGL-generated web service.
The benefit of a dedicated service results from its shared deployment with the Rich UI application. If a Rich UI application accesses a web service, your deployment of the application typically requires that you specify the service location. However, if a Rich UI application accesses a dedicated service, your deployment of the application does not require the location detail. Instead, the service will be available wherever you deploy the Rich UI application.
Note: Invocation of a dedicated service is slow in the Rich UI editor, but access is much faster when the application and services are deployed to a server.
Time required
This tutorial takes about 3 hours to finish. If you explore other concepts related to this tutorial, it might take longer to complete.
You can create the EGL files you need for this application in one of the following ways:
- Line by line (most helpful) : Complete the individual lessons to explore the code in small, manageable chunks, learning important keywords and concepts. This method also requires the greatest time commitment.
- Finished code files : At the end of each lesson in which you develop logic, you can link to the completed code, which you can copy into the Rich UI editor.
Skill level
Introductory
Audience
This tutorial is designed for people who know the basic concepts of programming and want experience with EGL Rich UI.
System requirements
To complete this tutorial, you must have the following tools and components installed on your computer:
- A copy of the EGL Development Tools downloaded from the Eclipse EGL Development Tools project at http://eclipse.org/edt/.
- A working Internet connection.
Prerequisites
You do not need any experience with EGL to complete this tutorial.
Expected results
You will create a working Rich UI application and database-access service.
Lessons in this tutorial
- Lesson 1: Plan the application
Design your application on paper before you begin coding. - Lesson 2: Set up the projects
Create three EGL projects, one for your RUI client code, one for services code, and one for code shared by the other two projects. - Lesson 3: Connect to a new Derby database
Use the Derby open source database manager to handle the data store for the application. - Lesson 4: Create the Rich UI handler
Start to build the handler by using EGL wizards and then the Rich UI editor. - Lesson 5: Create the service
Create a dedicated service to access the database. - Lesson 6: Add code for the service functions
In EGL, I/O statements such as add and get access data that resides in different kinds of persistent data storage, from file systems to queues to databases. The coding is similar for the different cases. - Lesson 7: Create a library of reusable functions
Create a library to format money values and to associate category numbers with descriptions. - Lesson 8: Add variables and functions to the Rich UI handler
Add source code that supports the user interface. - Lesson 9: Complete the code that supports the user interface
Next, you will complete the single-row layout, as well as the code that supports the Clear and Save buttons. - Lesson 10: Install Apache Tomcat
You can use Apache Tomcat to display the web page and to run the EGL-generated service. - Lesson 11: Deploy and test the payment application
During the deployment process, EGL creates HTML files and server-specific code to match your target environment.
| < Previous | Next > |
