Notice: This Wiki is now read only and edits are no longer possible. Please see: https://gitlab.eclipse.org/eclipsefdn/helpdesk/-/wikis/Wiki-shutdown-plan for the plan.
EDT:Tutorial: RUI With DataBase Lesson 1
Access a database with EGL Rich UI
| < Previous | Next > |
Contents
Lesson 1: Plan the application
Design your application on paper before you begin coding.
When you plan an application, do as follows:
- List your objectives, as this tutorial did earlier.
- Sketch the interface.
- Consider the flow of events.
- Identify the application structure.
Sketch the interface
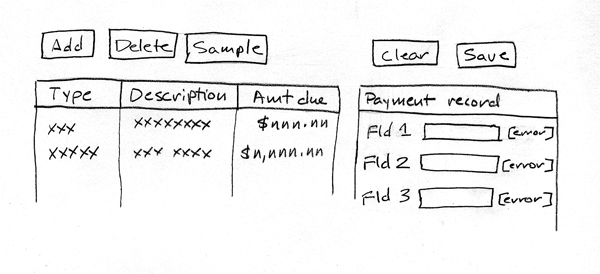
Use this sketch as a guide when you create the components of the interface:
At the left are three buttons (Add, Delete, and Sample) and a data grid; on the right are two buttons (Clear and Save) and a single-record layout.
Consider the application flow
At run time, the user can do as follows:
- Click the Sample button to delete all rows from the database table, to add sample rows, and to display the sample rows in the data grid.
- Click the Add button to add an almost empty row to the database and to display that data.
- Click the Delete button to delete, from the database, the data that was displayed in the currently selected row of the data grid.
- Click the Clear button to remove content from the single-record layout.
- Click a row of the data grid to copy the details of that row to the single-record layout.
- Change the details in the single-record layout and click the Save button to update the related database row.
The reader might disagree with this flow of events. For example, why not have the user clear the single-record layout, type data into the layout, and click the Add button to create a database row that has useful data from the start? That change is one of many options, and a good learning strategy is to follow the steps of this tutorial and to use the lessons learned for a production-level application.
Identify the application structure
When you write a complex Rich UI application, you write code in several Rich UI handlers, each of which corresponds to a web page or to a section of a web page. However, in this tutorial you develop only one handler. As noted earlier, a handler can access services, some of which you might develop by using an EGL Service type.
Whenever possible, use preexisting resources. Your Rich UI application will use the following EGL projects that are provided with the product:
- org.eclipse.edt.rui.dojo_version
- Provides the following widget types for this tutorial:
- DojoButton
- DojoCheckbox
- DojoComboBox
- DojoCurrencyTextBox
- DojoDateTextBox
- DojoTitlePane
All those widget types are based on Dojo, as are many other widgets that are available to you. For background details on that technology, see Dojo toolkit (http://dojotoolkit.org).
- org.eclipse.edt.rui.widgets_version
- Provides the following widget types for this tutorial:
- DataGrid
- GridLayout
- TextField
- TextLabel
You will develop the following logic:
- SQLService
- A dedicated service that interacts with a database table.
- PaymentLib
- A library that can provide code to several handlers
- PaymentFileMaintenanceHandler
- The handler that defines the web application.
Lesson checkpoint
In this lesson, you completed the following tasks:
- Sketched the application interface
- Considered the runtime flow of events.
- Identified the application structure
In the next lesson, you create the EGL source projects in which you will define the application programs.
| < Previous | Next > |
