Notice: This Wiki is now read only and edits are no longer possible. Please see: https://gitlab.eclipse.org/eclipsefdn/helpdesk/-/wikis/Wiki-shutdown-plan for the plan.
Acceleo/Getting Started
Contents
First Generator Module
| Authors | Laurent Goubet |
| Laurent Delaigue | |
| Contact | laurent.goubet@obeo.fr |
| laurent.delaigue@obeo.fr |
Copyright 2008, 2011 Obeo.
| Upgraded to Acceleo 3.3+ by | Tomasz Babczyński |
| Contact | tomasz.babczynski@pwr.edu.pl |
Prerequisites
- Java JDK >= 1.5
- Eclipse >= Luna
- Acceleo >= 3.3
- UML2 installed into Eclipse (update links to the current version of eclipse, of course)
Introduction
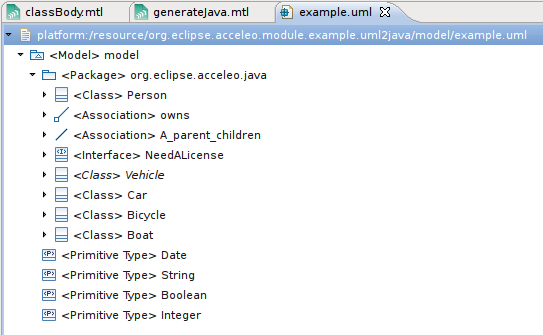
The aim of this tutorial is to get you started with Acceleo by helping you create your first generation module. For the purpose of this tutorial, we will focus on creating an Acceleo module that generates Java beans from a UML model. You will need an ".uml" model as the input of the soon created generator. You can create one thanks to the wizards and editor provided by the UML project. It is not comfortable though. Alternatively you can create one using Obeo UMLDesigner. In the incredible case that you do not want to create your own but simply have the UML model, you can take one provided by the "UML to Java" Acceleo example (File -> New -> Example -> Acceleo -> UML to Java).
Use the Acceleo perspective
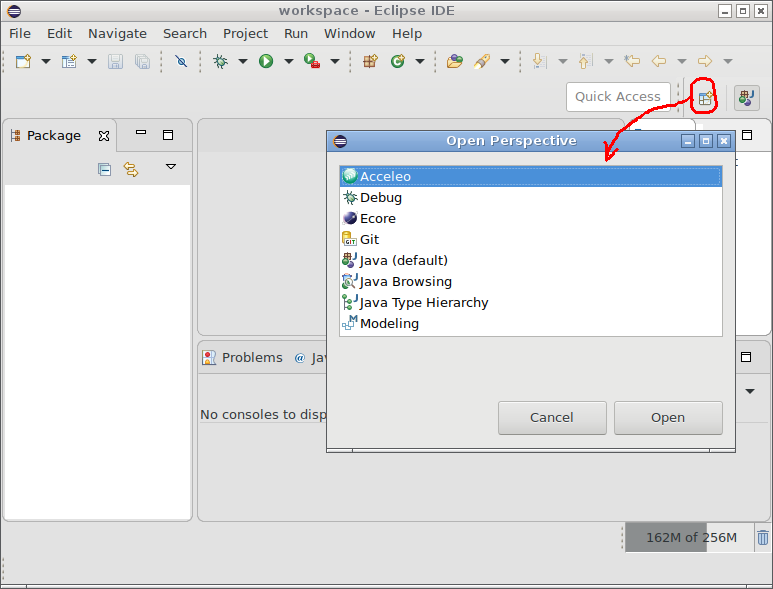
Using the Acceleo perspective will make things easier when working with Acceleo as it provides dedicated views and actions. Furthermore, being on that perspective will promote some menu items so that they are directly accessible instead of being nested within others.
You can switch to the Acceleo perspective by selecting the Window > Open Perspective > Other... menu and selecting Acceleo in the popup that appears then.
Create an Acceleo Project
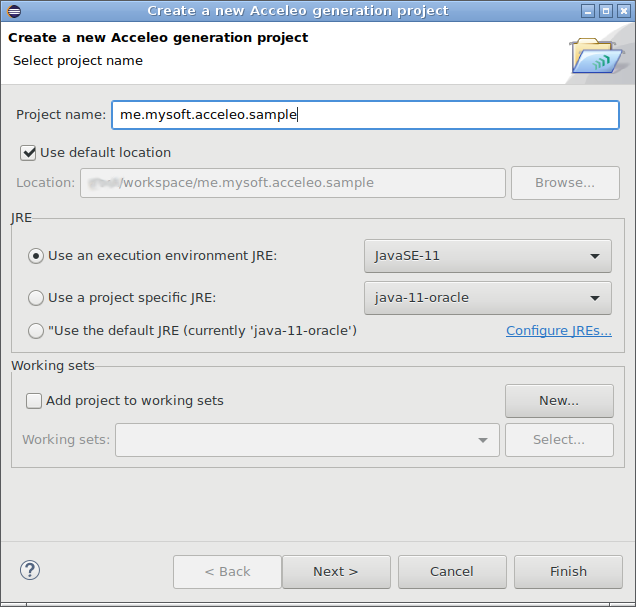
Acceleo Projects are meant to provide you with facilities to write your Acceleo modules. In order to create a new Acceleo project, use the menu item File > New > Acceleo Project.
Choose the name you want for your project (here, we'll go for the me.mysoft.acceleo.sample), then click Next>.
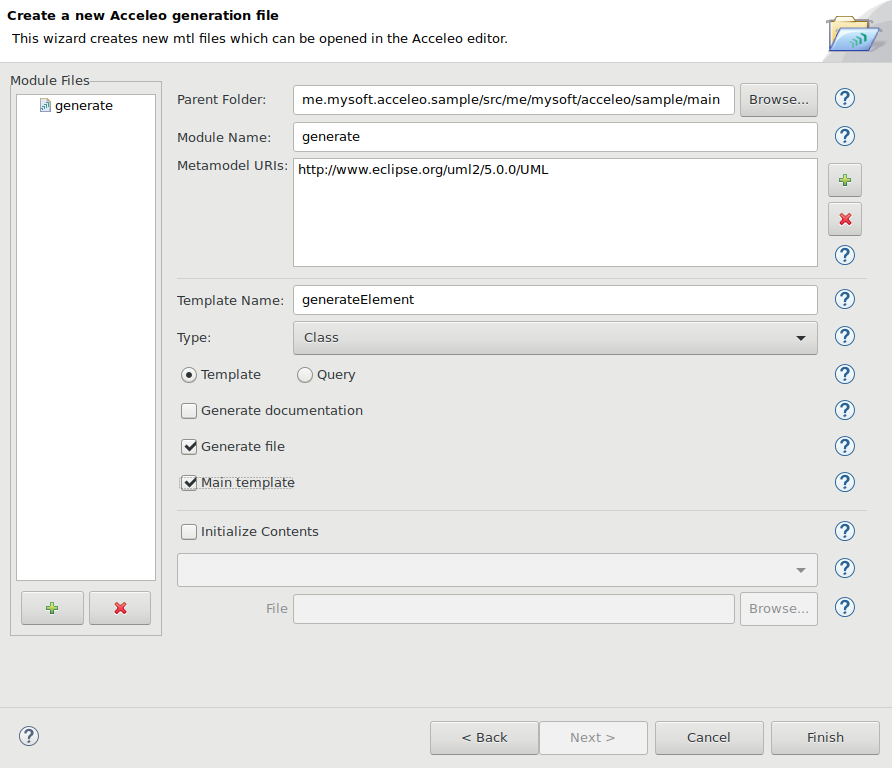
This second wizard page allows you to initialize the project by creating one or several Acceleo module files.
- Select the folder in which you want to create the new module file.
- Fill in the module name (we'll leave it as generate in this example).
- Select the metamodel from which your generation module will take its types (in this example, UML).
- Finally, choose the metaclass that will be used to generate the file (in this example, Class). This can be modified later at any time directly in the module files.
Note: other options are available to initialize the new module with existing content. These will be discussed in detail later.
You can create more than one module file in this project by using the "Add" button on the left, we only need one in this example.
Clicking on finish will create the module file(s), and some files automatically generated from it (more on these below).
The Acceleo editor
The Acceleo module editor provides the following features:
- Syntax highlighting
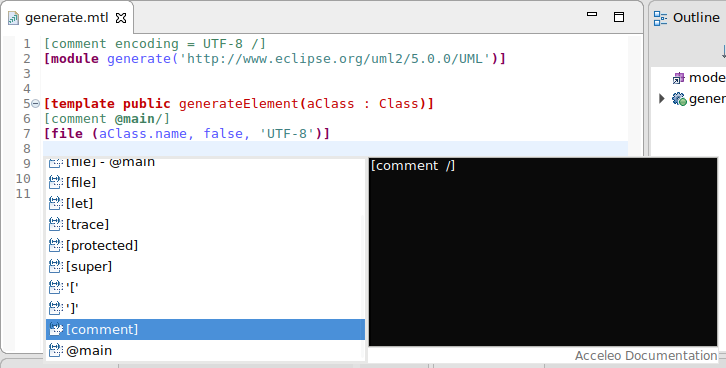
- Content assistant (ctrl + space)
- Error detection
- Quick fixes (ctrl + shift + 1)
- Dynamic outline
- Quick outline (ctrl + o)
- Code folding
- Open declaration (either with 'ctrl + left click' or 'F3' on selection)
- Search references (ctrl + shift + G)
For more information about the Acceleo syntax, please read the official OMG specification accessible from the official MTL Specification.
Generating java beans
We would now like to create a bean for each of the classes defined in our sample model. Here is the code for the module file:
 [comment encoding = UTF-8 /]
 [module generate('http://www.eclipse.org/uml2/5.0.0/UML')/]

 [template public generateElement(aClass : Class)]
  [comment @main /]
 [file (aClass.name.concat('.java'), false)]
   public class [aClass.name.toUpperFirst()/] {
   [for (p: Property | aClass.attribute) separator('\n')]
     private [p.type.name/] [p.name/];
   [/for]

   [for (p: Property | aClass.attribute) separator('\n')]
     public [p.type.name/] get[p.name.toUpperFirst()/]() {
       return this.[p.name/];
     }
   [/for]

   [for (o: Operation | aClass.ownedOperation) separator('\n')]
     public [o.type.name/] [o.name/]() {
       // TODO should be implemented
     }
   [/for]
   }
 [/file]
 [/template]
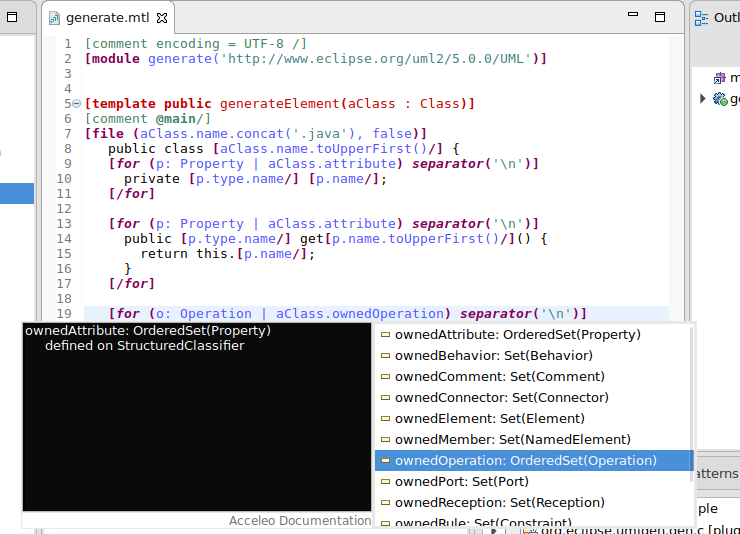
As shown below, the content assistant provides choices from the UML metamodel:
You can now launch the generation of your Java beans using this generation module but you need an ".uml" model as the input. You can create one thanks to the wizards and editor provided by the UML project or you can take the one provided in the "UML to Java" Acceleo example (File -> New -> Example -> Acceleo -> UML to Java).
In order to do this, you will have to :
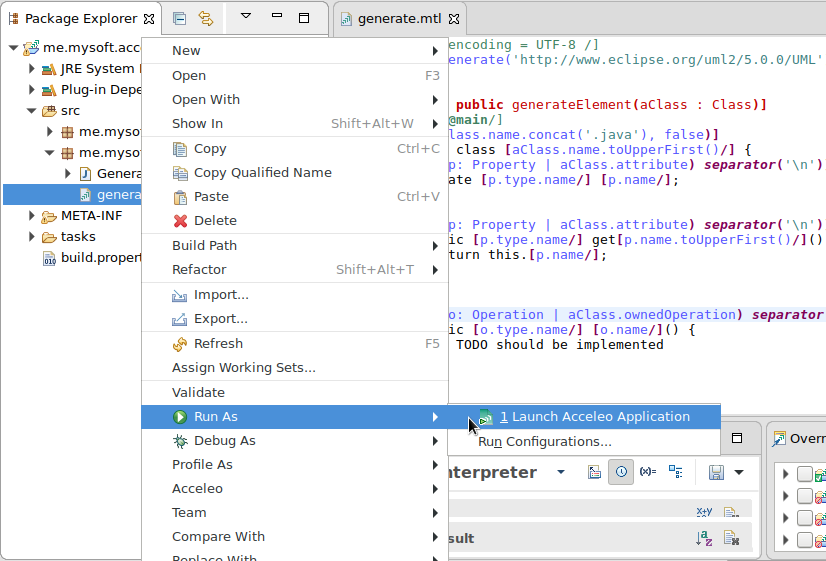
Right-click on the Acceleo module file (that is, the generate.mtl file) and select Run As > Launch Acceleo Application.
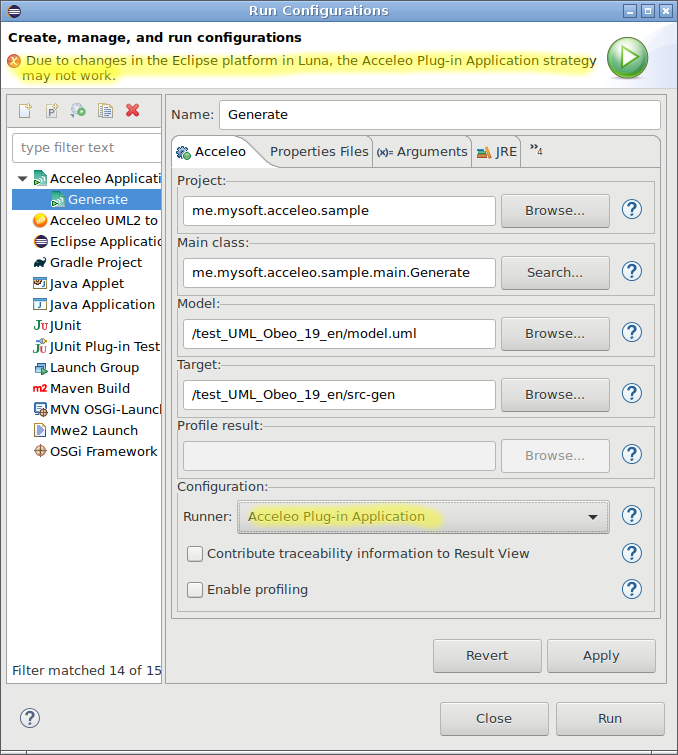
The Acceleo launch configuration page opens, and you need to provide it with the sample model and target folder.
Run as Acceleo Plug-in
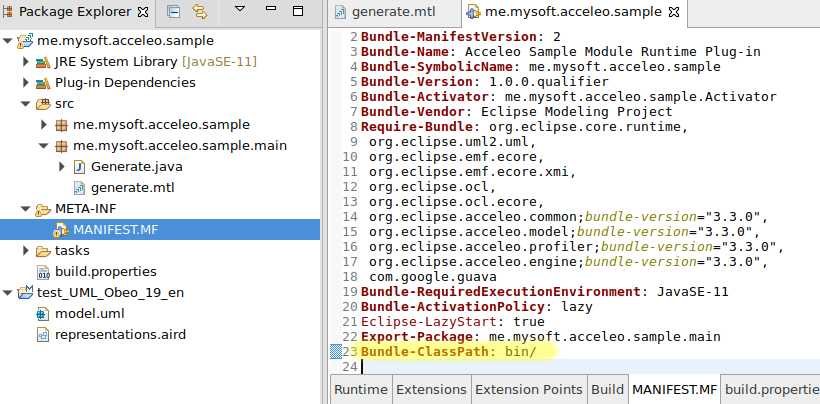
Due to changes... as you can see in the above figure means that you are to do something to workaround the problem. It is simple - add bin/ to the classpath in the MANIFEST.MF file. You can find it in the META-INF directory. But remember - you were warned, this may not work as expected.
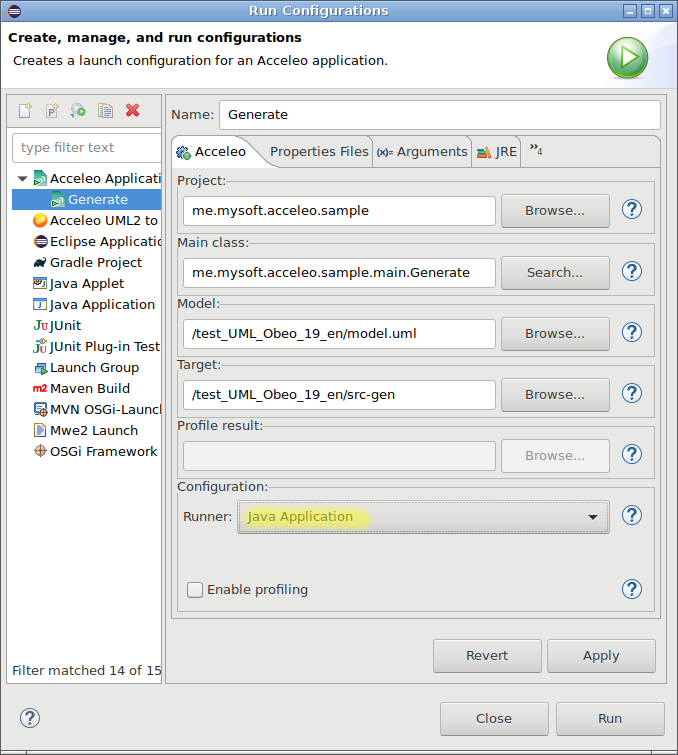
Run as Java Application
The second (better, recommended but harder) way is to use Java runner as the wizard suggests.
It works fine with some metamodels
but not with UML. It must be registered and initialized first if you want to deal with real models and not with just one or two classes.
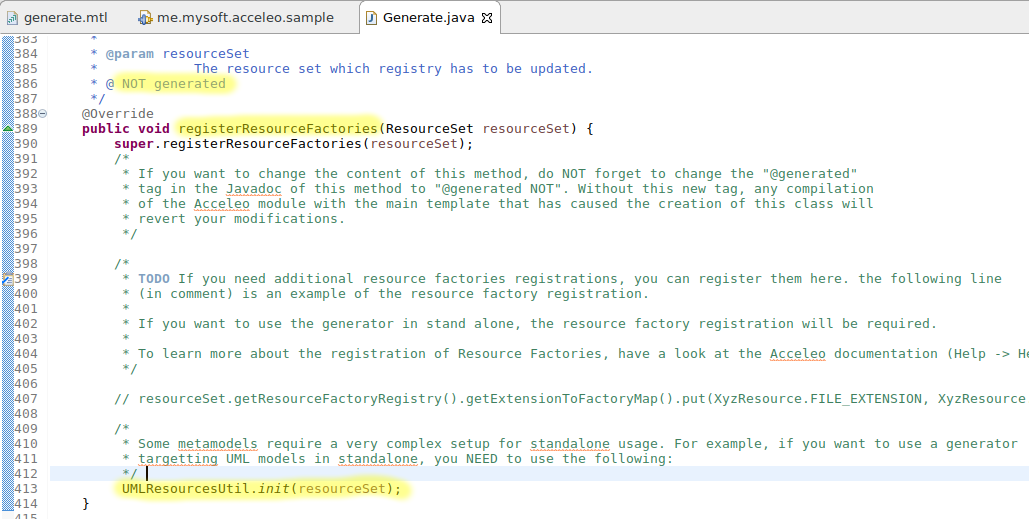
The initialization is done by calling the UMLResourcesUtil.init(resourceSet) method in the method registerPackages of the class
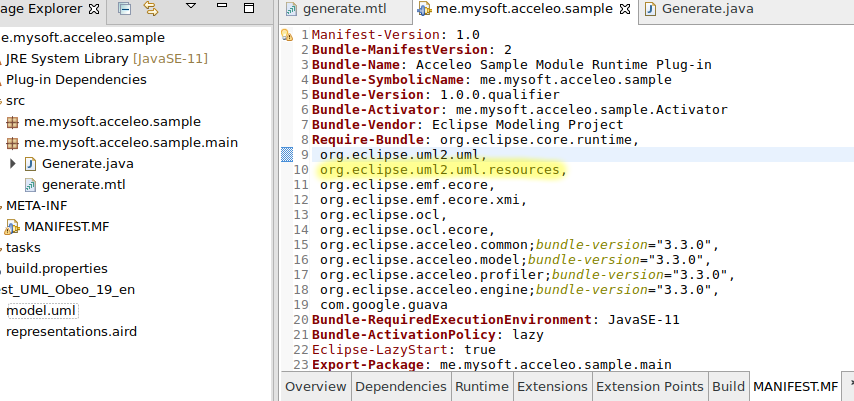
generated from the main acceleo module. To make "UMLResourcesUtil" class accessible in the project, you should first add proper dependency in the MANIFEST.MF as you can see in the figure below.
Now you can go to the code (Generate class) and insert (actually just uncomment) the call (and of course an import). Do NOT forget to save the manifest first. Additionally you have to change the @generated annotation to something else. Otherwise your changes will be lost during next build.
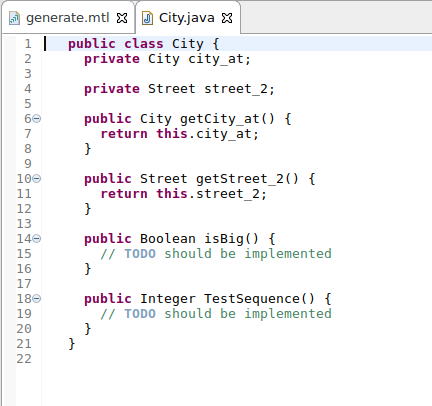
Now you can successfully run the project. The resulting Java file generated by this module file will look like this (certainly depending on your UML model):
User code blocks
Acceleo supports two ways of specifying user code blocks in the generated code. User code blocks delimit portions of text that are only generated once, and preserved for subsequent generations. This is very useful in order to allow users to add code in some areas of the generated files while keeping the rest of the file under the control of the generator.
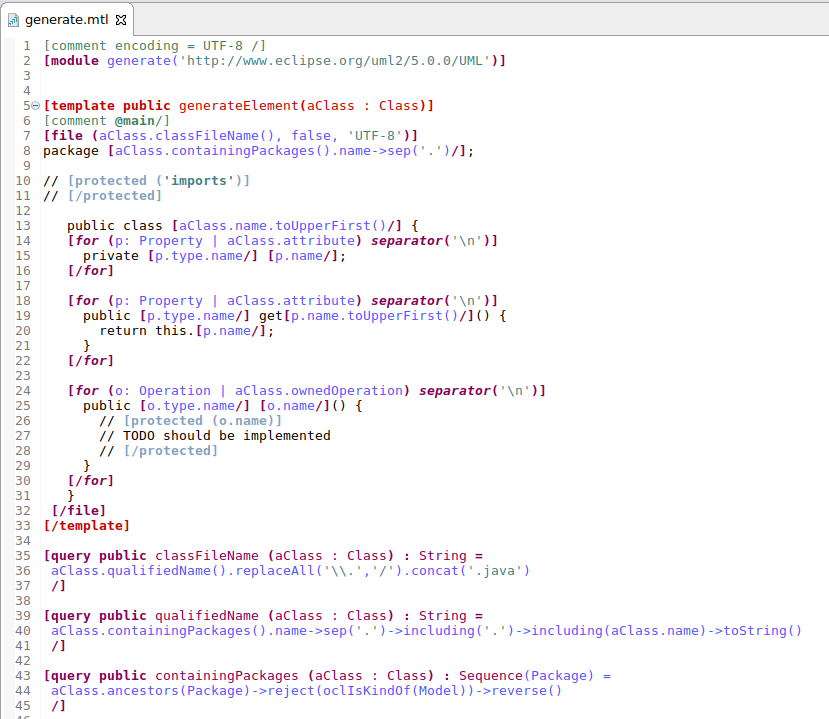
The first way of specifying user-code blocks is to use the standard [protected (id)]...[/protected] construct, as shown below (we've also added some queries in there to handle the package structure):
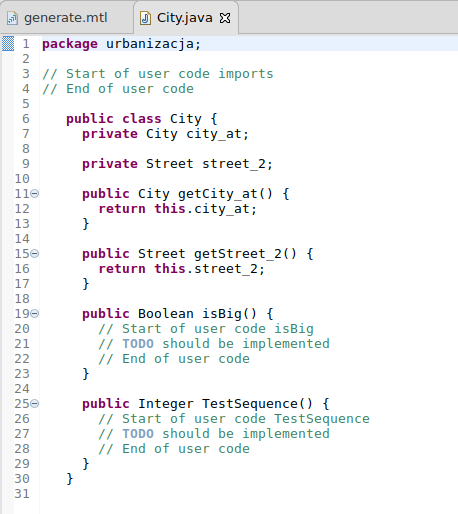
The above module produces the following code:
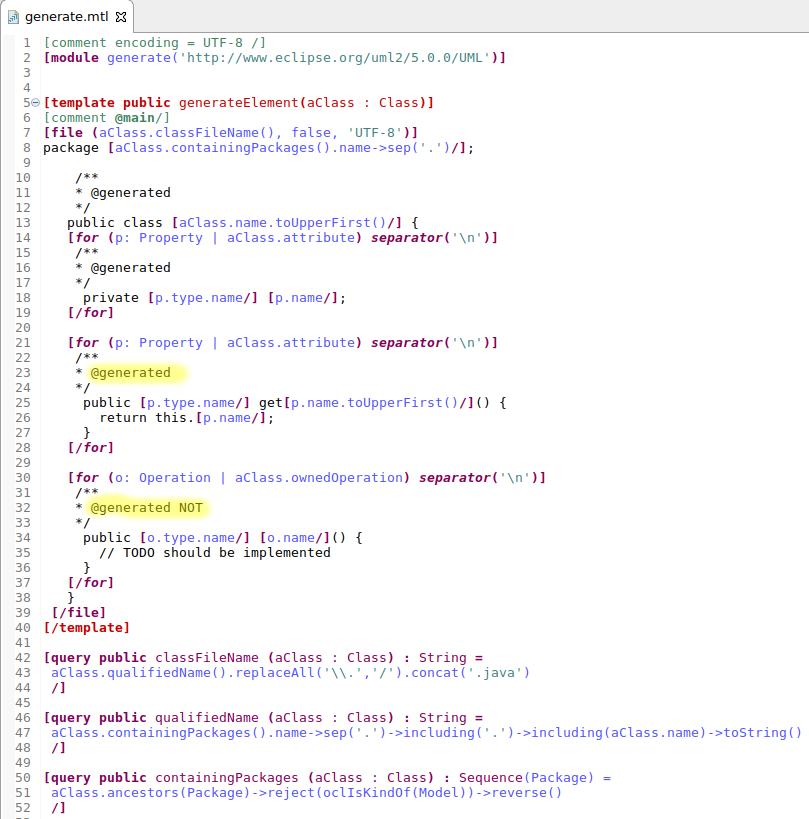
The second way, which is specific to generators that target the java language, is to add @generated annotations on the javadoc of elements that must be generated. Other elements (those that do not have such annotations in their javadoc, or in which the annotation has been slightly modified (i.e: @generated NOT or @not-generated ... or whatever you fancy)) are considered not to be modified by subsequent generations.
If a file contains at least one annotation @generated, the merge of the former java file and the newly generated one is delegated to JMerge_. @generated annotations must be added in the javadoc of the relevant java elements. They are not JDK5 annotations.
In both of these examples, the code located in "protected" areas will never be overriden by subsequent generations, be it left as-is or modified by the user outside of the module (directly in the generated file).
Java services wrappers
We will now add a requirement that java beans should only be generated for Classes that have the Bean stereotype. This coud be done through Acceleo alone, but for the purpose of this tutorial we will use a java service (extension of the language) in order to check whether the stereotype is present on any given Class.
It is possible to initialize the content of a new Acceleo module file with content that comes from :
- An existing Acceleo module file (a copy of this file is made)
- Some java code that you need to access from your Acceleo templates
We will detail here the second possibility, which makes it possible to execute standard java code from any Acceleo template or query.
First, create the Java class we'll use as a service in Acceleo.
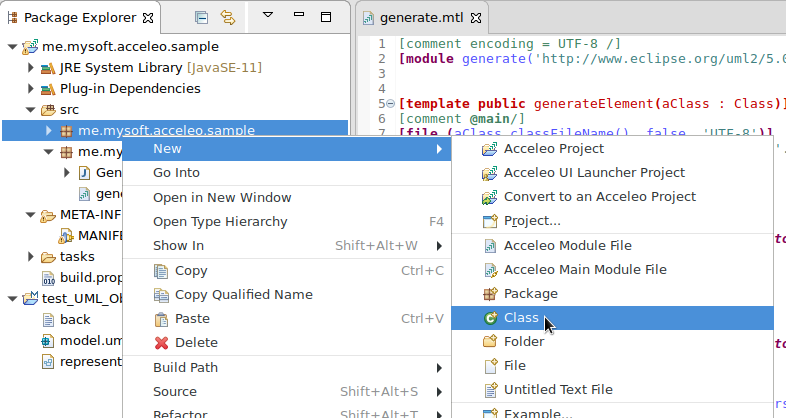
- Right-click the me.mysoft.acceleo.sample package in the Package Explorer and select New > Class
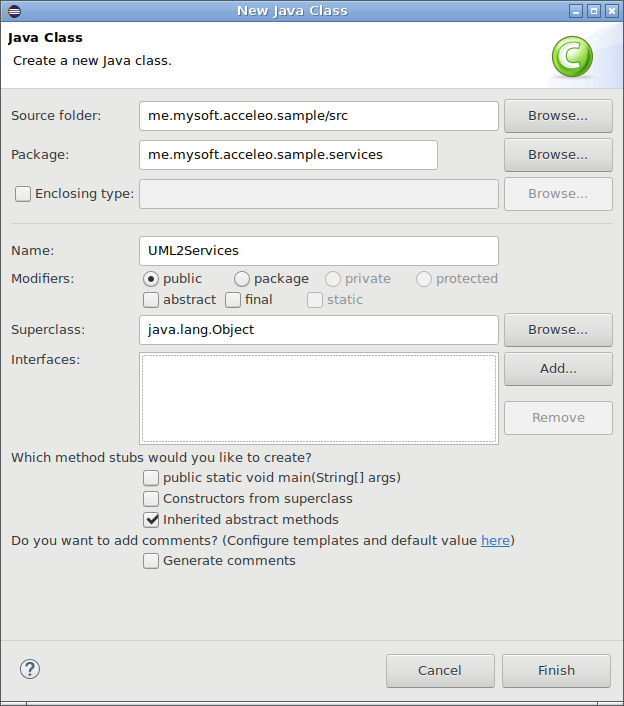
- In the popup that appears, change the Package field to me.mysoft.acceleo.sample.services and fill in the name field, we'll call this java Class UML2Services in this tutorial.
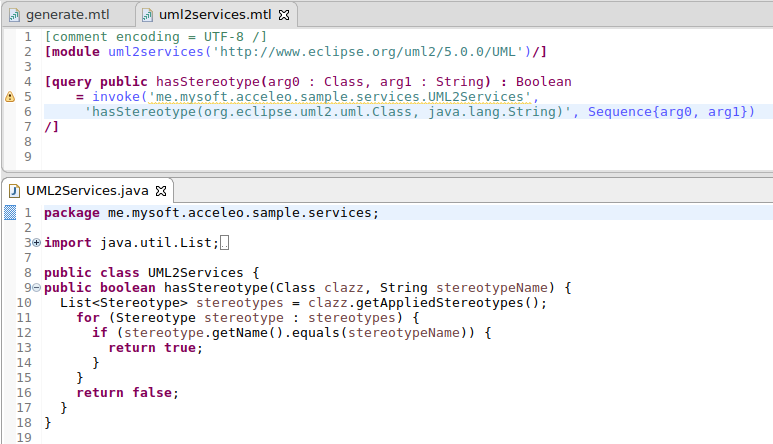
- Finally, paste in the following code for this class :
 package me.mysoft.acceleo.sample.services;

 import java.util.List;

 import org.eclipse.uml2.uml.Class;
 import org.eclipse.uml2.uml.Stereotype;

 public class UML2Services {
 public boolean hasStereotype(Class clazz, String stereotypeName) {
   List<Stereotype> stereotypes = clazz.getAppliedStereotypes();
     for (Stereotype stereotype : stereotypes) {
       if (stereotype.getName().equals(stereotypeName)) {
         return true;
       }
     }
     return false;
   }
 }
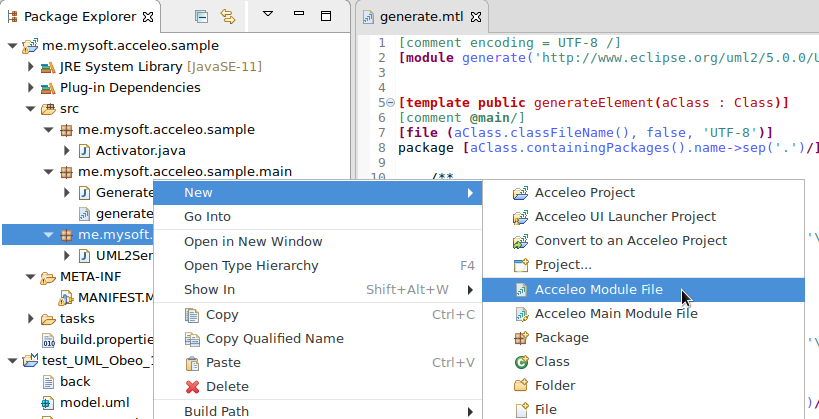
Now, what's left is to call this method from Acceleo. The easiest way to do so is to use the provided wizard. Right-click the me.mysoft.acceleo.sample.services package and select New > Acceleo Module File.
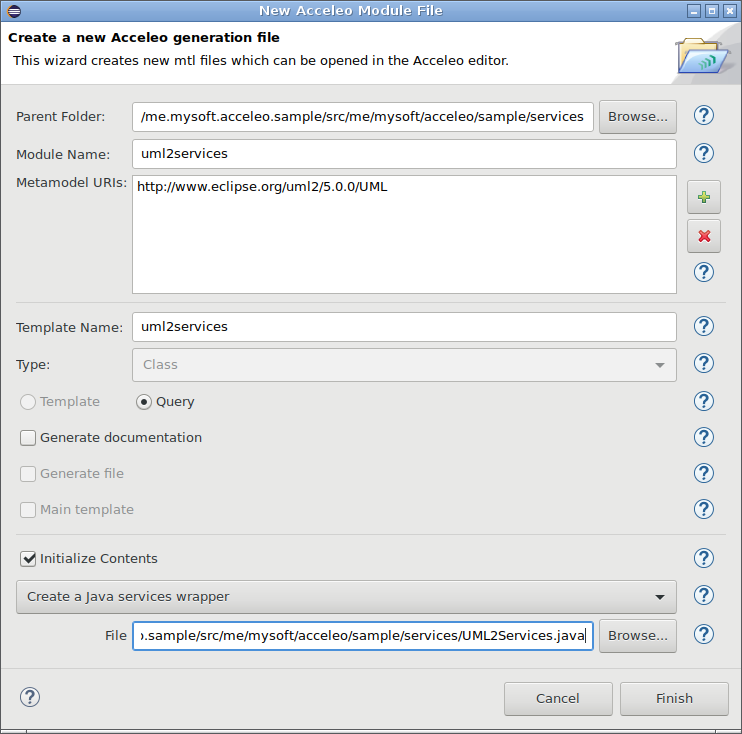
In the wizard window, enter the relevant information in the fields : select the UML metamodel URI and change the name field to uml2Services. Then, activate the Advanced button in order to gain access to the advanced options.
Tick the Initialize Contents checkbox and select: Create a Java services wrapper. Finally, browse to find the UML2Services java file.
This creates a new Acceleo Module file that contains a query (one per java method in your java class) whose role is just to delegate its behavior to the java class, thus making it accessible to your templates.
This is simply achieved thanks to the non-standard ``invoke`` Acceleo operation. You may want to rename parameters of the query. Arg0 is for class investigated, arg1 is the name of stereotype. The whole query together with the Java code says whether the class has applied the given stereotype or not.
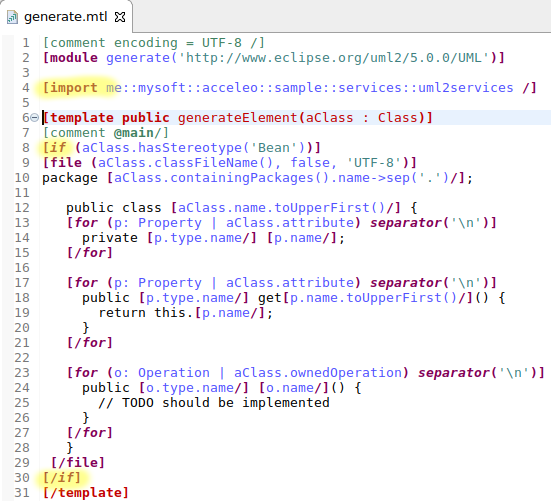
Now to prevent Acceleo from generating files for classes that do not have the Bean stereotype, all that's needed is to import the uml2Services module in the generate module and nest the [file] block within an [if] block calling this service. Clear the src-gen directory prior to run if you want to see the difference.
Now you should see only classes with Bean stereotype applied. It depends on the UML model and may mean - nothing. In this case just remove if before next experiments.
Creating a main module
We recommend not to have multiple modules with an @main annotation, as it complicates the workflow (you have to launch multiple generations to create all needed files). On the contrary, we recommend creating a "main" module which role will be to delegate to all of the modules that will create files. Typically, this module will be placed alone in its own *.main package.
Let's create this launcher for the beans generation. First, right-click the me.mysoft.acceleo.sample package in the Package Explorer and select New > Acceleo Module File.
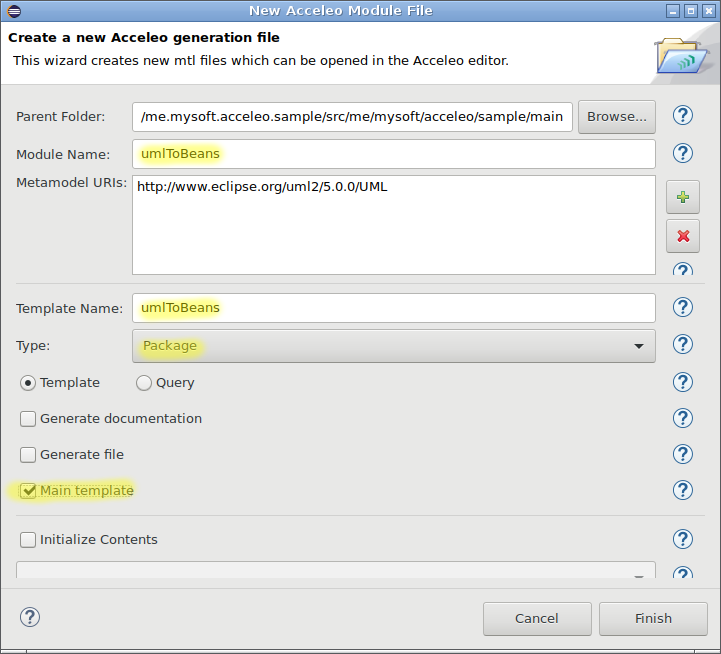
We will need to change all default information. First, give a meaningful name for this module (umlToBeans in this example) and set its metamodel appropriately. As we generate on UML, we will also change the root type of our generation to Package (the root of our UML model). We will also untick Generate file and tick Main template in options. Note the /main at the end of the parent folder field after Main template ticked.
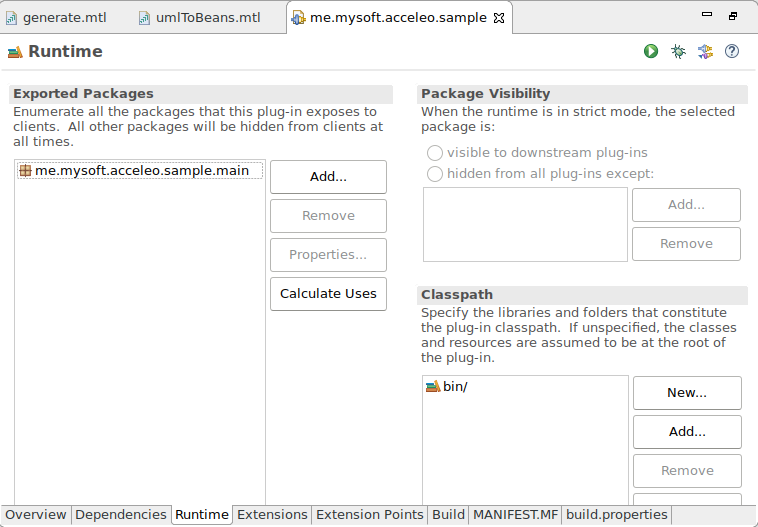
Since this module contains a @main annotation, we will need to export its containing package (so that other Eclipse plugins may launch the generation). For this, open the META-INF/MANIFEST.MF file of your project, go to its Runtime tab, click Add and select the me.mysoft.acceleo.sample.main package. The tab should look like this when you are done :
In fact you should have it already after previous exercises.
Recall the header of this section. Yes, it is good time to remove @main annotation from the generate module. You can also remove the Generate.java file and move the generate.mtl file to the me.mysoft.acceleo.sample.files package creating it first.
Now, paste the following code in your umlToBeans module :
 [comment encoding = UTF-8 /]
 [module umlToBeans('http://www.eclipse.org/uml2/5.0.0/UML')/]

 [import me::mysoft::acceleo::sample::files::generate /]

 [template public umlToBeans(aPackage : Package)]
 [comment @main /]
 [for (aClass : Class | aPackage.packagedElement->filter(Class))]
 	[aClass.generateElement()/]
 [/for]
 [/template]
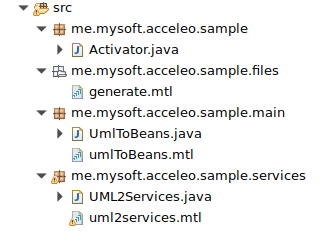
After all editions and re-factoring you should have following package structure :
And that's it! you can now launch this main module in order to generate java beans from any UML model. Simply right click the umlToBeans.mtl file, select Run As > Launch Acceleo Application and select the model from which to generate and the target folder before hitting the *Run* button.
Creating a UI launcher
Now that your generation modules are ready, you may want to have some wizards to launch the generation from within Eclipse. You can use the generated Java launcher in a manually coded action, but you can also use the New Acceleo UI project wizard. This wizard will create a new Eclipse project which will allow you to launch the generation with a right-click action on any appropriate model.
First, right click on your Acceleo project (me.mysoft.acceleo.sample) then select New > Acceleo UI Launcher Project.
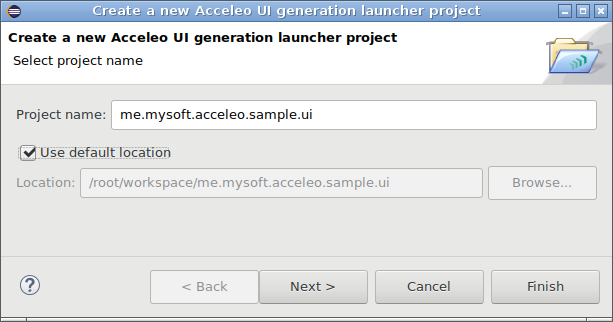
Fill in the desired name for this project, then click next.
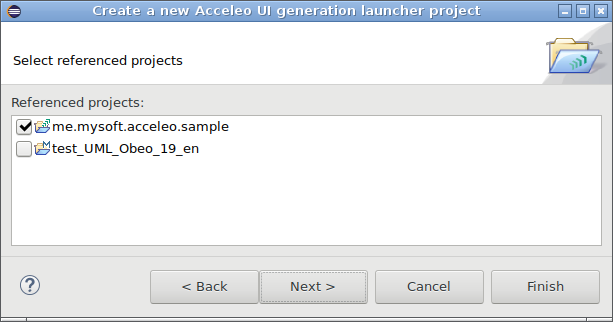
Select the generator project as referenced project, then click next.
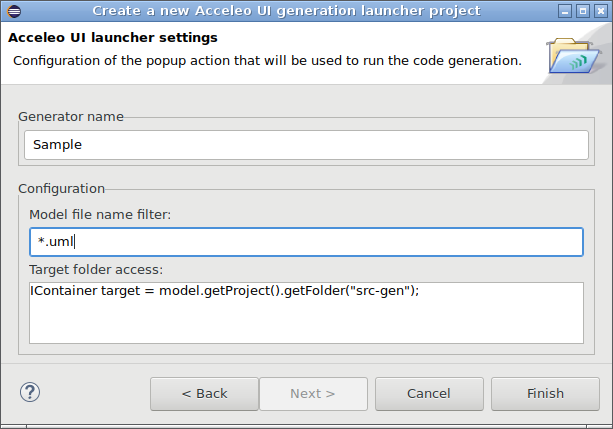
Finally, enter the model filename filter (files for which the generation action must be proposed on right-clicks, *.uml in our example), and the Java code for the target folder (leave it as-is to generate the code in the src-gen folder of the project containing the right-clicked model).
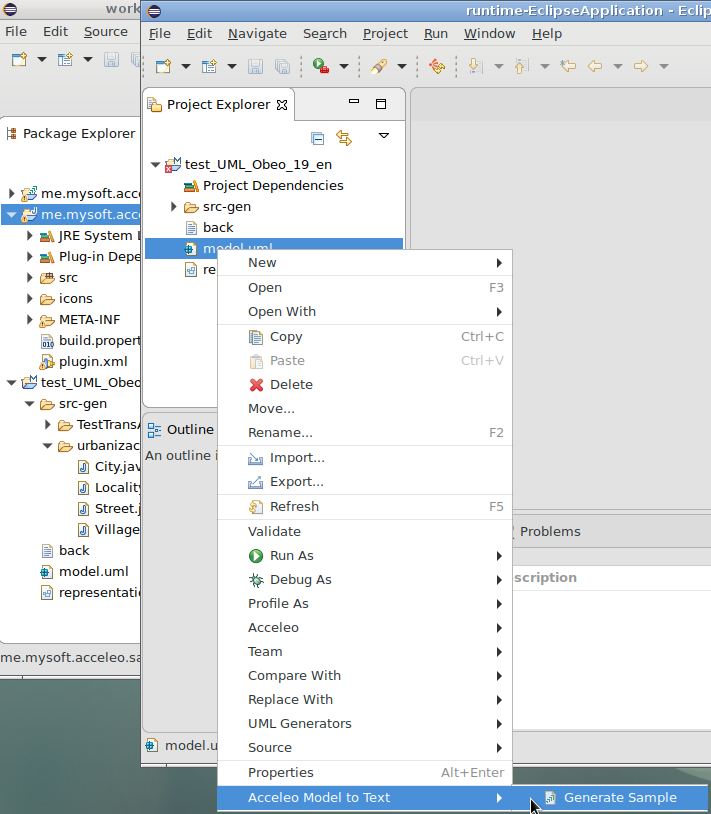
The wizard will create a new plug-in with all the necessary code to display a new action for the selected model file that will generate code in the specified folder. The screen-shot below shows the result of this plugin, a Generate Uml To Beans action on the *.uml* files.
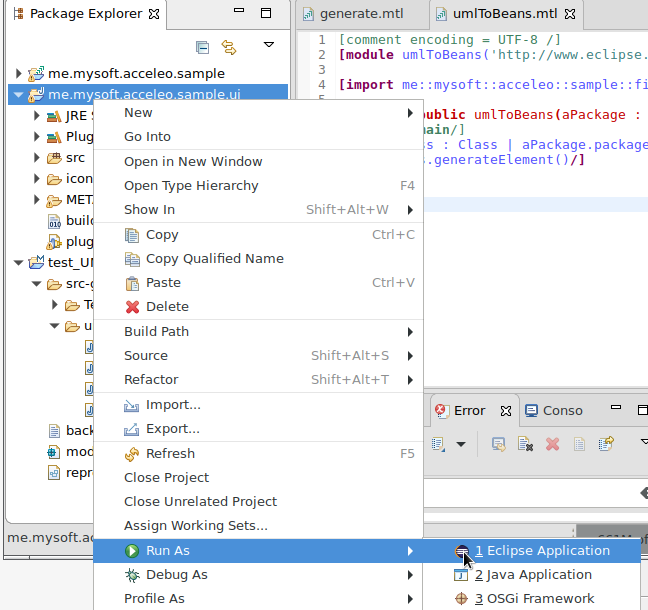
If you are not familiar with the Eclipse you would be surprised not seeing the option in the menu. The trick is as follow. The new plug-in was created. Plug-ins are to be installed to integrate with the IDE. Fortunately, there is a simple way to temporarily install a plug-in - just run it as Eclipse application.
You have to import the UML model into the runtime workspace e.g. from the previous workspace and then the lost option should appear when you right-click on the .uml file.
| Acceleo Portal | |
| Project | Project · Installation |
| Features | Acceleo Features · Runtime · Acceleo editor · Views & Perspective · Interpreter · Maven |
| User documentation | Getting Started · User Guide · Acceleo operations reference · OCL operations reference · Text Production Rules · Migration From Acceleo 2.x · Best Practices · Videos · FAQ |
| Developer documentation | Source code · How to contribute · Compatibility · MOFM2T specification · OCL specification |
| Community | Professional Support · Report a bug |


