Notice: This Wiki is now read only and edits are no longer possible. Please see: https://gitlab.eclipse.org/eclipsefdn/helpdesk/-/wikis/Wiki-shutdown-plan for the plan.
Henshin/Getting started
This tutorial shows you how to get started with Henshin. It introduces the Bank Accounts example to show some of the basic concepts of the Henshin transformation language and tool environment. We explain how to define transformation rules using Henshin's integrated graphical editor, and how to use the interpreter (wizard and programmatically) to execute rules on an example model.
We assume that you are familiar with the Eclipse Modeling Framework (EMF). If not, please start by reading one of the excellent available tutorials.
Our example transformation is endogenous, meaning that it operates on a single metamodel. A minimal Eclipse project containing a transformation model, a suite of example input models, and source code can be found here. To use the project contained in this Zip file, download it and import it into your workspace via File → Import... → General → Existing Projects into Workspace. The individual files contained in the project can also be inspected online in our Git repository .
Once you want to go beyond the basic concepts covered in this tutorial, we recommend to look at the Henshin meta-model for a complete reference on how model transformations are specified in Henshin and what their capabilities are. Additional details about rule creation and rule application can be found in the articles about the graphical editor and the interpreter
Metamodel and Instance Model
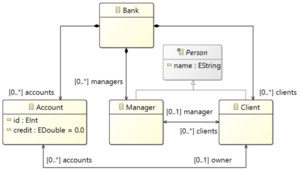
The metamodel is defined in the file bank.ecore. We used the Ecore Tools to draw a diagram (depicted on the right). The diagram is stored in the file bank.aird.
The class Bank serves as a root container for all other classes. Every bank owns a number of accounts, each with a unique ID and the current credit. Two types of persons are distinguished: managers and clients. Every client is associated with at most one manager and can own a number of accounts in the bank. Note that the references between Account and Client, and Manager and Client are bidirectional. Therefore, it is for example not only possible to obtain all accounts of a given client, but also to find out to which client a given account belongs to.
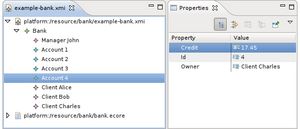
An example instance model is depicted on the right using the Sample Reflective Ecore Model editor. It contains one manager, three clients and four accounts. Note that we did not generate code from the metamodel. Thus, we use dynamic EMF here, i.e. the instance model is typed over a dynamic metamodel loaded from bank.ecore. This is also the reason why we used the generic file extension *.xmi here and not, say, *.bank.Transformation Rules
We define a couple of transformation rules for the above metamodel. In fact, the rule set we aim to define is provided as part of the aforementioned zip file, but here we assume that we want to create the rules from scratch. To this end, we use the integrated graphical editor of Henshin. To set up the transformation, do File → New → Other → Henshin → Henshin transformation Diagram. This wizard will create two files, one for storing the transformation model and one for the diagram information (e.g. bank.henshin and bank.henshin_diagram). When the wizard is finished, an empty diagram file is created and opened in the graphical editor. Now you need to import the metamodel for which you want to define a transformation. This can be done by right-clicking in the empty editor and selecting Import Package... → From Workspace. Then select the file bank.ecore and within this file the package bank. If the import was successfull you will see all classes of the metamodel appearing in the palette of the editor.
To create a new transformation rule, use the Rule tool in the palette. In the top of every rule, its name and parameters are specified (and some optional information which we do not consider here).
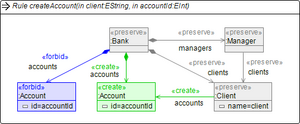
Parameters: In the below example, we write createAccount(in client:EString, in accountId:EInt), where the client parameter is the name of the client for whom an account should be created, and accountId is the ID to be used for the new account. A parameter has a kind, which can be either in, out, inout, or var. An in parameter is passed into the rule from the rule's context. An out parameter is passed out of the rule into the rule's context. An inout parameter is both passed both into and out of the rule, to and from its context. A var parameter or variable is used internally inside a rule only. Optionally, a parameter also has a type, like EString and EInt in the example. You can change the kind, type and name of a parameter simply by typing this information into the bar at the top of the rule.
Nodes: Inside of the rule, we now create a number of nodes now, as shown in the screenshot below. For example, to create the bank node in the top, you can use the Bank tool in the palette. After you have created the node, you can change its name and also its type. For changing the name of this object to bank click on the name label of the node and enter bank:Bank. Note that these names can be important when you want to pass an object as a parameter of the rule. In this case you would add bank to the list of the rule.
Edges: To specify a link between two nodes use the tool Edge in the palette and draw a line between two lines. This is possible only if the metamodel contains a reference between the two corresponding classes. If multiple references are possible, you can choose from a pop-up menu.
Attributes: Attributes can be created within nodes and are specified by the name of the attribute and an '=' followed by an expression which is evaluated during the rule application.
Actions: Nodes and edges are annotated with stereotypes which we refer to as actions. A number of actions are supported: «preserve» matches an object and preserves it during the rule application, «create» creates a new object or link between objects, «delete» deletes an existing object or link, «forbid» forbid the existience of an object or link. Note that these are the basic actions, which can be further parameterized (see below).
The rule createAccount(client,accountId) matches a bank, a client with the name given in the rule parameter client and the client's manager. The rule creates a new account for the client and sets its ID to the value given in accountId. The rule is applicable only if now other account exists already with the same ID.
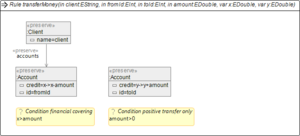
The rule transferMoney(client,fromId,toId,amount,x,y) matches a client with the name client and his account with the ID given in fromId and another account with the ID toId. The credit attribute of both account is changed, which is denoted using an arrow notation: old value -> new value. In the source account, the old credit is matched using a parameter x and set to x-amount, analogously for the destination account. Note that the conditions check whether the credit balance on the source account is high enough and that transfers are always positive. If the conditions don not hold, the rule can not be applied. The conditions are evaluated by the Oracle Nashorn JavaScript Engine. Note also that x and y have to be specified as var parameters. When executing this rule, these parameters will be automatically initialized by the found match.
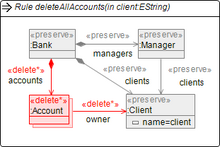
The rule deleteAllAccounts(client) deletes all accounts of a given client. This is done using a star-operator, i.e. using the action «delete*». On the model level, this is mapped to a nested rule. which has a for-all semantics. Note that, when deleting bidirectional edges, both directions have to be specified(!). If the checkDangling-attribute in the rule is set to true, a node can only be deleted if all its links are deleted, too. As an exercise, you may define a rule which moves all accounts from one client to another client.
Execution using the Interpreter Wizard
We now show how to execute single transformation rules using the Henshin interpreter, invoked through a dialog. To run this dialog, open the *.henshin file, right-click on a rule or a transformation and select Apply Transformation in the context menu. Then choose an instance model that should be transformed. Finally, set the parameters of the rule (not all have to be specified) and click on Preview to see the changes.
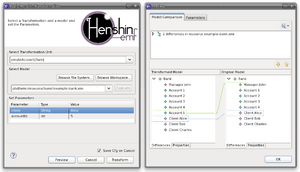
An application of the rule createAccount(client) is shown on the right. As parameters we specified client=Alice with type String, and accountId=5 with type Int. The preview window on the right shows the result of applying the rule with these parameters.
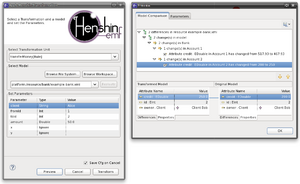
An application of the rule transferMoney is shown on the right. We have specified the parameters client, fromId, toid and amount. The other parameters are automatically matched by the transformation engine. Note also that is important to specify the correct parameter types, because otherwise the rule cannot be matched. The preview window on the right shows the result of applying the rule with these parameters.
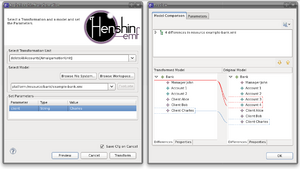
An application of the ruleThe rule deleteAllAccounts(client) is shown on the right. As parameter we specified client=Charles with type String. The preview window on the right shows the result of applying the rule with these parameters.
Performance Optimization using EMaps
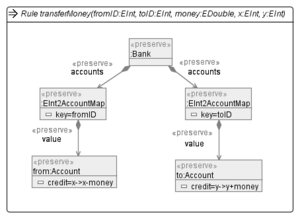
The rule transferMoney can also be realized using EMF EMaps. This significantly improves the performance for large models because Account objects can be looked up efficiently based on their ID.
Execution using the Interpreter API
Of course, you can also invoke the interpreter programmatically. You can find an implementation of the example transformations above using the interpreter in the bank example package.
Main contributor of this example: Christian Krause

