Notice: This Wiki is now read only and edits are no longer possible. Please see: https://gitlab.eclipse.org/eclipsefdn/helpdesk/-/wikis/Wiki-shutdown-plan for the plan.
Henshin/Interpreter
The Henshin interpreter is the default engine for executing model transformations defined in Henshin. The interpreter can be invoked either using a wizard or programmatically using an API.
Contents
Interpreter Wizard
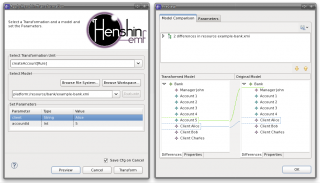
The interpreter wizard can be invoked by a right-click on a *.henshin file in the Package Explorer and selecting Henshin→Apply Transformation.
In the first page of the wizard, you need to enter the following information:
- Choose a transformation rule or unit to be applied.
- Specify a model file to be transformed using the rule or unit.
- Enter possible parameters of the rule or unit. Make sure that the type of the parameters is correctly set. Ignore means that the parameter is not set and will be matched automatically by the interpreter.
If you click Preview you should either see the modifications to the model or get a message that the rule or unit could not be applied. If you think it should be applicable but still get a message that it is not, make sure the parameters are all correctly set including their types.
If you click Transform the model will be transformed and saved, if possible.
Debugging using the interpreter
The latest version of Henshin includes basic debugging support for single rule applications, as well as Run/Debug Configurations.
Run/Debug Configuration
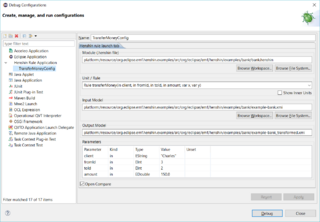
Henshin now provides the usual Eclipse Run and Debug Configurations that simplify repeated application of transformation and enable debugging.
To debug a rule application, first make sure you are in the Debug perspective so that all the necessary views / actions are available. Next, create a new debug configuration of the type Henshin Rule Application (Run→Debug Configurations). Here you must specify the desired module (*.henshin file), then select the rule and edit the rule parameters. You also have to provide paths to the input and output models (the latter will be created / overwritten). The dialog is very similar to the existing Interpreter Wizard. Click Debug after setting the desired parameters to start debugging the rule application. To re-launch an existing debug configuration, you can use the Debug Button or Dropdown in the Toolbar.
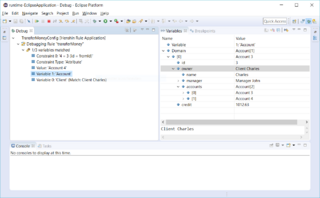
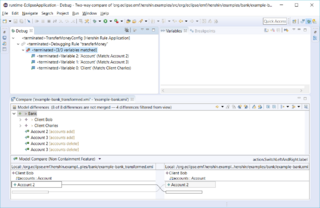
When starting a debug configuration, it will be initialized pointing to the first variable (as determined by the search plan). From there, you can use the standard step into, step over, and step return actions, and analyze the state of the rule application using the Debug and Variables views.
Step Semantics
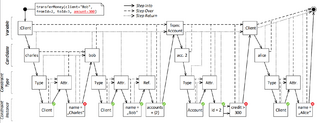
The Henshin debugger aims to preserve the semantics of those three actions known from imperative languages (step into/over subroutines, step out of current routine). This is done by introducing four (artificial) debug levels to define the current state of the matching process hierarchically. The concrete execution of the step actions depends on the current debug level, but generally speaking, step into moves the debugging state one level "down", step over stays on the same level, and step return moves the state one level "up".
| Debug Level | Represents | Examples |
|---|---|---|
| Variable i | the i-th variable of the search plan | Bank, Client, Account |
| Value | a specific candidate from the current variable's domain | Client Alice, Account 3 |
| Constraint Type | one possible kind of constraint | Attribute, Reference |
| Constraint n | the n-th individual constraint of a given constraint type | (Attribute) Constraint 2 |
| Debug Level → ↓ Step Action |
Variable | Value / Candidate | Constraint Type | Constraint Instance |
|---|---|---|---|---|
| Step into | Continues with the first candidate for the variable. | Continues with checking/enforcing the first constraint type. | Checks/enforces the first constraint of the current type. | Identical to step over. |
| Step over | Tries all candidates including all constraint checks until a different variable is matched. Terminates if no variable is left. | Executes all constraint checks for the current candidate. | Executes all constraint checks of the current constraint type. | Checks/enforces the next constraint of the current type. Continues with the next constraint type if there is no further constraint of the current type. Backtracks to the next value if the constraint is not met. |
| Step return | Identical to step over. | Tries all remaining candidates including all constraint checks until the next variable is matched. Terminates if no variable is left. | Executes constraint checks for all remaining constraint types. | Executes all remaining constraint checks of the current constraint type. |
These four levels make up the call stack in the henshin debugger, where the elements are ordered bottom to top (i.e., the variable level is at the bottom). When a match for a node was found, the corresponding variable is marked as matched in the call stack view, and the next variable is displayed on top.
Using the Debug / Variable View
The debugger tries to provide meaningful descriptions for any EObjects displayed in the debug / variables view (e.g. "Client Charles, Account 4) so they can be distinguished at a glance. This is done by looking for attributes called "name" or "id", and displaying that to the user. If such information is unavailable (e.g., the Bank EObject), an index is created from the object's position in list of all instances of the same type (as taken from the EGraph). The Variables view can be used to further inspect the state of the match finding process in a tree view. It shows different information depending on the currently selected stack frame. EObjects ELists are expandable / collapsible.
Limitations
The Debugger currently only supports debugging single rule applications, i.e., the following scenarios are not supported and are subject to further development:
- Debugging of Transformation Units other than simple rule applications (e.g., sequential units, conditional units) is currently not supported.
- Rule Nesting (e.g., multi rules) is not supported in this version, and rules containing nested rules in a debugging launch will result in an error, unexpected or incorrect results!
- For Positive and Negative Application Conditions (PACs / NACs) there is currently no debugging support. They should be applied correctly by the current version of the debugger (if not combined with nested rules), but they cannot be stepped through as they are not part of the actual match.
Note that these limitations do not apply to a normal "non-debug" launch of a run configuration.
Interpreter API
The interpreter can be also invoked programmatically via its API.
Make sure all needed dependencies to the Henshin runtime and to EMF are fulfilled. For working with XMI-based models, at least org.eclipse.emf.henshin.interpreter for running Henshin and org.eclipse.emf.ecore.xmi for loading models and rules need to be included in the classpath (e.g. as a plug-in dependency). Various examples, including Java files showcasing API usage, are available. The apibasics example is especially focused on showing how to load, create and save models, execute Henshin rules, and how to test the correct behavior of rules with JUnit.
Loading & Saving
For loading and saving of models and transformations you can use the class HenshinResourceSet, which provides some convenience methods. Below you can see how to load models and transformations.
// Create a resource set for the working directory "my/working/directory":
HenshinResourceSet resourceSet = new HenshinResourceSet("my/working/directory");

// If static meta-models are involved, initialize the relevant packages:
MyMetamodelPackage.eINSTANCE.eClass();

// Register relevant resource factories for model loading (XMIResourceFactoryImpl usually works):
resourceSet.getResourceFactoryRegistry().getExtensionToFactoryMap().put("xmi", new XMIResourceFactoryImpl());

// Load a model:
Resource model = resourceSet.getResource("mymodel.xmi");

// Load the Henshin module:
Module module = resourceSet.getModule("mytransformation.henshin");

// Apply the transformation (see below)...

// Save the model:
model.save(null);
Note that all relative file paths will be resolved using the working directory of the resource set. You should make sure that you use a single resource set for all loading and saving operations. There are also some more convenience methods for loading and saving (see the Javadoc).
Transforming and more
Here is a typical use case for the interpreter:
// Prepare the engine:
Engine engine = new EngineImpl();

// Initialize the graph:
EGraph graph = new EGraphImpl(model);

// Find the unit to be applied:
Unit unit = module.getUnit("myMainUnit");

// Apply the unit:
UnitApplication application = new UnitApplicationImpl(engine, graph, unit, null);
application.execute(null);
This is all code necessary to execute a transformation in Henshin! Note that engines should always be reused (you need only a single instance). The same holds for the EGraph. UnitApplications, however, should not be reused since they store information about a rule execution (e.g., parameter assignment) which may interfere with follow-up rule executions.
You can also use the following convenience method. It also properly updates the contents of the model resource based on the changes to the EGraph.
InterpreterUtil.applyToResource(unit, engine, model);
Setting and Getting Parameter Values This is how you can assign parameter values for the unit application (before executing it), and retrieving the resulting values (after the application):
application.setParameterValue("p1", "helloworld");
application.setParameterValue("p2", object);

application.execute(null);

Object newValue = application.getResultParameterValue("p2");
If you want to apply a single rule, you can also use RuleApplication. In this class, you can also specify partial or complete matches, and get the result match (a.k.a. co-match) after the rule application. The classes for parameter assignments and matches implement toString() -- so you can also easily inspect their details.
Canceling, Logging and Profiling Maybe you noticed already the null parameter passed to the execute() method. Here you can also base an ApplicationMonitor instance which give you the possibility to inspect and to cancel unit or rule applications. For logging, you can use the already implemented class LoggingApplicationMonitor which will print detailed logs on every rule application. You can filter the logging ask this monitor to automatically save the intermediate results of your transformation or to abort the execution after a certain amount of steps. Another very interesting implementation is ProfilingApplicationMonitor which automatically collects statistics on the execution times for rule. Just run printStats() after the transformation to find out where the bottlenecks are in your transformation. If you think that Henshin should be able to apply a particular rule faster, contact the Henshin mailing list with your profiling results.
Finding matches Sometimes, you just want to find matches for a rule without actually applying the rule. You can directly use the engine for this:
Match partialMatch = new MatchImpl(rule);  // can be also null
partialMatch.setParameterValue(p1,"foo");

// Iterate over all matches and print them on the console:
for (Match match : engine.findMatches(rule, graph, partialMatch)) {
  System.out.println(match);
}
Note that matches are computed on-demand and that findMatches() returns an instance of Iterable<Match>. If you need all matches anyway, you can also use InterpreterUtil.findAllMatches() which will return a list of all matches.
Checking graph isomorphy You can use this to check whether to EGraphs are isomorphic:
InterpreterUtil.areIsomorphic(graph1, graph2); // or resources
Note that this is not really fast because the necessary metadata for a more efficient isomorphy checking is not available for plain EGraphs. Faster isomorphy checking is implemented separately in the state space tools but requires to compute hash codes first.
Nondeterministic rule application Due to optimisation reasons, the application of rules behaves deterministically by default - among multiple possible matches, the one chosen as starting point for the rule application remains the same over multiple executions. In some situations, a random behaviour is required. This can be achieved by configuring the engine's options in the following way:
engine.getOptions().put(Engine.OPTION_DETERMINISTIC, false);

