Notice: This Wiki is now read only and edits are no longer possible. Please see: https://gitlab.eclipse.org/eclipsefdn/helpdesk/-/wikis/Wiki-shutdown-plan for the plan.
Henshin/Graphical Editor
The graphical Henshin editor allows to specify transformation rules and transformation units as defined by the transformation meta-model in an intuitive and compact way. This article describes the basic usage of the graphical editor.
Contents
Creating a Henshin Diagram
If you want to create a new transformation from scratch using the graphical editor, simply open the New... wizard and select Henshin -> Henshin Diagram and follow the wizard. The wizard will create two files: filename.henshin and filename.henshin_diagram, where you choose filename. The *.henshin file contains the actual transformation, whereas the *.henshin_diagram only stores diagram information. You can also use the tree-based editor to edit the Henshin file directly. To use the graphical editor, you need to oben the Henshin diagram file.
If you already have a transformation in a *.henshin file and you want to create a diagram for it, do a right-click on the Henshin file and select Initialize henshin_diagram file.... This will create and open the diagram file for you.
Importing Models
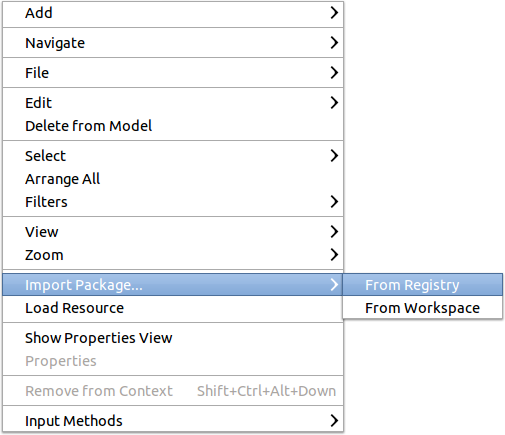
To define a transformation, you first need to import some EMF models. This can be done using an action in the context menu of the graphical editor, as shown below. When you have successfully imported a new package, all its classes automatically appear in the palette on the right-hand side of the graphical editor.
Editing Transformation Rules
The graphical editor offers an intuitive way of representing rules. In Henshin, objects are referred to as nodes and links between objects as edges. A collection of nodes and edges forms a graph.
The control flow of an arbitrary number of rules is specified using units.
Actions
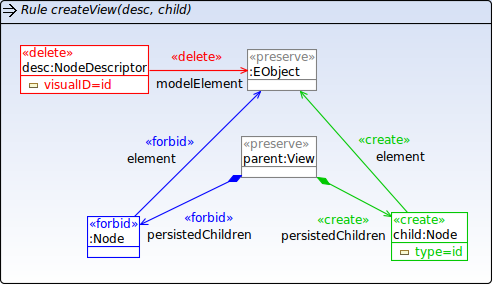
In the graphical editor, a rule are depicted and edited as a single graph. To distinguish between node/edges which should be matched, deleted, created etc. by the rule, stereotypes are used. We refer to the stereotypes as actions. Currently, the following actions are supported for nodes / edges / attributes: «preserve», «create», «delete», «forbid» and «require». To change the action for an element in the rule, select the action label and use the keyboard to type the action (you don't need to type the surrounding «...»).
The actions «forbid» and «require» play a special role, as they are used respectively to specify Negative Application Conditions (NACs) and Positive Application Conditions (PACs). The two actions can be also parameterized to distinguish multiple NACs/PACs. For example, if there are two elements, one with the action «forbid#1» and the other one with «forbid#2», then neither of the two objects must be present. If both elements have the same (or no) forbid parameter, then the two elements must not be found together. It works in the same way for «require».
Parameters and Transparent Containers
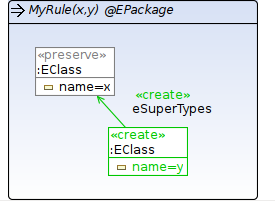
To specify parameters of the rule, simply write the names of the parameters separated by commas and surrounded by (...) after the name of the rule in the title. The graphical editor moreover supports as a special feature to specify transparent containers. As a general rule in EMF, all objects should be part of a containment tree, i.e., every object should have a unique parent, except the root object. For flat graph-like structures, this would mean that you have to draw the parent object and the containment edges to all objects in a rule separately. Since this can be quite verbose, the graphical editor supports transparent container objects. Simply write the rule name and append '@' followed by the type of the parent object and all objects in the rule will be automatically treated as children of an object of this type. This works only if the parent type defines canonical containment edges for all elements that are used in the rule.
The example rule on the right matches an EClass with the name x and deletes it from its EPackage, and creates a new EClass with the name y and adds it to the EPackage. Note that we do not need to draw the EPackage node here explicitly.
Limitations
The graphical editor currently supports application conditions only with limited expressiveness: no nesting of application conditions, and no boolean combination of application conditions beyond basic conjunction and negation.
Visual Multi-View Editor
An alternative multi-view graphical editor is currently developed at the TU Berlin and Uni Luxembourg. This multi-view editor is not yet part of the official Henshin toolset, but will be added in the future.


