Notice: This Wiki is now read only and edits are no longer possible. Please see: https://gitlab.eclipse.org/eclipsefdn/helpdesk/-/wikis/Wiki-shutdown-plan for the plan.
MDT/UML2/Introduction to UML2 Profiles
Copyright © 2004, 2014 International Business Machines Corp., CEA, and others.
Contents
- 1 Summary
- 2 Prerequisites
- 3 Introduction
- 4 Getting Started
- 5 Creating Profiles
- 6 Importing Primitive Types
- 7 Creating Enumerations
- 8 Creating Enumeration Literals
- 9 Creating Stereotypes
- 10 Creating Stereotype Generalizations
- 11 Creating Stereotype Properties
- 12 Referencing Metaclasses
- 13 Creating Extensions
- 14 Defining Profiles
- 15 Saving Profiles
- 16 Loading Models
- 17 Applying Profiles
- 18 Applying Stereotypes
- 19 Accessing Stereotype Property Values
- 20 Conclusion
- 21 References
Summary
This article describes how to work with profiles using the UML2 plug-ins for Eclipse. In particular, it gives an overview of how to create and apply profiles (and their contents) both programmatically and by using the sample UML editor.
Kenn Hussey and James Bruck
Last Updated: January 21, 2014
Prerequisites
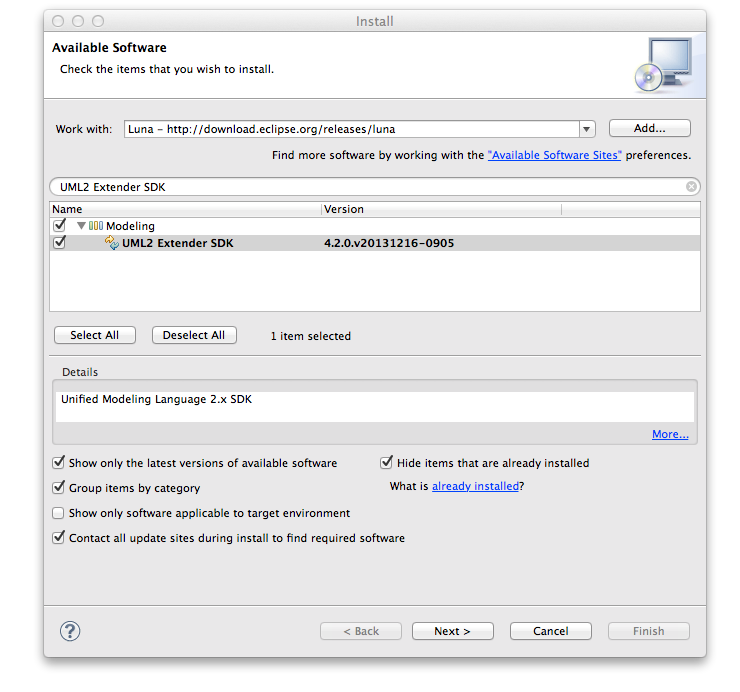
To start using UML2 (and to follow along with the example in this article), you must have Eclipse, EMF, and UML2 installed. You can either download the Modeling Tools Package or follow these steps:
- Download and run Eclipse.
- Select the Help > Install New Software… menu item.
- Select a software site to work with, e.g., Luna - http://download.eclipse.org/releases/luna.
- Expand the Modeling tree item.
- Select UML2 Extender SDK and press the Next > button.
- Review the install details and press the Next > button.
- Accept the terms of the license agreement and press the Finish button.
- Restart Eclipse when prompted to do so.
At this stage, UML2 and all dependencies should be installed.
Introduction
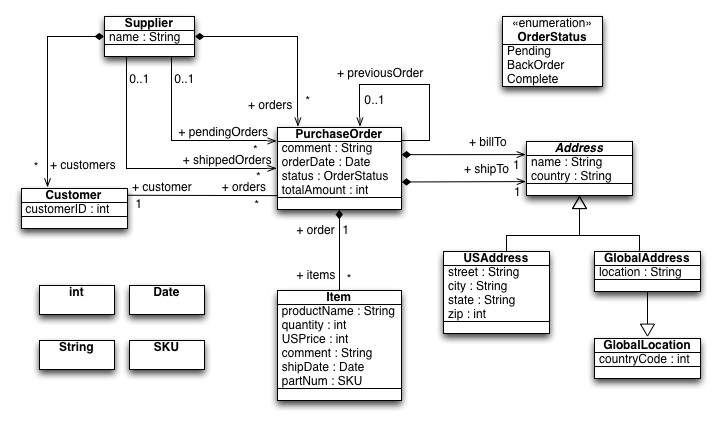
This article will walk you through the basics of creating and applying profiles using UML2. Using a subset of the Ecore profile (see below) and the model we described in the “Getting Started with UML2” article [1] (the ExtendedPO2 model, shamelessly “borrowed” from the EMF “bible” [2]) as an example, we’ll look at what’s involved in creating some of the more common elements that make up a profile. For each type of element, we’ll first explain the creation process using the sample UML editor and explore how to accomplish the same thing using Java code. Then we’ll look at what’s involved in applying profiles and stereotypes to models. The ExtendedPO2 model is shown below.
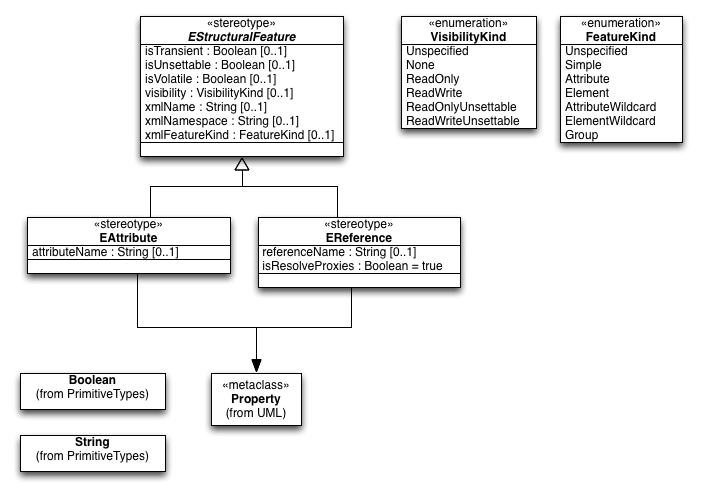
The Ecore profile that we will develop is as follows, comprising only the subset of stereotypes dealing with properties.
Getting Started
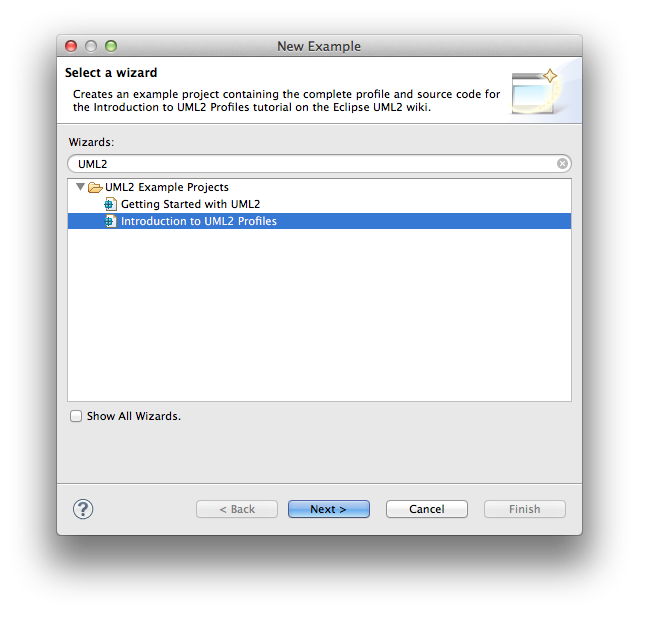
![]() Readers who don't want to follow every step of this tutorial may install a working solution from the New → Example... wizard, selecting the UML2 Example Projects → Introduction to UML2 Profiles sample. This will be available when Enhancement 382342 is resolved and released in a UML2 build. This includes the finished profile, complete source code, and a launch configuration that runs the stand-alone Java application which creates the profile in the root folder of the example project, applies it to a test model, and manipulates stereotype attributes ("tagged values").
Readers who don't want to follow every step of this tutorial may install a working solution from the New → Example... wizard, selecting the UML2 Example Projects → Introduction to UML2 Profiles sample. This will be available when Enhancement 382342 is resolved and released in a UML2 build. This includes the finished profile, complete source code, and a launch configuration that runs the stand-alone Java application which creates the profile in the root folder of the example project, applies it to a test model, and manipulates stereotype attributes ("tagged values").
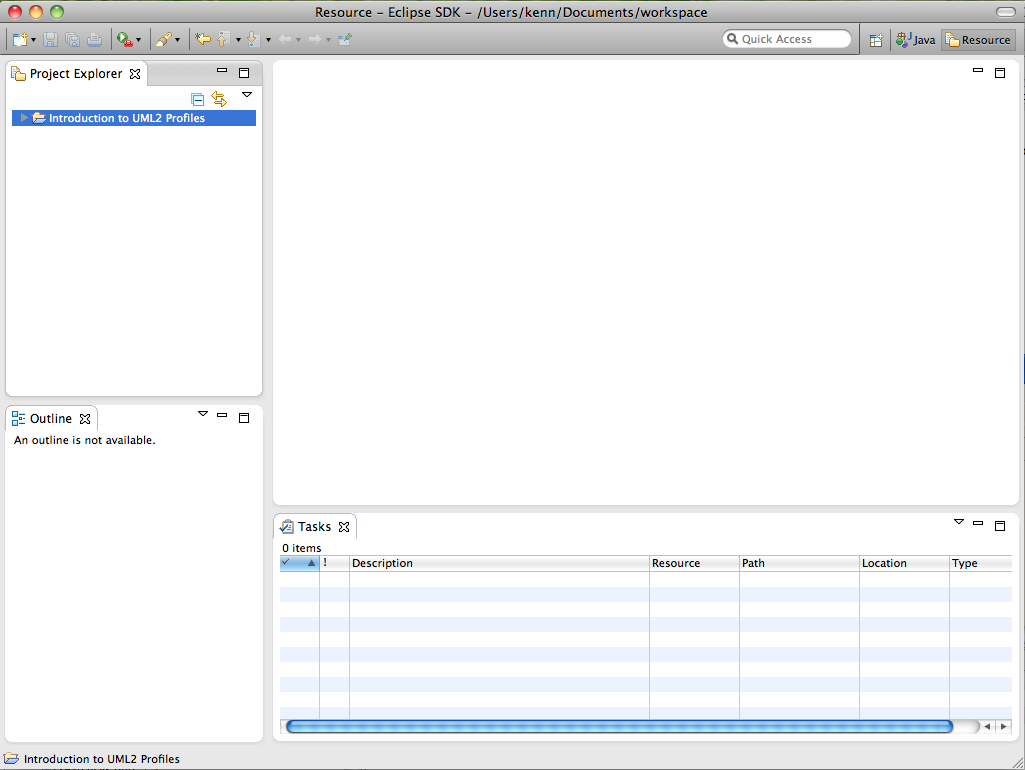
Before getting started, you’ll need to create a simple project in your workspace. This project will serve as the container for the profile that we’ll create using the UML editor. To create a simple project for this article, follow these steps:
- Select the Window > Open Perspective > Other… menu item.
- Select the Resource perspective and press the OK button.
- Select the File > New > Project... menu item.
- Select the Project wizard from the General category and press the Next > button.
- Enter a project name (e.g., “Introduction to UML2 Profiles”), and press the Finish button.
At this point your workspace should look something like this:
OK, that should be enough to get us going with the UML editor. Now, to follow along with the programmatic approach to creating profiles, we’ll assume that you’ve created a Java class (named, say, “IntroductionToUML2Profiles”) in which you can write some code to construct our sample profile. The code snippets we’ll show assume you’ve defined the following utility methods to give the user information on the program’s status:
    public static boolean DEBUG = true;

    protected static void out(String format, Object... args) {
        if (DEBUG) {
            System.out.printf(format, args);
            if (!format.endsWith("%n")) {
                System.out.println();
            }
        }
    }

    protected static void err(String format, Object... args) {
        System.err.printf(format, args);
        if (!format.endsWith("%n")) {
            System.err.println();
        }
    }
A static debug flag can be used to enable or disable verbose information printed to the system’s output stream. Errors will always be printed to the system’s error stream.
All right, then! In each of the following subsections, we’ll look at how to create or manipulate a different kind of UML element, starting with profiles.
Creating Profiles
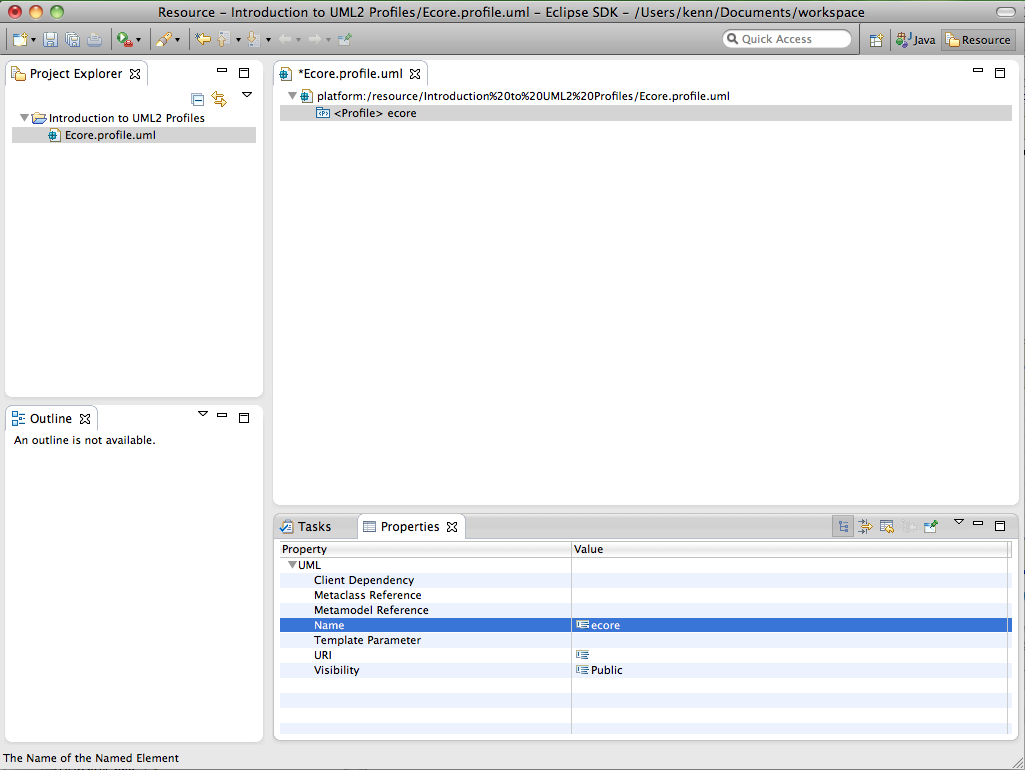
At the root of every UML2 profile is a profile element. It defines limited extensions to a reference metamodel (i.e., UML) with the purpose of adapting the metamodel to a specific platform or domain (e.g., EMF). Metaclasses from the reference metamodel are extended via stereotypes, which are defined as part of profiles. To create a profile using the UML editor, follow these steps:
- Select a project (e.g., Introduction to UML2 Profiles) in the Project Explorer view and select the File > New > Other... menu item.
- Select the UML Model wizard from the Example EMF Model Creation Wizards category and press the Next > button.
- Enter a file name (e.g., “Ecore.profile.uml”) and press the Next > button.
- Select Profile for the model object and press the Finish button.
- Select the Window > Show View > Properties menu item.
- Select the <Profile> element in the UML editor.
- Enter a value (e.g., “ecore”) for the Name property in the Properties view.
- (optional) Enter a value (e.g., "http://www.eclipse.org/schema/UML2/examples/ecore") for the URI property in the Properties view.
![]() In UML™, packages may be identified uniquely by assigning URIs. In UML2 profiles, this URI is used as the namespace URI of the Ecore EPackage representing the profile metadata in EMF. By specifying this URI explicitly, you can establish a stable namespace URI that will be used by all successive iterations of your profile schema as it evolves over time. If you omit the URI, one will be generated automatically by UML2 in the Ecore definition. This default namespace URI is suffixed by an increasing version number, resulting in a different URI in each successive definition. A consequence of this is that existing models that have an older profile definition applied will have to be migrated to the new version when it is deployed. This is useful when incompatible changes are made in the profile from one version to the next. You may, of course, also change the explicitly set URI yourself, when required.
In UML™, packages may be identified uniquely by assigning URIs. In UML2 profiles, this URI is used as the namespace URI of the Ecore EPackage representing the profile metadata in EMF. By specifying this URI explicitly, you can establish a stable namespace URI that will be used by all successive iterations of your profile schema as it evolves over time. If you omit the URI, one will be generated automatically by UML2 in the Ecore definition. This default namespace URI is suffixed by an increasing version number, resulting in a different URI in each successive definition. A consequence of this is that existing models that have an older profile definition applied will have to be migrated to the new version when it is deployed. This is useful when incompatible changes are made in the profile from one version to the next. You may, of course, also change the explicitly set URI yourself, when required.
![]() By convention, resources that contain profiles end with a .profile.uml file extension in UML2.
By convention, resources that contain profiles end with a .profile.uml file extension in UML2.
At this point your workspace should look something like this:
Let’s look at how to perform the same task using Java code. The code snippet below shows a method that programmatically creates and returns a profile with a specified name.
    protected static Profile createProfile(String name, String nsURI) {
        Profile profile = UMLFactory.eINSTANCE.createProfile();
        profile.setName(name);
        profile.setURI(nsURI);

        out("Profile '%s' created.", profile.getQualifiedName());

        return profile;
    }
First, we ask the UML factory singleton to create a profile, and we set its name and URI. Then, we output information to the user to let them know that the profile has been successfully created. Finally, we return the profile. You’ll notice most, if not all, of the code snippets in this article will follow this pattern: create the element (and set some properties on it), inform the user, and return it.
OK, let’s see this method in action. For example, we could create a profile named ‘ecore’ as follows:
Profile ecoreProfile = createProfile("ecore", "http://www.eclipse.org/schema/UML2/examples/ecore");
Importing Primitive Types
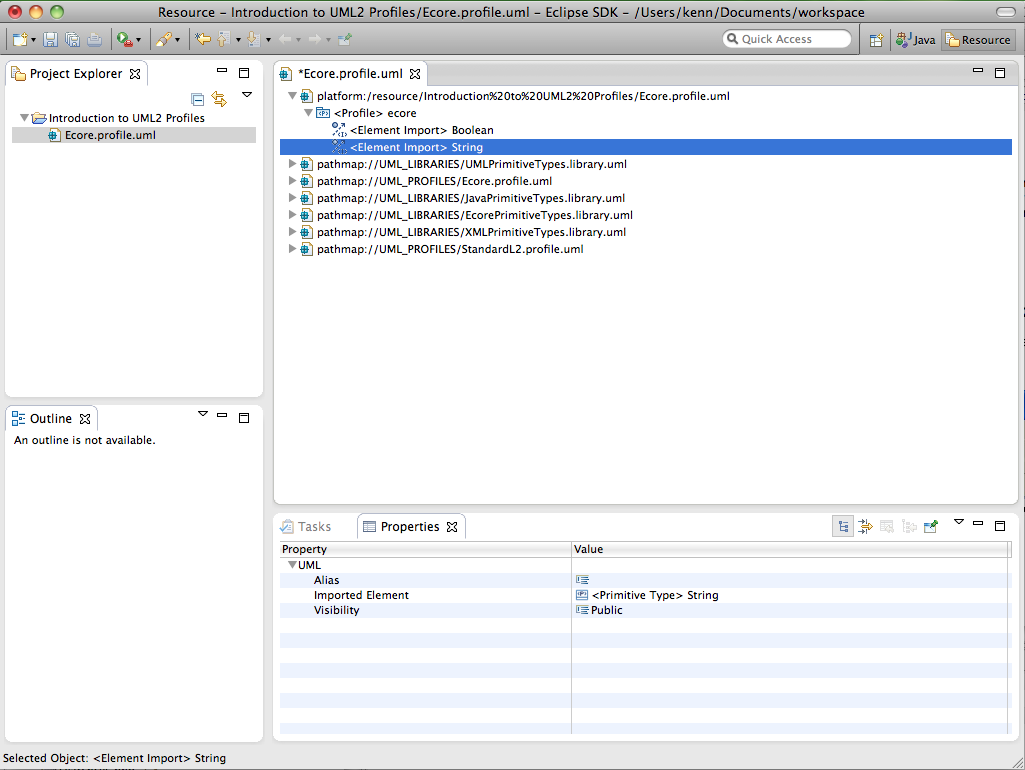
Just like a class, a stereotype may have properties, which may be referred to as tag definitions. The types of these properties may be pre-defined in (domain-specific) libraries referenced by the profile. A profile can be made to reference primitive types from libraries (such as those provided in the org.eclipse.uml2.uml.resources plug-in) by creating an import relationship between the profile and the primitive type. To import a primitive type using the UML editor, follow these steps:
- Select a package (e.g., <Profile> ecore) in the UML editor.
- Select the UML Editor > Package > Import Type... menu item.
- Choose a primitive type (e.g., PrimitiveTypes::Boolean), press the Add button, then press the OK button.
![]() Import the other required primitive type (PrimitiveTypes::String) into the Ecore profile using the UML editor.
Import the other required primitive type (PrimitiveTypes::String) into the Ecore profile using the UML editor.
At this point your workspace should look something like this:
Let’s look at how to perform the same task using Java code. The code snippet below shows a method that programmatically imports the primitive type with a specified name from the UML primitive types library into a specified package and returns it.
    protected static PrimitiveType importPrimitiveType(org.eclipse.uml2.uml.Package package_, String name) {
        org.eclipse.uml2.uml.Package umlLibrary = (org.eclipse.uml2.uml.Package) load(URI.createURI(UMLResource.UML_PRIMITIVE_TYPES_LIBRARY_URI));

        PrimitiveType primitiveType = (PrimitiveType) umlLibrary.getOwnedType(name);

        package_.createElementImport(primitiveType);

        out("Primitive type '%s' imported.", primitiveType.getQualifiedName());

        return primitiveType;
    }
Here we load the model library containing the UML primitive types (Boolean, Integer, Real, String, and UnlimitedNatural) using a load(...) utility method (described later) and a URI defined on the UMLResource interface. Next, we retrieve the desired (owned) primitive type from the model by name using one of the convenience methods defined in the UML2 API. Finally, we invoke another convenience method to create the element import relationship between the package and the element (with default public visibility), notify the user, and return the primitive type.
![]() The UML resources plug-in (org.eclipse.uml2.uml.resources) provides several model libraries (which by convention have a .library.uml file extension) that contain commonly used primitive types, such as those defined by Java and EMF (in addition to those defined by UML™ itself). These libraries can be accessed using URIs defined on the UMLResource interface, as shown above.
The UML resources plug-in (org.eclipse.uml2.uml.resources) provides several model libraries (which by convention have a .library.uml file extension) that contain commonly used primitive types, such as those defined by Java and EMF (in addition to those defined by UML™ itself). These libraries can be accessed using URIs defined on the UMLResource interface, as shown above.
![]() In UML2, a method of the form get<feature name>(String) exists for every feature that can contain or reference named elements. In this case, the package has a feature (ownedType) that can contain types, so we pass the unqualified name of the type we are looking for to the getOwnedType(String) convenience method. Behind the scenes, the package will iterate over all of its owned types and return the first one that it finds that has the specified (unqualified) name.
In UML2, a method of the form get<feature name>(String) exists for every feature that can contain or reference named elements. In this case, the package has a feature (ownedType) that can contain types, so we pass the unqualified name of the type we are looking for to the getOwnedType(String) convenience method. Behind the scenes, the package will iterate over all of its owned types and return the first one that it finds that has the specified (unqualified) name.
OK, let’s see this method in action. For example, we could import the primitive type named ‘Boolean’ into profile ‘ecore’ as follows:
PrimitiveType booleanPrimitiveType = importPrimitiveType(ecoreProfile, "Boolean");
![]() Write code to programmatically import the other required primitive type (i.e., ‘String’) into the Ecore profile.
Write code to programmatically import the other required primitive type (i.e., ‘String’) into the Ecore profile.
Creating Enumerations
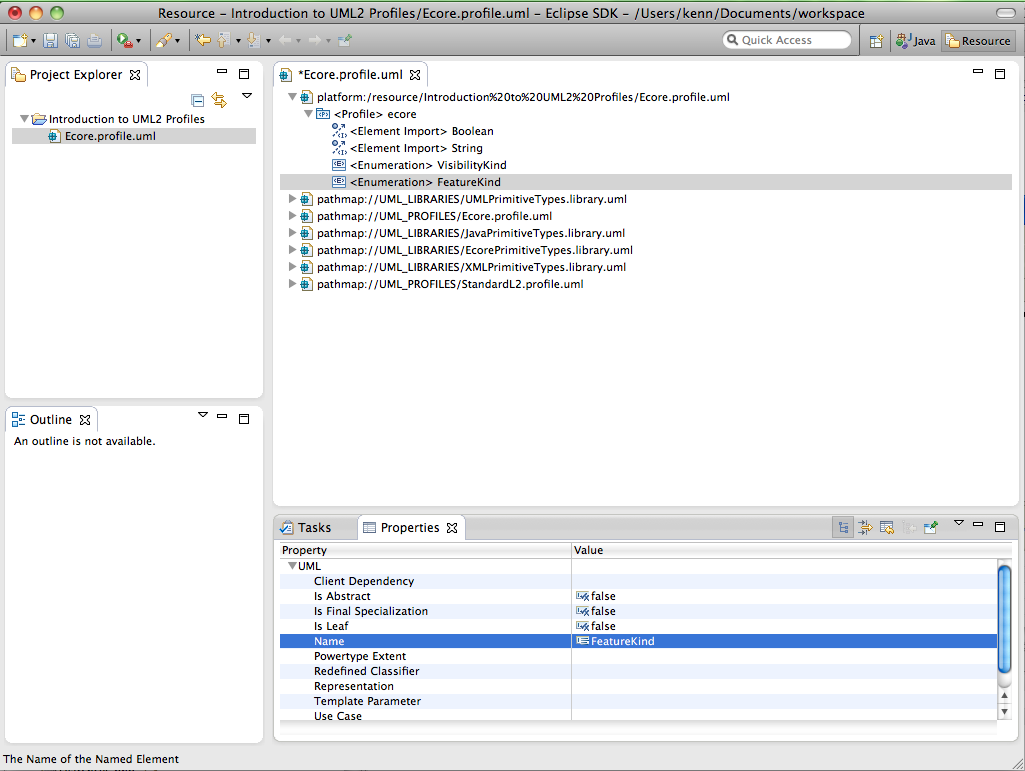
As with packages, profiles can contain enumerations. An enumeration is a kind of data type whose instances may be any of a number of user-defined enumeration literals. To create an enumeration using the UML editor, follow these steps:
- Select a profile (e.g., <Profile> ecore) in the UML editor.
- Select the New Child > Owned Type >'Enumeration' option from the context menu.
- Enter a value (e.g., “VisibilityKind”) for the Name property in the Properties view.
![]() Create the other enumeration (i.e., “FeatureKind”) for the Ecore profile using the UML editor.
Create the other enumeration (i.e., “FeatureKind”) for the Ecore profile using the UML editor.
At this point your workspace should look something like this:
Let’s look at how to perform the same task using Java code. The code snippet below (which should be familiar from the Getting Started with UML2 article) shows a method that programmatically creates and returns an enumeration with a specified name in a specified package.
    protected static Enumeration createEnumeration(org.eclipse.uml2.uml.Package package_, String name) {
        Enumeration enumeration = package_.createOwnedEnumeration(name);

        out("Enumeration '%s' created.", enumeration.getQualifiedName());

        return enumeration;
    }
Here we call the createOwnedEnumeration(String) convenience factory method to ask the package to create a primitive type with the specified name as one of its packaged elements.
OK, let’s see this method in action. For example, we could create an enumeration named ‘VisibilityKind’ in profile ‘ecore’ as follows:
Enumeration visibilityKindEnumeration = createEnumeration(ecoreProfile, "VisibilityKind");
![]() Write code to programmatically create the other enumeration (i.e., ‘FeatureKind’) for the Ecore profile.
Write code to programmatically create the other enumeration (i.e., ‘FeatureKind’) for the Ecore profile.
Creating Enumeration Literals
An enumeration literal is a user-defined data value for an enumeration. To create an enumeration literal using the UML editor, follow these steps:
- Select an enumeration (e.g., <Enumeration> VisibilityKind) in the UML editor.
- Select the New Child > Owned Literal > Enumeration Literal option from the context menu.
- Enter a value (e.g., “Unspecified”) for the Name property in the Properties view.
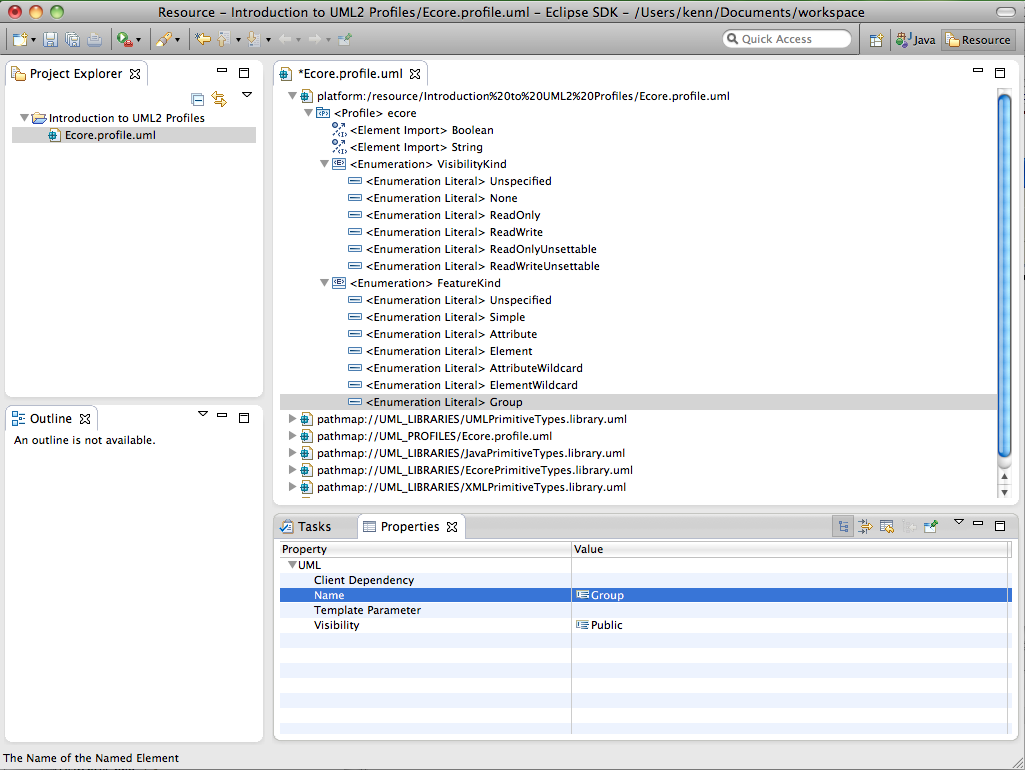
![]() Create the remaining enumeration literals for the Ecore profile (i.e., “None”, “ReadOnly”, “ReadWrite”, “ReadOnlyUnsettable”, and “ReadWriteUnsettable” for <Enumeration> VisibilityKind; “Unspecified”, “Simple”, “Attribute”, “Element”, “AttributeWildcard”, “ElementWildcard”, and “Group” for <Enumeration> FeatureKind) using the UML editor.
Create the remaining enumeration literals for the Ecore profile (i.e., “None”, “ReadOnly”, “ReadWrite”, “ReadOnlyUnsettable”, and “ReadWriteUnsettable” for <Enumeration> VisibilityKind; “Unspecified”, “Simple”, “Attribute”, “Element”, “AttributeWildcard”, “ElementWildcard”, and “Group” for <Enumeration> FeatureKind) using the UML editor.
At this point your workspace should look something like this:
Let’s look at how to perform the same task using Java code. The code snippet below shows a method that programmatically creates and returns an enumeration literal with a specified name in a specified enumeration.
    protected static EnumerationLiteral createEnumerationLiteral(Enumeration enumeration, String name) {
        EnumerationLiteral enumerationLiteral = enumeration.createOwnedLiteral(name);

        out("Enumeration literal '%s' created.", enumerationLiteral.getQualifiedName());

        return enumerationLiteral;
    }
Here we call the createOwnedLiteral(String) convenience factory method to ask the enumeration to create an enumeration literal with the specified name as one of its owned literals.
OK, let’s see this method in action. For example, we could create an enumeration literal named ‘Unspecified’ in enumeration ‘VisibilityKind’ as follows:
createEnumerationLiteral(visibilityKindEnumeration, "Unspecified");
![]() Write code to programmatically create the remaining enumeration literals (i.e., ‘None’, ‘ReadOnly’, ‘ReadWrite’, ‘ReadOnlyUnsettable’, and ‘ReadWriteUnsettable’ in enumeration ‘VisibilityKind’; ‘Unspecified’, ‘Simple’, ‘Attribute’, ‘Element’, ‘AttributeWildcard’, ‘ElementWildcard’, and ‘Group’ in enumeration ‘FeatureKind’) for the Ecore profile.
Write code to programmatically create the remaining enumeration literals (i.e., ‘None’, ‘ReadOnly’, ‘ReadWrite’, ‘ReadOnlyUnsettable’, and ‘ReadWriteUnsettable’ in enumeration ‘VisibilityKind’; ‘Unspecified’, ‘Simple’, ‘Attribute’, ‘Element’, ‘AttributeWildcard’, ‘ElementWildcard’, and ‘Group’ in enumeration ‘FeatureKind’) for the Ecore profile.
Creating Stereotypes
A stereotype defines how an existing metaclass may be extended, and enables the use of platform- or domain-specific terminology or notation in place of, or in addition to, the ones used for the extended metaclass. Each stereotype may extend one or more classes through extensions as part of a profile. To create a stereotype using the UML editor, follow these steps:
- Select a profile (e.g., <Profile> ecore) in the UML editor.
- Select the New Child > Owned Stereotype > Stereotype option from the context menu.
- Enter a value (e.g., “EStructuralFeature”) for the Name property in the Properties view.
- Select a value (e.g., true) for the Is Abstract property in the Properties view.
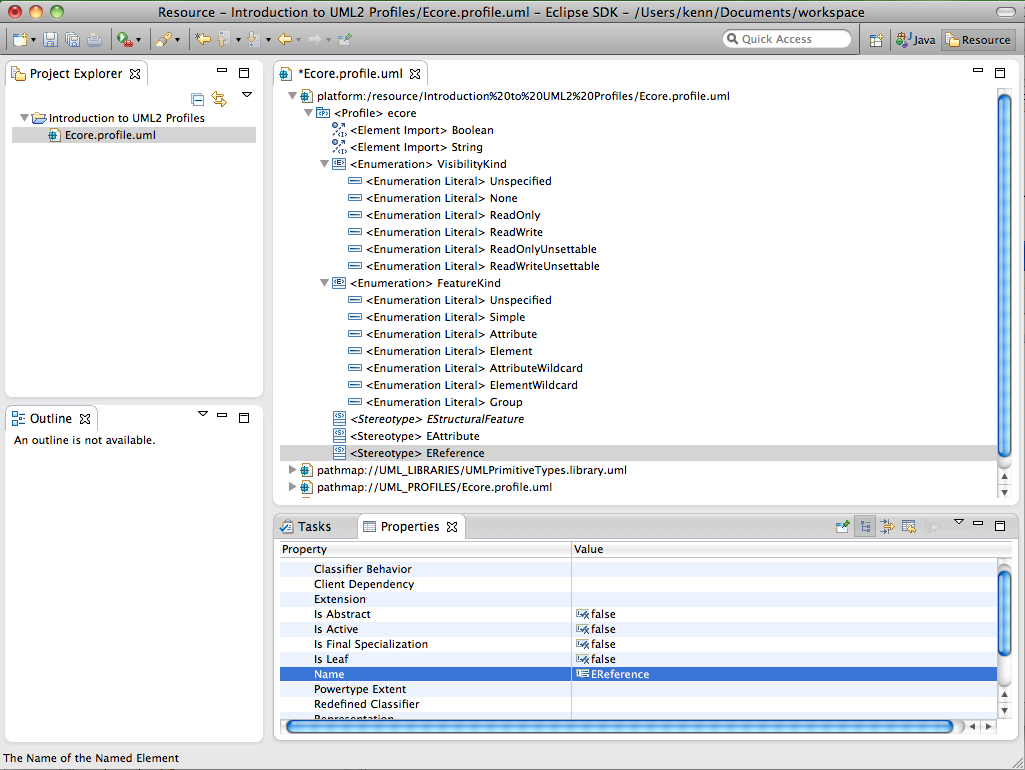
![]() Create the remaining stereotypes for the Ecore profile (i.e., “EAttribute” and “EReference”) using the UML editor.
Create the remaining stereotypes for the Ecore profile (i.e., “EAttribute” and “EReference”) using the UML editor.
At this point your workspace should look something like this:
Let’s look at how to perform the same task using Java code. The code snippet below shows a method that programmatically creates and returns a(n) (abstract) stereotype with a specified name in a specified profile.
    protected static Stereotype createStereotype(Profile profile, String name, boolean isAbstract) {
        Stereotype stereotype = profile.createOwnedStereotype(name, isAbstract);

        out("Stereotype '%s' created.", stereotype.getQualifiedName());

        return stereotype;
    }
Here we call the createOwnedStereotype(String, boolean) convenience factory method to ask the profile to create a stereotype with the specified name as one of its owned members, and set the isAbstract attribute of the stereotype based on the specified boolean argument.
OK, let’s see this method in action. For example, we could create an abstract stereotype named ‘EStructuralFeature’ in profile ‘ecore’ as follows:
Stereotype eStructuralFeatureStereotype = createStereotype(ecoreProfile, "EStructuralFeature", true);
![]() Write code to programmatically create the remaining (non-abstract) stereotypes (i.e., ‘EAttribute’ and ‘EReference’) for the Ecore profile.
Write code to programmatically create the remaining (non-abstract) stereotypes (i.e., ‘EAttribute’ and ‘EReference’) for the Ecore profile.
Creating Stereotype Generalizations
Just like classes, stereotypes may be involved in generalizations (stereotypes are a kind of class). A generalization is a taxonomic relationship between a specific classifier and a more general classifier whereby each instance of the specific classifier is also an indirect instance of, and inherits the features of, the general classifier. To create a stereotype generalization using the UML editor, follow these steps:
- Select a stereotype (e.g., <Stereotype> EAttribute) in the UML editor.
- Select the New Child > Generalization > Generalization option from the context menu.
- Select a value (e.g., ecore::EStructuralFeature) for the General property in the Properties view.
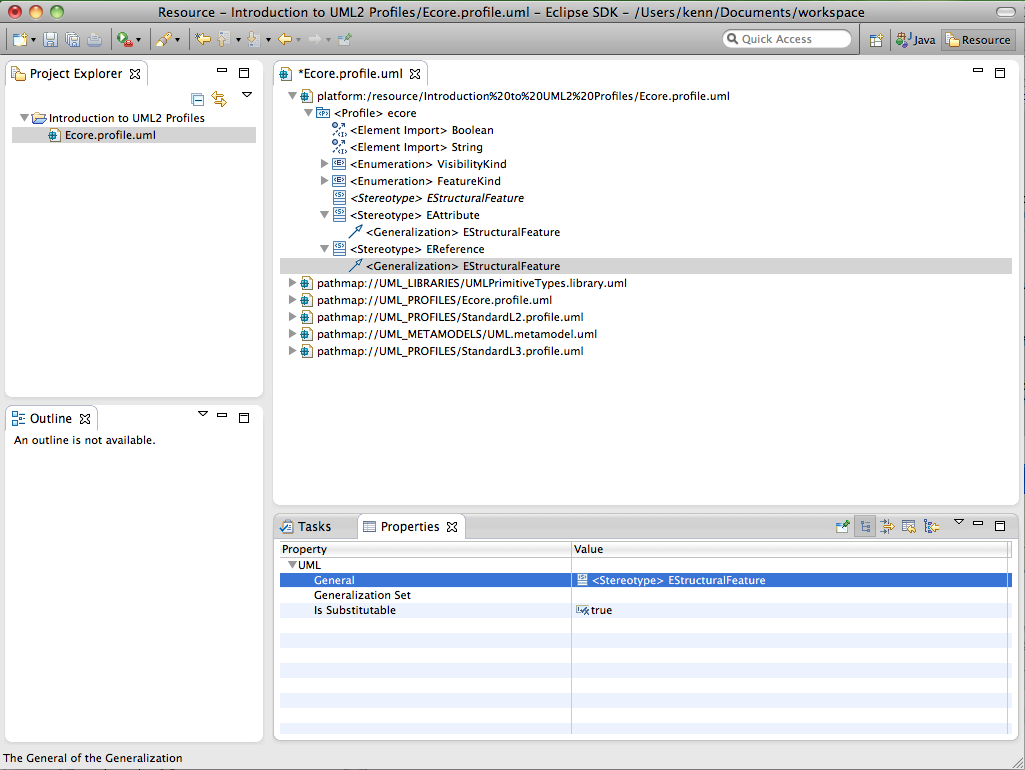
![]() Create the other generalization (i.e., between EReference and EStructuralFeature) for the Ecore profile using the UML editor.
Create the other generalization (i.e., between EReference and EStructuralFeature) for the Ecore profile using the UML editor.
![]() Be sure to pick the first ecore::EStructuralFeature item (with a lowercase "ecore") instead of the second one (with an uppercase "Ecore"), which comes from the built-in Ecore profile provided by UML2.
Be sure to pick the first ecore::EStructuralFeature item (with a lowercase "ecore") instead of the second one (with an uppercase "Ecore"), which comes from the built-in Ecore profile provided by UML2.
At this point your workspace should look something like this:
Let’s look at how to perform the same task using Java code. The code snippet below shows a method that programmatically creates and returns generalization between specified specific and general classifiers.
    protected static Generalization createGeneralization(Classifier specificClassifier, Classifier generalClassifier) {
        Generalization generalization = specificClassifier.createGeneralization(generalClassifier);

        out("Generalization %s --|> %s created.", specificClassifier.getQualifiedName(), generalClassifier.getQualifiedName());

        return generalization;
    }
Here we call a convenience factory method on the specific classifier that creates a generalization as one of its children and sets the general classifier to the specified argument.
OK, let’s see this method in action. For example, we could create a generalization between specific stereotype ‘EAttribute’ and general stereotype ‘EStructuralFeature’ as follows:
createGeneralization(eAttributeStereotype, eStructuralFeatureStereotype);
![]() Write code to programmatically create the other generalization (i.e., between ‘EReference’ and ‘EStructuralFeature’) for the Ecore profile.
Write code to programmatically create the other generalization (i.e., between ‘EReference’ and ‘EStructuralFeature’) for the Ecore profile.
Creating Stereotype Properties
Again just like classes, stereotypes may have properties (attributes). When a stereotype is applied to a model element, the values of the properties may be referred to as tagged values. To create a stereotype property using the UML editor, follow these steps:
- Select a stereotype (e.g., <Stereotype> EStructuralFeature) in the UML editor.
- Select the New Child > Owned Attribute > Property option from the context menu.
- Enter a value (e.g., "isTransient”) for the Name property in the Properties view.
- Select a value (e.g., PrimitiveTypes::Boolean) for the Type property in the Properties view.
- Enter a value (e.g., 0) for the Lower property in the Properties view.
- Select the property (e.g., <Property> isTransient) in the UML editor.
- Select a value (e.g., false) from the pick-list in the Default property in the Properties view.
![]() Default values for properties (and parameters) are represented as value specifications (first-class objects) in UML™ 2.x. Here we have selected a literal Boolean (whose default value is false) as the default value of our property since its type is Boolean. If the type of the property were String, we’d have used a literal string instead. Once a default value specification has been created, its value can alternatively be set with the owning property selected via the Default property in the Properties view. For attributes typed by the UML™ standard primitive types or by enumeration types, the Default property in the property sheet provides assistance in creating value specifications of the appropriate type. For other types (e.g., custom data types or classes), it is necessary to explicitly create the Default Value value specification.
Default values for properties (and parameters) are represented as value specifications (first-class objects) in UML™ 2.x. Here we have selected a literal Boolean (whose default value is false) as the default value of our property since its type is Boolean. If the type of the property were String, we’d have used a literal string instead. Once a default value specification has been created, its value can alternatively be set with the owning property selected via the Default property in the Properties view. For attributes typed by the UML™ standard primitive types or by enumeration types, the Default property in the property sheet provides assistance in creating value specifications of the appropriate type. For other types (e.g., custom data types or classes), it is necessary to explicitly create the Default Value value specification.
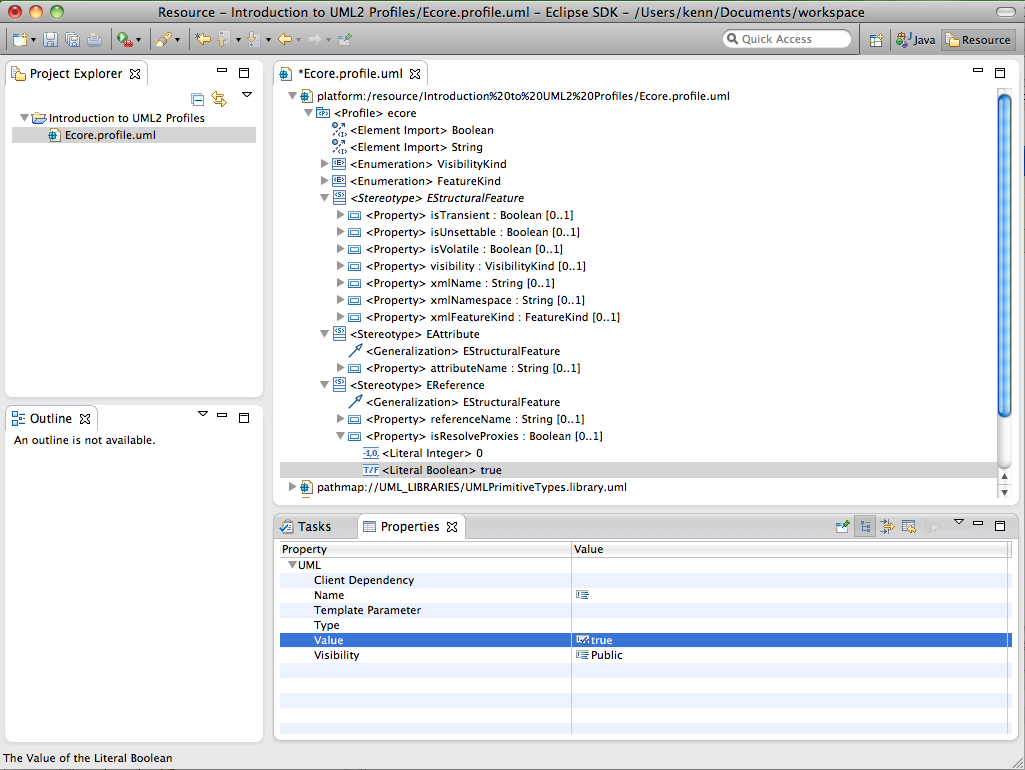
![]() Create the remaining stereotype properties for the Ecore profile (i.e., “isUnsettable”, “isVolatile”, “visibility”, “xmlName”, “xmlNamespace”, and “xmlFeatureKind” for <Stereotype> EStructuralFeature; “attributeName” for <Stereotype> EAttribute; “referenceName” and “isResolveProxies” for <Stereotype> EReference) using the UML editor.
Create the remaining stereotype properties for the Ecore profile (i.e., “isUnsettable”, “isVolatile”, “visibility”, “xmlName”, “xmlNamespace”, and “xmlFeatureKind” for <Stereotype> EStructuralFeature; “attributeName” for <Stereotype> EAttribute; “referenceName” and “isResolveProxies” for <Stereotype> EReference) using the UML editor.
![]() Be sure to set the appropriate default value for each stereotype property so that it is consistent with the corresponding property in Ecore. In particular, the default value for the “isResolveProxies” should be a literal Boolean with a value of true instead of the default (!) default value of false. Note also that the types of the “visibility” and “xmlFeatureKind” properties should be the enumerations we created earlier (i.e., ecore::Visibility and ecore::FeatureKind, respectively).
Be sure to set the appropriate default value for each stereotype property so that it is consistent with the corresponding property in Ecore. In particular, the default value for the “isResolveProxies” should be a literal Boolean with a value of true instead of the default (!) default value of false. Note also that the types of the “visibility” and “xmlFeatureKind” properties should be the enumerations we created earlier (i.e., ecore::Visibility and ecore::FeatureKind, respectively).
At this point your workspace should look something like this:
Let’s look at how to perform the same task using Java code. The code snippet below shows a method that programmatically creates and returns an attribute with a specified upper bound, lower bound, type, name, and (optionally) default value in a specified class.
    protected static Property createAttribute(org.eclipse.uml2.uml.Class class_, String name, Type type, int lowerBound, int upperBound, Object defaultValue) {
        Property attribute = class_.createOwnedAttribute(name, type, lowerBound, upperBound);

        if (defaultValue instanceof Boolean) {
            LiteralBoolean literal = (LiteralBoolean) attribute.createDefaultValue(null, null, UMLPackage.Literals.LITERAL_BOOLEAN);
            literal.setValue(((Boolean) defaultValue).booleanValue());
        } else if (defaultValue instanceof String) {
            if (type instanceof Enumeration) {
                InstanceValue value = (InstanceValue) attribute.createDefaultValue(null, null, UMLPackage.Literals.INSTANCE_VALUE);
                value.setInstance(((Enumeration) type).getOwnedLiteral((String) defaultValue));
            } else {
                LiteralString literal = (LiteralString) attribute.createDefaultValue(null, null, UMLPackage.Literals.LITERAL_STRING);
                literal.setValue((String) defaultValue);
            }
        }

        out("Attribute '%s' : %s [%s..%s]%s created.", //
            attribute.getQualifiedName(), // attribute name
            type.getQualifiedName(), // type name
            lowerBound, // no special case for multiplicity lower bound
            (upperBound == LiteralUnlimitedNatural.UNLIMITED)
                ? "*" // special case for unlimited bound
                : upperBound, // finite upper bound
            (defaultValue == null)
                ? "" // no default value (use type's intrinsic default)
                : String.format(" = %s", defaultValue));

        return attribute;
    }
Here we call the createOwnedAttribute(String, Type, int, int) convenience factory method to ask the class to create a property as one of its owned attributes, set the type of the attribute to the specified type, and set the lower and upper bounds of the attribute (the factory method creates a literal integer and literal unlimited natural, respectively, and sets its value to the specified integer value). If a default value is provided, we create a value specification of the appropriate type (in this example, only booleans, strings, and enumeration literals are handled).
![]() The LiteralUnlimitedNatural.UNLIMITED constant represents the unlimited value for upper bounds (-1), as it does in EMF.
The LiteralUnlimitedNatural.UNLIMITED constant represents the unlimited value for upper bounds (-1), as it does in EMF.
OK, let’s see this method in action. For example, we could create an attribute with multiplicity 0..1 of type ‘UMLPrimitiveTypes::Boolean’ named ‘isTransient’ in stereotype ‘EStructuralFeature’ as follows:
Property isTransientProperty = createAttribute(eStructuralFeatureStereotype, "isTransient", booleanPrimitiveType, 0, 1, null);
![]() Write code to programmatically create the remaining stereotype properties (i.e., ‘isUnsettable’, ‘isVolatile’, ‘visibility’, ‘xmlName’, ‘xmlNamespace’, and ‘xmlFeatureKind’ in stereotype ‘EStructuralFeature’; ‘attributeName’ in stereotype ‘EAttribute’; ‘referenceName’ and ‘isResolveProxies’ in stereotype ‘EReference’) for the Ecore profile.
Write code to programmatically create the remaining stereotype properties (i.e., ‘isUnsettable’, ‘isVolatile’, ‘visibility’, ‘xmlName’, ‘xmlNamespace’, and ‘xmlFeatureKind’ in stereotype ‘EStructuralFeature’; ‘attributeName’ in stereotype ‘EAttribute’; ‘referenceName’ and ‘isResolveProxies’ in stereotype ‘EReference’) for the Ecore profile.
Referencing Metaclasses
A profile is a restricted form of a metamodel that must always be related to a reference metamodel (e.g., UML). A profile cannot be used without its reference metamodel; it defines a limited capability to extend metaclasses of the reference metamodel via stereotypes. Profiles can be made to reference metaclasses from metamodels by creating an import relationship between the profile and the reference metaclass. To reference a metaclass using the UML editor, follow these steps:
- Select a profile (e.g., <Profile> ecore) in the UML editor.
- Select the UML Editor > Profile > Reference Metaclass... menu item.
- Choose a metaclass (e.g., UML::Property), press the Add button, then press the OK button.
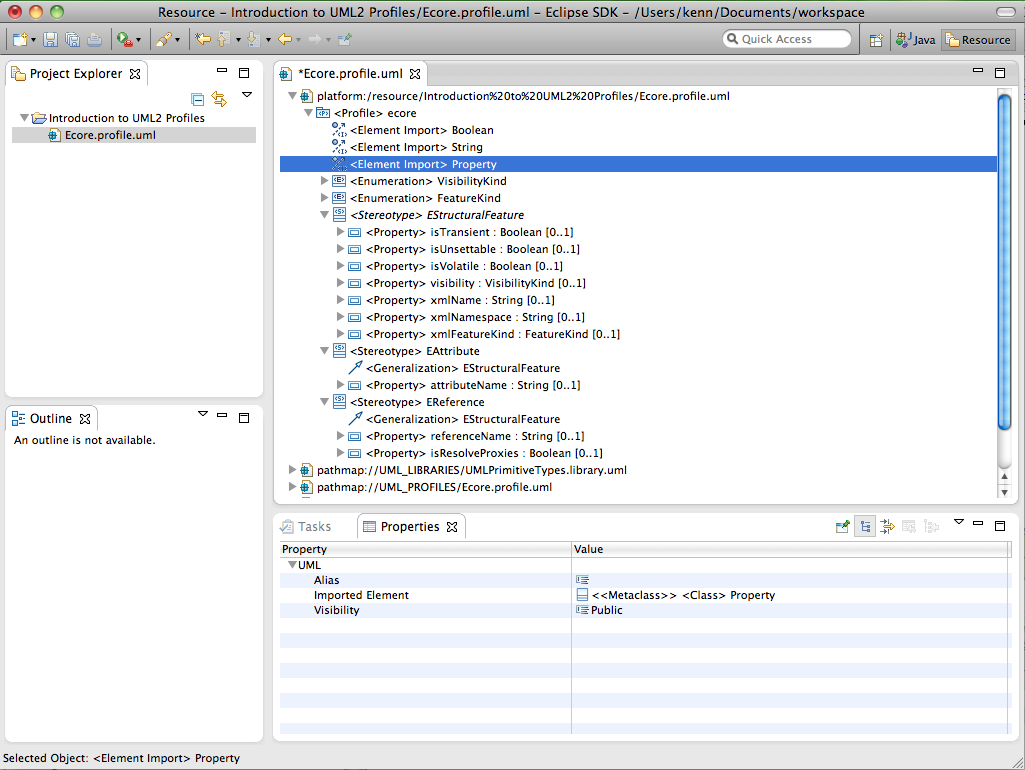
At this point your workspace should look something like this:
Let’s look at how to perform the same task using Java code. The code snippet below shows a method that programmatically references the metaclass with a specified name in the UML metamodel from a specified profile and returns it.
    protected static org.eclipse.uml2.uml.Class referenceMetaclass(Profile profile, String name) {
        Model umlMetamodel = (Model) load(URI.createURI(UMLResource.UML_METAMODEL_URI));

        org.eclipse.uml2.uml.Class metaclass = (org.eclipse.uml2.uml.Class) umlMetamodel.getOwnedType(name);

        profile.createMetaclassReference(metaclass);

        out("Metaclass '%s' referenced.", metaclass.getQualifiedName());

        return metaclass;
    }
Here we load the metamodel containing the UML metaclasses using a load(...) utility method (described later) and a URI defined on the UMLResource interface. Next, we retrieve the desired (owned) metaclass from the (meta)model by name using the convenience method. Finally, we invoke another convenience method to create the element import relationship between the profile and the metaclass, notify the user, and return the metaclass.
![]() The UML resources plug-in (org.eclipse.uml2.uml.resources) provides two metamodels (which by convention have a .metamodel.uml file extension), UML and Ecore. These metamodels can be accessed using URIs defined on the UMLResource interface, as shown above.
The UML resources plug-in (org.eclipse.uml2.uml.resources) provides two metamodels (which by convention have a .metamodel.uml file extension), UML and Ecore. These metamodels can be accessed using URIs defined on the UMLResource interface, as shown above.
OK, let’s see this method in action. For example, we could reference the metaclass named ‘Property’ from profile ‘ecore’ as follows:
org.eclipse.uml2.uml.Class propertyMetaclass = referenceMetaclass(ecoreProfile, UMLPackage.Literals.PROPERTY.getName());
Creating Extensions
Extensions are used to indicate that the properties of metaclasses are extended through stereotypes, and give the ability to flexibly apply (and later unapply) stereotypes to elements. An extension is a kind of association, one end of which is an ordinary property, and the other is an extension end. An extension may be required (depending on the lower bound of the extension end), which indicates that an instance of the extending stereotype must be created whenever an instance of the extended metaclass is created. To create an extension using the UML editor, follow these steps:
- Select a stereotype (e.g., <Stereotype> EAttribute) in the UML editor.
- Select the UML Editor > Stereotype > Create Extension... menu item.
- Choose a metaclass (e.g., UML::Property), press the Add button, then press the OK button.
![]() Create the other extension (i.e., between UML::Property and <Stereotype> EReference) for the Ecore profile using the UML editor.
Create the other extension (i.e., between UML::Property and <Stereotype> EReference) for the Ecore profile using the UML editor.
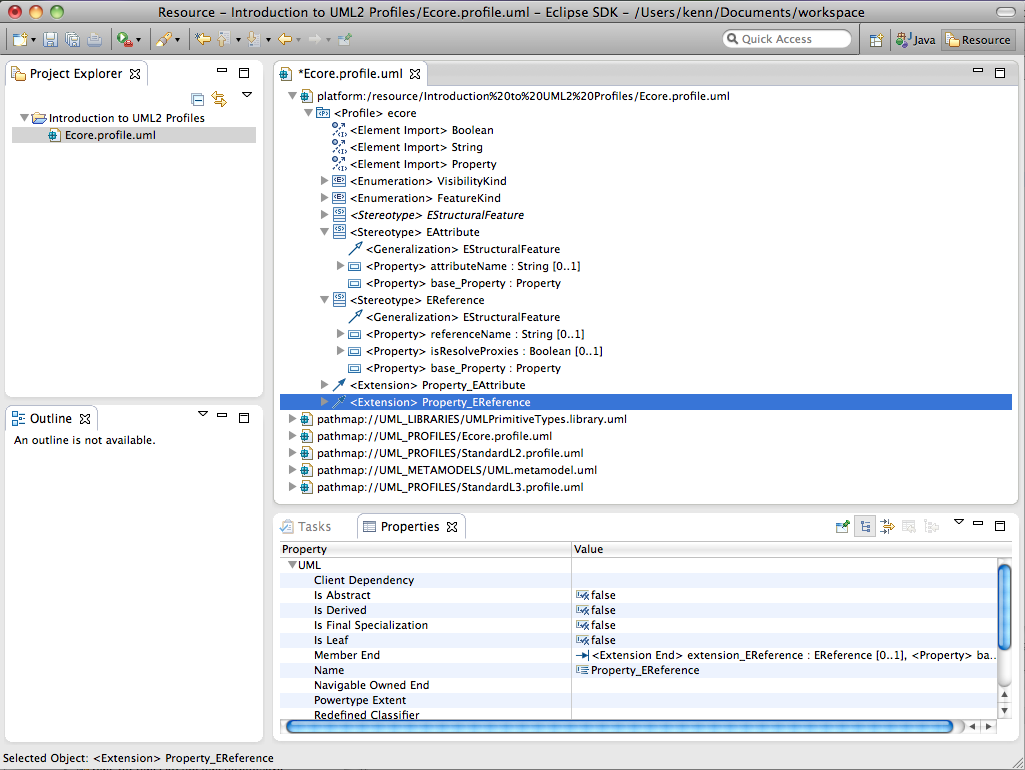
At this point your workspace should look something like this:
![]() You’ll notice that a number of new elements have appeared in the UML editor. In particular, you’ll see a new stereotype property with a name of the form base_<metaclass name>, an extension with a name of the form <metaclass name>_<stereotype name>, and an extension end with a name of the form extension_<stereotype name>. It’s important that these elements not be modified, since the UML2 profile mechanism depends on these constructs.
You’ll notice that a number of new elements have appeared in the UML editor. In particular, you’ll see a new stereotype property with a name of the form base_<metaclass name>, an extension with a name of the form <metaclass name>_<stereotype name>, and an extension end with a name of the form extension_<stereotype name>. It’s important that these elements not be modified, since the UML2 profile mechanism depends on these constructs.
Let’s look at how to perform the same task using Java code. The code snippet below shows a method that programmatically creates and returns a(n) (required) extension between a specified metaclass and a specified stereotype.
    protected static Extension createExtension(org.eclipse.uml2.uml.Class metaclass, Stereotype stereotype, boolean required) {
        Extension extension = stereotype.createExtension(metaclass, required);

        out("%sxtension '%s' created.", //
            required
                ? "Required e" // it's a required extension
                : "E", // an optional extension
            extension.getQualifiedName());

        return extension;
    }
Here we call a convenience method on the stereotype that creates an extension (and its ends) between it and a metaclass as one of its siblings (i.e., as a child of its profile namespace). Behind the scenes, the stereotype also creates the ends of the extension, resulting in a new property on the stereotype (with a special name) and an extension end owned by the extension (again, with a special name).
OK, let’s see this method in action. For example, we could create a non-required extension between metaclass ‘Property’ and stereotype ‘EAttribute’ in profile ‘ecore’ as follows:
createExtension(propertyMetaclass, eAttributeStereotype, false);
![]() Write code to programmatically create the other extension (i.e., between metaclass ‘Property’ and stereotype ‘EReference’) for the Ecore profile.
Write code to programmatically create the other extension (i.e., between metaclass ‘Property’ and stereotype ‘EReference’) for the Ecore profile.
Defining Profiles
There. We’ve finished creating (a scaled down version of) the Ecore profile, and we’re ready to start using it. But before we can, there’s one final thing we need to do: define it. Since a profile effectively represents an augmentation of a reference metamodel (UML), in order for the extensions we’ve defined to appear as though they’re part of the UML metamodel, they need to be “defined” at the meta-metamodel (i.e., Ecore) level. The implementation of profile support in UML2 supports defining both dynamic and static profile representations. In this article, we'll focus on the former.
When defining a dynamic profile representation, the contents of a profile are converted to an equivalent Ecore format that is stored as an annotation on the profile. Then, when a profile and its stereotypes are applied to a model and its elements, dynamic EMF (see the EMF book for details) is used to store property values for the stereotypes. For the most part, you can ignore this complexity, as long as you remember to define your profile before using it. To define a dynamic profile representation using the UML editor, follow these steps:
- Select a profile (i.e., <Profile> ecore) in the UML editor.
- Select the UML Editor > Profile > Define menu item.
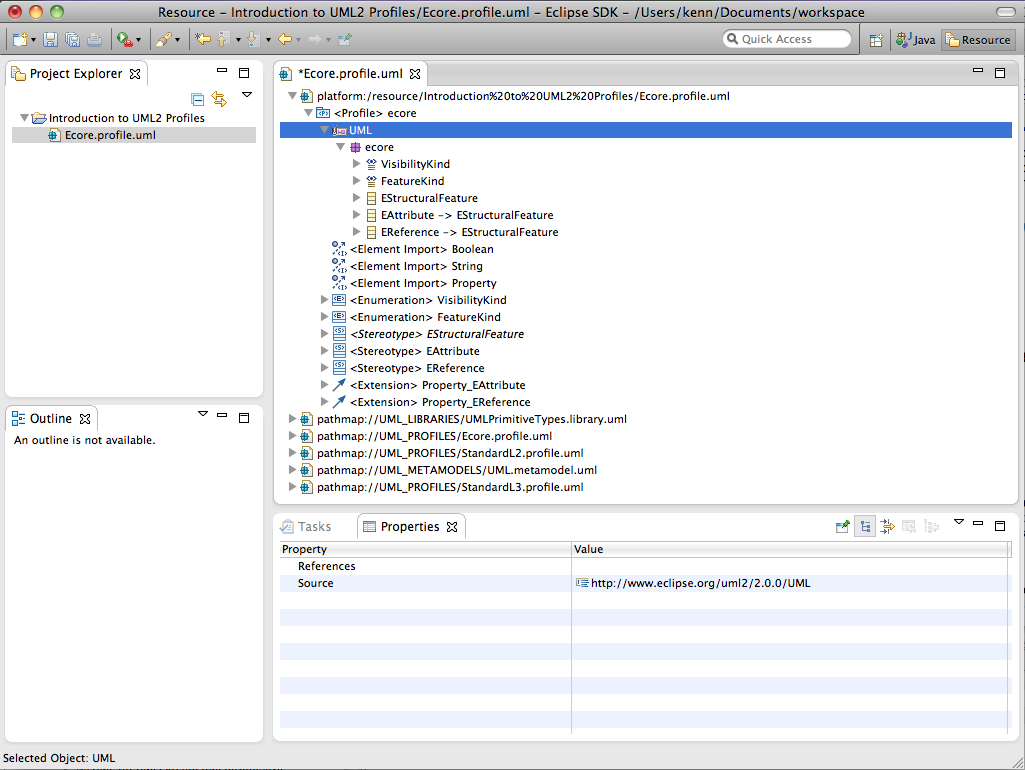
At this point your workspace should look something like this:
You’ll notice that an annotation with source "http://www.eclipse.org/uml2/2.0.0/UML" has been attached to the profile. It contains the generated Ecore representation (an Ecore package with classes, attributes, enums, etc.) of the profile. As with extensions, it’s important that this annotation (and its contents) not be modified, since the UML2 profile mechanism depends on these constructs.
Let’s look at how to perform the same task using Java code. The code snippet below shows a method that programmatically defines a specified profile.
    protected static void defineProfile(Profile profile) {
        profile.define();

        out("Profile '%s' defined.", profile.getQualifiedName());
    }
Here we call a convenience method on the profile that generates the Ecore representation of the profile and increments its version.
OK, let’s see this method in action. For example, we could define the ‘ecore’ profile as follows:
defineProfile(ecoreProfile);
Saving Profiles
Now that we’ve spent all this time creating and defining a profile, we’d better save our work. When we created our profile using the UML model wizard, a UML resource was created for us, so now all that needs to be done is to serialize the contents of our profile as XMI to a file on disk (i.e., Ecore.profile.uml). To save a profile using the UML editor, follow these steps:
- Select the File > Save menu item.
It’s that simple. Programmatically, we have a bit more work to do because so far, we’ve been creating our profile in a vacuum, i.e., without a containing resource. The code snippet below shows a method that saves a specified package to a resource with a specified URI.
    private static final ResourceSet RESOURCE_SET;

    static {
        // Create a resource-set to contain the resource(s) that we load and
        // save
        RESOURCE_SET = new ResourceSetImpl();

        // Initialize registrations of resource factories, library models,
        // profiles, Ecore metadata, and other dependencies required for
        // serializing and working with UML resources. This is only necessary in
        // applications that are not hosted in the Eclipse platform run-time, in
        // which case these registrations are discovered automatically from
        // Eclipse extension points.
        UMLResourcesUtil.init(RESOURCE_SET);

    }

    protected static void save(org.eclipse.uml2.uml.Package package_, URI uri) {
        // Create the resource to be saved and add the package to it
        Resource resource = RESOURCE_SET.createResource(uri);
        resource.getContents().add(package_);

        // And save.
        try {
            resource.save(null);
            out("Done.");
        } catch (IOException ioe) {
            err(ioe.getMessage());
        }
    }
Here we use a statically initialized resource set to create a resource with the specified URI, add the package to the resource’s contents, and ask the resource to save itself using the default options. If an exception occurs, we notify the user via our handy utility method.
![]() The above example uses the UMLResourcesUtil.init(...) API introduced in UML2 4.0.0 for the Juno release. As commented in the code snippet, this is not required in code running in the Eclipse Platform run-time, as in that case these registrations are discovered automatically from extension points.
The above example uses the UMLResourcesUtil.init(...) API introduced in UML2 4.0.0 for the Juno release. As commented in the code snippet, this is not required in code running in the Eclipse Platform run-time, as in that case these registrations are discovered automatically from extension points.
OK, let’s see this method in action. For example, we could save the ‘ecore’ profile to a resource with URI ‘Ecore.profile.uml’ (relative to a local filesystem path passed in as an argument) as follows:
save(ecoreProfile, URI.createFileURI(args[0]).appendSegment("Ecore").appendFileExtension(UMLResource.PROFILE_FILE_EXTENSION));
![]() The UMLResource.PROFILE_FILE_EXTENSION constant represents the file extension for UML2 profiles (.profile.uml).
The UMLResource.PROFILE_FILE_EXTENSION constant represents the file extension for UML2 profiles (.profile.uml).
Loading Models
In order to make use of our profile, we’ll need to open a model and load the profile. We’ll use the ExtendedPO2 model that was created in the Getting Started with UML2 article (you’ll need to copy it into your project and refresh the workspace first).
To open a model using the UML editor, follow these steps:
- Double-click on the resource (i.e., ExtendedPO2.uml) in the Navigator view.
Behind the scenes, a resource is obtained from the right kind resource factory (based on the extension ‘.uml’) and loaded, and then a new UML editor is opened and populated with the resource’s contents.
To load a profile (or any resource, actually) using the UML editor, follow these steps:
- Select the UML Editor > Load Resource... menu item.
- Press the Browse Workspace... button.
- Select a resource (e.g., Introduction to UML2 Profiles/Ecore.profile.uml) and press the OK button.
- Press the OK button.
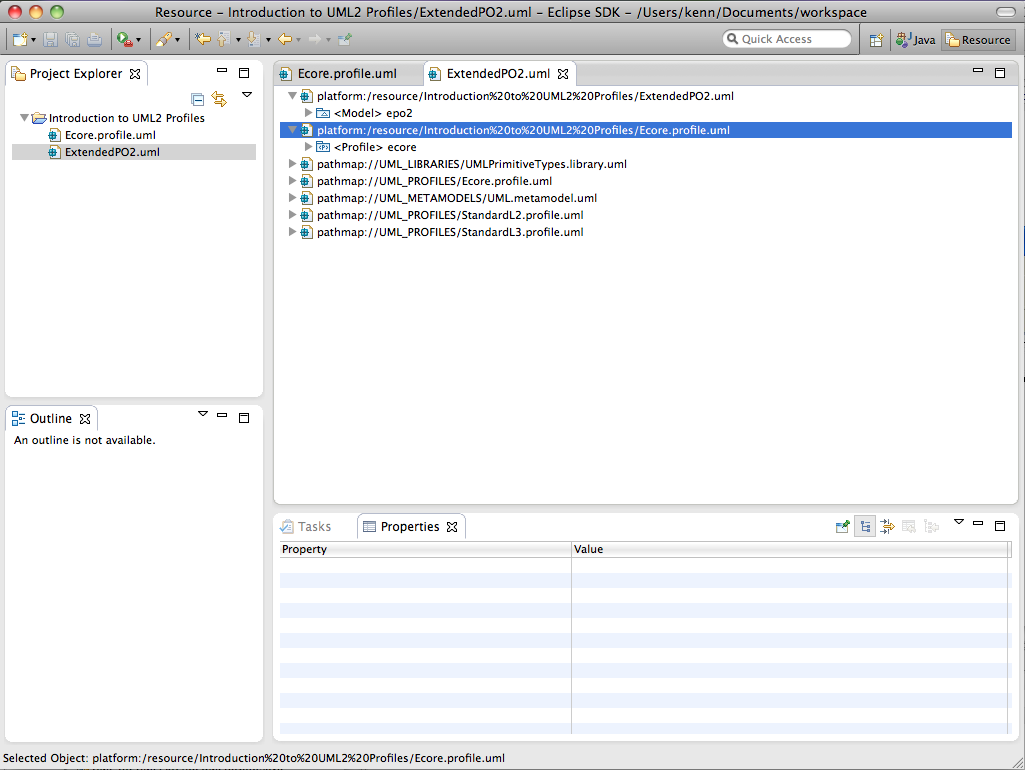
At this point your workspace should look something like this:
Programmatically, we have a bit more work to do. The code snippet below shows a method that loads a package from a resource with a specified URI.
    protected static org.eclipse.uml2.uml.Package load(URI uri) {
        org.eclipse.uml2.uml.Package package_ = null;

        try {
            // Load the requested resource
            Resource resource = RESOURCE_SET.getResource(uri, true);

            // Get the first (should be only) package from it
            package_ = (org.eclipse.uml2.uml.Package) EcoreUtil.getObjectByType(resource.getContents(), UMLPackage.Literals.PACKAGE);
        } catch (WrappedException we) {
            err(we.getMessage());
            System.exit(1);
        }

        return package_;
    }
Here we obtain a resource with the specified URI from our statically initialized resource set, asking that it be loaded on demand. Next, we use an EMF utility method to obtain the first object of type Package from the resource’s contents. If an exception occurs, we notify the user via our handy utility method. Finally, if all is well, we return the package.
![]() The EcoreUtil class (provided by EMF) defines a number of utilities that you may find quite useful when working with EMF-based resources.
The EcoreUtil class (provided by EMF) defines a number of utilities that you may find quite useful when working with EMF-based resources.
OK, let’s see this method in action. For example, we could load the ‘epo2’ model from a resource with URI ‘ExtendedPO2.uml’ (relative to a filesystem path passed in as an argument) as follows:
Model epo2Model = (Model) load(URI.createFileURI(args[0]).appendSegment("ExtendedPO2").appendFileExtension(UMLResource.FILE_EXTENSION));
Applying Profiles
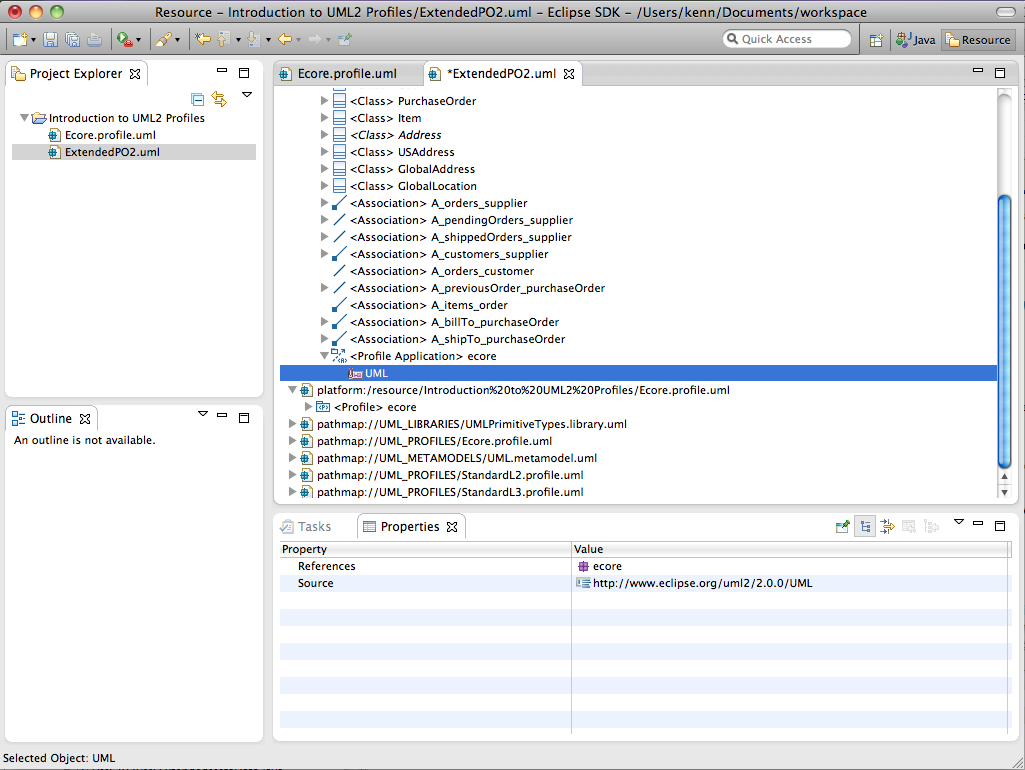
OK, our profile has been created, defined, saved, and loaded, and we’re ready to apply it to our model. Applying a profile means that it is allowed (but not necessarily required) to apply the stereotypes that are defined in the profile to elements in the package. A profile application is a special type of package import that indicates that a profile has been applied to a package. To apply a profile to a package using the UML editor, follow these steps:
- Select a package (e.g., <Model> epo2) in the UML editor.
- Select the UML Editor > Package > Apply Profile... menu item.
- Choose a profile (e.g., ecore), press the Add button, then press the OK button.
![]() Be sure to pick the profile we’ve created instead of the built-in profile provided by the UML resources plug-in (i.e., ecore, not Ecore).
Be sure to pick the profile we’ve created instead of the built-in profile provided by the UML resources plug-in (i.e., ecore, not Ecore).
At this point your workspace should look something like this:
![]() You’ll notice another annotation (with source "http://www.eclipse.org/uml2/2.0.0/UML") has been attached, in this case to keep track of the Ecore representation for the definition of the profile that is currently applied to the package. Again, it’s important that this annotation not be modified, since the UML2 profile mechanism depends on this construct. Note that a newer definition of the profile can be applied using the same menu item, and a profile (along with all of its stereotypes) can be unapplied using the UML Editor > Package > Unapply Profile... menu item.
You’ll notice another annotation (with source "http://www.eclipse.org/uml2/2.0.0/UML") has been attached, in this case to keep track of the Ecore representation for the definition of the profile that is currently applied to the package. Again, it’s important that this annotation not be modified, since the UML2 profile mechanism depends on this construct. Note that a newer definition of the profile can be applied using the same menu item, and a profile (along with all of its stereotypes) can be unapplied using the UML Editor > Package > Unapply Profile... menu item.
Let’s look at how to perform the same task using Java code. The code snippet below shows a method that programmatically applies a specified profile to a specified package.
    protected static void applyProfile(org.eclipse.uml2.uml.Package package_, Profile profile) {
        package_.applyProfile(profile);

        out("Profile '%s' applied to package '%s'.", profile.getQualifiedName(), package_.getQualifiedName());
    }
Here we call a convenience method on the package that creates a profile application on the package and sets the profile as the imported profile.
OK, let’s see this method in action. For example, we could apply the ‘ecore’ profile to the ‘epo2’ model as follows:
applyProfile(epo2Model, ecoreProfile);
Applying Stereotypes
We’re on the home stretch now. Once a profile has been applied to a package, stereotypes defined in the profile can be applied to instances of the appropriate metaclasses (as per the defined extensions). When a stereotype is applied to an element, that element is effectively extended with the properties that are defined as part of the stereotype. To apply a stereotype to an element using the UML editor, follow these steps:
- Select an element (e.g., <Property> pendingOrders : PurchaseOrder [0..*] in <Class> Supplier) in the UML editor.
- Select the UML Editor > Element > Apply Stereotype... menu item.
- Choose a stereotype (e.g., ecore::EReference), press the Add button, then press the OK button.
![]() Apply the appropriate stereotypes to other properties (<Property> shippedOrders : PurchaseOrder [0..*] in <Class> Supplier; <Property> totalAmount : int [0..1], <Property> previousOrder : PurchaseOrder [0..1], and <Property> customer : Customer in <Class> PurchaseOrder; <Property> orders : PurchaseOrder [0..*] in <Class> Customer) in the ExtendedPO2 model using the UML editor.
Apply the appropriate stereotypes to other properties (<Property> shippedOrders : PurchaseOrder [0..*] in <Class> Supplier; <Property> totalAmount : int [0..1], <Property> previousOrder : PurchaseOrder [0..1], and <Property> customer : Customer in <Class> PurchaseOrder; <Property> orders : PurchaseOrder [0..*] in <Class> Customer) in the ExtendedPO2 model using the UML editor.
At this point your workspace should look something like this:
![]() A stereotype (and its tagged values) can be unapplied using the UML Editor > Element > Unapply Stereotype... menu item.
A stereotype (and its tagged values) can be unapplied using the UML Editor > Element > Unapply Stereotype... menu item.
Let’s look at how to perform the same task using Java code. The code snippet below shows a method that programmatically applies a specified stereotype to a specified (named) element.
    protected static void applyStereotype(NamedElement namedElement, Stereotype stereotype) {
        namedElement.applyStereotype(stereotype);

        out("Stereotype '%s' applied to element '%s'.", stereotype.getQualifiedName(), namedElement.getQualifiedName());
    }
Here we call a convenience method on the element that creates an instance of the Ecore class representing the specified stereotype (using dynamic EMF) and attaches it to the element using an annotation.
OK, let’s see this method in action. For example, we could apply the ‘EReference’ stereotype to the ‘pendingOrders’ property of the ‘Supplier’ class in the ‘epo2’ model as follows:
    org.eclipse.uml2.uml.Class supplierClass = (org.eclipse.uml2.uml.Class) epo2Model.getOwnedType("Supplier");

    Property pendingOrdersProperty = supplierClass.getOwnedAttribute("pendingOrders", null);
    applyStereotype(pendingOrdersProperty, eReferenceStereotype);
![]() Write code to programmatically apply the appropriate stereotypes to other properties (i.e., ‘epo2::Supplier::shippedOrders’, ‘epo2::PurchaseOrder::totalAmount’, ‘epo2::PurchaseOrder::previousOrder’, ‘epo2::PurchaseOrder::customer’, and ‘epo2::Customer::orders’) in the ExtendedPO2 model.
Write code to programmatically apply the appropriate stereotypes to other properties (i.e., ‘epo2::Supplier::shippedOrders’, ‘epo2::PurchaseOrder::totalAmount’, ‘epo2::PurchaseOrder::previousOrder’, ‘epo2::PurchaseOrder::customer’, and ‘epo2::Customer::orders’) in the ExtendedPO2 model.
Accessing Stereotype Property Values
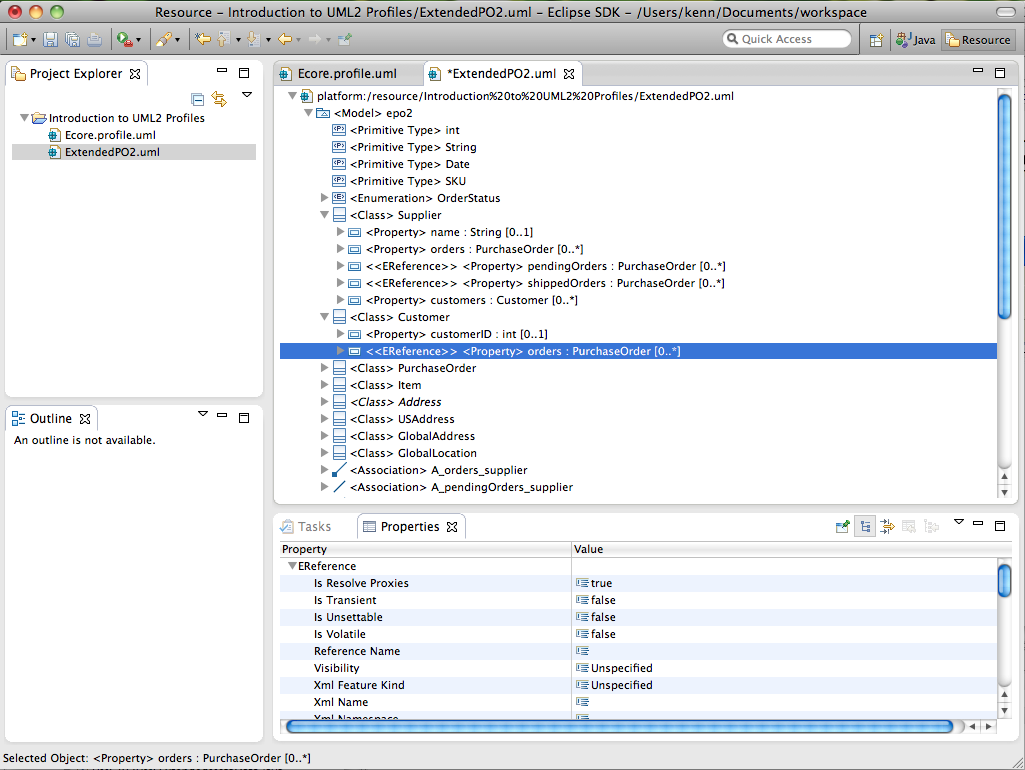
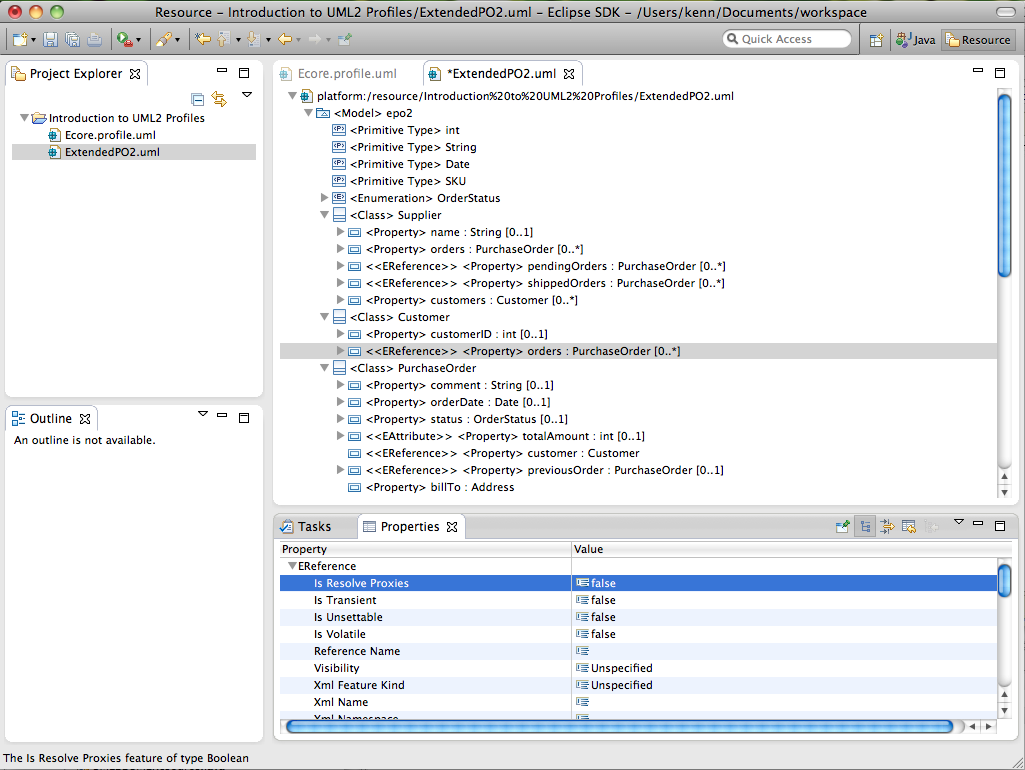
At long last, we’re ready to get and set values for the properties (tagged values) defined in our extensions. To get and set the value for a stereotype property using the UML editor, follow these steps:
- Select the element to which the stereotyped has been applied (i.e., <<EReference>> <Property> pendingOrders : PurchaseOrder [0..*] in <Class> Supplier) in the UML editor.
- Enter or select a value (i.e., false) for the property (i.e., Is Resolve Proxies) under the category named for the stereotype (i.e., EReference) in the Properties view.
![]() Get and set values for other stereotype properties (i.e., Is Transient and Is Volatile under EReference for <<EReference>> <Property> pendingOrders : PurchaseOrder [0..*] in <Class> Supplier; Is Resolve Proxies, Is Transient, and Is Volatile under EReference for <<EReference>> <Property> shippedOrders : PurchaseOrder [0..*] in <Class> Supplier; Is Transient and Is Volatile under EAttribute for <<EAttribute>> <Property> totalAmount : int [0..1] in <Class> PurchaseOrder; Is Resolve Proxies under EReference for <<EReference>> <Property> previousOrder : PurchaseOrder [0..1] in <Class> PurchaseOrder; Is Resolve Proxies under EReference for <<EReference>> <Property> customer : Customer in <Class> PurchaseOrder; Is Resolve Proxies under EReference for <<EReference>> <Property> orders : PurchaseOrder [0..*] in <Class> Customer) in the ExtendedPO2 model using the UML editor.
Get and set values for other stereotype properties (i.e., Is Transient and Is Volatile under EReference for <<EReference>> <Property> pendingOrders : PurchaseOrder [0..*] in <Class> Supplier; Is Resolve Proxies, Is Transient, and Is Volatile under EReference for <<EReference>> <Property> shippedOrders : PurchaseOrder [0..*] in <Class> Supplier; Is Transient and Is Volatile under EAttribute for <<EAttribute>> <Property> totalAmount : int [0..1] in <Class> PurchaseOrder; Is Resolve Proxies under EReference for <<EReference>> <Property> previousOrder : PurchaseOrder [0..1] in <Class> PurchaseOrder; Is Resolve Proxies under EReference for <<EReference>> <Property> customer : Customer in <Class> PurchaseOrder; Is Resolve Proxies under EReference for <<EReference>> <Property> orders : PurchaseOrder [0..*] in <Class> Customer) in the ExtendedPO2 model using the UML editor.
At this point your workspace should look something like this:
Let’s look at how to perform the same task using Java code. The code snippet below shows a method that programmatically gets and returns the value of a specified property of a specified stereotype for a specified element.
    protected static Object getStereotypePropertyValue(NamedElement namedElement, Stereotype stereotype, Property property) {
        Object value = namedElement.getValue(stereotype, property.getName());

        out("Value of stereotype property '%s' on element '%s' is %s.", property.getQualifiedName(), namedElement.getQualifiedName(), value);

        return value;
    }
Here we call a convenience method on the (named) element that retrieves the value of a property with a specified name from the dynamically created Ecore object instance corresponding to the specified applied stereotype, notifies the user, and returns it.
OK, let’s see this method in action. For example, we could get the value of the ‘isVolatile’ property of the ‘EReference’ stereotype for the ‘pendingOrders’ property of the ‘Supplier’ class in the ‘epo2’ model as follows:
getStereotypePropertyValue(pendingOrdersProperty, eReferenceStereotype, isVolatileProperty);
![]() Write code to programmatically get the values of the other stereotype properties for elements in the ExtendedPO2 model.
Write code to programmatically get the values of the other stereotype properties for elements in the ExtendedPO2 model.
The code snippet below shows a method that programmatically sets the value of a specified property of a specified stereotype for a specified element to a specified value.
    protected static void setStereotypePropertyValue(NamedElement namedElement, Stereotype stereotype, Property property, Object value) {
        Object valueToSet = value;

        if ((value instanceof String) && (property.getType() instanceof Enumeration)) {
            // Get the corresponding enumeration literal
            valueToSet = ((Enumeration) property.getType()).getOwnedLiteral((String) value);
        }

        namedElement.setValue(stereotype, property.getName(), valueToSet);

        out("Value of stereotype property '%s' on element '%s' set to %s.", property.getQualifiedName(),
                namedElement.getQualifiedName(), value);
    }
Here we call a convenience method on the (named) element that sets the value of a property with a specified name in the dynamically created Ecore object instance corresponding to the specified applied stereotype and notifies the user.
![]() Values of primitive types are represented by the usual Java types: String, Boolean, Integer, etc. For values of enumerations, the UML2 API accepts and returns the EnumerationLiteral instances from the profile model. For convenience, this utility method allows enumeration values to be set using simply the name of the literal.
Values of primitive types are represented by the usual Java types: String, Boolean, Integer, etc. For values of enumerations, the UML2 API accepts and returns the EnumerationLiteral instances from the profile model. For convenience, this utility method allows enumeration values to be set using simply the name of the literal.
OK, let’s see this method in action. For example, we could set the value of the ‘isVolatile’ property of the ‘EReference’ stereotype for the ‘pendingOrders’ property of the ‘Supplier’ class in the ‘epo2’ model to Boolean.TRUE as follows:
setStereotypePropertyValue(pendingOrdersProperty, eReferenceStereotype, isVolatileProperty, true);
![]() Write code to programmatically set the values of the other stereotype properties for elements in the ExtendedPO2 model.
Write code to programmatically set the values of the other stereotype properties for elements in the ExtendedPO2 model.
Conclusion
Congratulations! If you’ve made it this far, you’ve successfully created and applied a simple profile programmatically and/or using the UML editor. There’s a whole lot more that could be said, but the purpose of this article was just to introduce you to the concepts. Stay tuned for more articles on how to develop tools with UML2.
For more information on UML2, visit the home page or join a discussion in the forum.
References
[1] K. Hussey and J. Bruck. "Getting Started with UML2”. International Business Machines Corp., CEA, and others, 2004, 2014.
[2] F. Budinsky, D. Steinberg, E. Merks, R. Ellersick, and T. J. Grose. Eclipse Modeling Framework. Pearson Education, Inc., Boston, MA, 2003.

