Notice: This Wiki is now read only and edits are no longer possible. Please see: https://gitlab.eclipse.org/eclipsefdn/helpdesk/-/wikis/Wiki-shutdown-plan for the plan.
JCR Management
Contents
- 1 JCR Management (JCRM)
- 1.1 The Contributions
- 1.2 The Status
- 1.3 The Architecture
- 1.4 Tasks
- 1.5 Next Milestone
- 1.6 Ideas
- 1.7 FAQ
- 1.8 A tour through JCRM
JCR Management (JCRM)
JCR Management will provide tooling and a JCR (http://en.wikipedia.org/wiki/Content_repository_API_for_Java) persistence framework for EMF with pluggable JCR implementations.
The Contributions
2008
- Johan Gielstra:
- posted a code contribution that enhances the JCRM New Project Wizard by automatically setting the project name in an oAW property file (https://bugs.eclipse.org/bugs/show_bug.cgi?id=244969)
- added namespace handling to the node type registration. The ecore package namespace is used now for the node types of its classes.(https://bugs.eclipse.org/bugs/show_bug.cgi?id=245739) This is an important first step for mapping JCR namespaces to Ecore packages.
- changed the model to model transformations to generate better property names (https://bugs.eclipse.org/bugs/process_bug.cgi). This makes the generated ecore model a lot more readable.
- enhanced JCRM to allow adding many nodes without needing to specify it's name. (https://bugs.eclipse.org/bugs/show_bug.cgi?id=245450) Before this patch only one node with a fixed name "NewNode" could be added. The contribution increments the node name by one if it exists.
- reviewed the first version of the JCRM tutorial
- My employer inovex GmbH (http://www.inovex.de) contributes 2 person days to work on this project within working hours.
- Ed Merks:
- helps as a mentor for questions regarding the Eclipse foundation.
- implemented a new feature request for EMF that I had (dynamic feature delegation)
- answers a lot of my questions in the newsgroup
2007
- My employer inovex GmbH (http://www.inovex.de) contributes 5 person days to work on this project within working hours.
- Ed Merks:
- helps as a mentor for questions regarding the Eclipse foundation.
- answers a lot of my questions in the newsgroup
- The ATL team contributed an initial meta model and transformation that will speed up ATL integration.
- Nick Boldt created the initial JCR Management (CVS, website, ...) setup at eclipse.org
The Status
JCRM is not production ready at the moment. The current code base consists of prototypes that serve as a basis for concrete discussions about requirements and solutions. The prototypes are tested exclusively with the example library EMF model.
The Architecture
JCRM is based on a mapping between EMF and JCR. One part is responsible to map EMF type elements to JCR node type elements and the other part maps EMF objects to JCR nodes. The main advantage of that architecture is, that many EMF frameworks can now work on JCR node types and nodes. The following JCRM tool prototypes are just examples how this mapping can be used. More ideas JCR tools or Eclipse projects are certainly welcome. They will be logged in the ideas section of this wiki. The most interesting ideas will be provided to the community for priorization and for validation the use cases. After that the JCRM team (at the moment it's just me - Sandro) will work on it.
Mapping of type elements
There is a seperate page that explains how to map EMF type elements to JCR node type elements.
Tasks
- See Bugzilla for an overview of the ToDo's https://bugs.eclipse.org/bugs/buglist.cgi?short_desc_type=allwordssubstr&short_desc=&product=EMFT&component=JCR+Management&long_desc_type=allwordssubstr&long_desc=&order=Importance
Next Milestone
Create a first downloadable presentation of the project.
Ideas
- Using Cedrics Compare editor inside the JCR Manager
FAQ
- What's the relationship between JCR Management and Jackrabbit JCR-OCM?
One part of JCR Management has the same goal as JCR-OCM - exposing node data and operations to domain models - but JCRM uses an MDSD approach based on Eclipse Modeling Framework (EMF). This makes it depending less on reflection and using more generated classes instead. It will delegate as many calls on JCR node data as possible to minimize copying node data to domain model objects. Additionally JCR Management also has many other goals. But find out the details of JCR-OCM and check out the source code and the documentation.
A tour through JCRM
Installation
- Jackrabbit:
JCRM currently expects Jackrabbit version 1.4 remotely at "//localhost:1099/jackrabbit.repository". Please make sure it's available there.
- Eclipse:
JCRM is tested with the Eclipse Gallileo modeling package
- JCRM:
- Create a new CVS repository location with the following configuration:
   Server: dev.eclipse.org
   Repository Path: /cvsroot/modeling
   User: anonymous
   Password: (leave blank)
   Connection Type: pserver
- Navigate to the branch 'org_eclipse_emf_jcrm-tour-0_8_3'
- Check out all modules org.eclipse.emf.jcrm.* as plugins
- In the "org.eclipse.emf.jcrm.conversion" plugin in the source folder you find the general build.xml file. It is used to build all projects.
- Right-Click it and choose "Run As/Ant Build..."
- In the "JRE" tab choose "Run in the same JRE as the workspace"
- Press "Run"
- There are three projects that don't get generated successfully with the Ant task. Unfortunately you have to generate these projects manually until I found a solution to that. These projects are:
- org.eclipse.emf.jcrm.repoconn.simplecredentials
- org.eclipse.emf.jcrm.repoconn and
- org.eclipse.emf.jcrm.ntmodel
Please go into their "model" folder, open the *.genmodel file, right-click at the root element and choose "Generate All"
- If there are no errors anymore you successfully checked out JCRM.
Running JCRM
- In the main menu choose "Run/Run Configurations"
- Create a new Run Configuration for "Eclipse Application"
- Give it a name like "Start JCRM" if you want
- In the "Arguments" tab make sure there is "-Xmx512m" in the "VM arguments" field
- Press "Run" to start a new Eclipse instance
- You can also start your Jackrabbit server now
This puts all plugin projects that have been checked out (and maybe modified) into the new Eclipse instance.
Creating a demo domain model
- In the new Eclipse instance create a new JCR Management project using the "New Project..." wizard. You can give it a name like "Demo" if you want.
- Paste the example library EMF model as library.ecore into the generated "model" folder. I tested JCRM basically with this model but the current features should also work with other models.
Registering the domain model and create the tooling
Now the fun part starts as the tooling can be generated.
- Right-Click at "workflow/registerModelToRepository.oaw" choose "Run As/oAW Workflow" to register your Ecore model to the Jackrabbit repository.
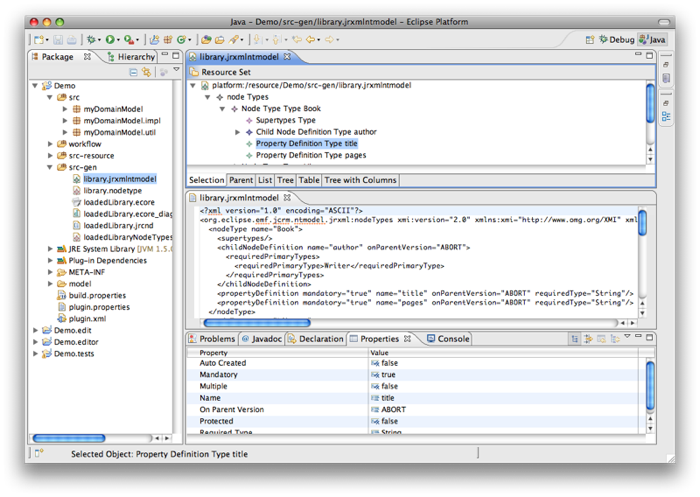
- "src-gen/library.jrxmlnt" is the xml file that has been used to register the domain model as Jackrabbit XML. This editor saves the content in the XML format that can be used for Jackrabbit node type registration. It completely supports drag 'n drop, copy & paste and undo/redo. The editor is basically the sample model editor of EMF enhanced with the JCRM type mapping semantics. You can use it to create a new XML file for the node type registration in Jackrabbit and you can also read the node types from the repository save it and manipulate it with this editor.
- "src-gen/library.nodetype" is a native JCRM model that serves as a basis for transformations into other models.
- Right-Click at "workflow/loadModelFromRepository.oaw" choose "Run As/oAW Workflow" to create a new EMF model from the native JCR node types and your own node types that are currently registered to your repository. This basically puts your domain model in the context of the node types of your repository.
- "src-gen/loadedLibrary.ecore" is the Ecore model that contains the domain model, the native JCR node types in Ecore format and the annotations that map the Ecore elements to node types elements. The JCR namespaces are mapped to packages.
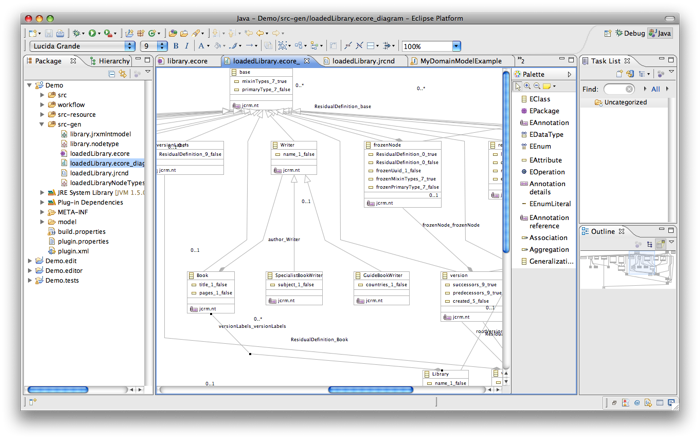
- "src-gen/loadedLibrarySinglePackage.ecore" is the same Ecore model like loadedLibrary.ecore. It is just not seperated into packages to make it easier to create a complete class diagram from that.
- Right-Click at "loadedLibrarySinglePackage.ecore/Initialize ecore_diagram Diagram file"
- Press "Finish" and you will see how the EClasses (node types) relate to each other in the Diagram
Configure JCRM for the use as API and as domain model editor
- Copy the loadedLibrary from the src-gen folder to the model folder to avoid that it is overwritten by subsequent calls on loadModelFromRepository.oaw
- Right-Click at loadedLibrary.ecore and create a new "Eclipse Modeling Framework/EMF model" (loadedLibrary.genmodel) based on the Ecore model.
- Choose 'Ecore model' as model importer at the 3rd page
- Press "Load" at the 4th page
- At the "Package Selection" page press "Select all" and check both available models in the "Referenced generator models" section. Then you can finish the dialog.
- Open the properties editor for the root element of the genmodel and change the "Model/Feature Delegation Field" to "Dynamic". That delegates all calls on the model to the JCRM framework.
- Right-Click at the root element of the genmodel and select "Generate All". That generates the model classes, initial source code for a test class and the tree based editor for the model.
- Add org.eclipse.emf.jcrm.userdependencies to the list of the plug-in dependencies in the META-INF/MANIFEST.MF file. Make sure the "reexport" option is selected.
- Add the following extension to the plugin.xml file:
  <extension point="org.eclipse.emf.jcrm.ejcrmnode.conCon4FileExtension">
     <connectionConfiguration
           ConConURI="defaultRMIConnection"
           extension="library">
     </connectionConfiguration>
  </extension>
It tells EMF to register the 'library' extension with the JCRM ResourceFactory. "defaultRMIConnection" is the name of the connection that the JCRM ResourceFactory (ConConResourceFactoryImpl) will use to connect to a JCR. Later on the tour you will see the connection configuration file that contains all configured connections to choose from.
Starting the domain model editor
- In the main menu of your current (2nd) Eclipse instance choose "Run/Run Configurations"
- Create a new Run Configuration for "Eclipse Application"
- Give it a name like "Start Editor" if you want
- Press "Run" to start a new Eclipse instance open a new simple project like that:
- In the new Eclipse instance (the 3rd):
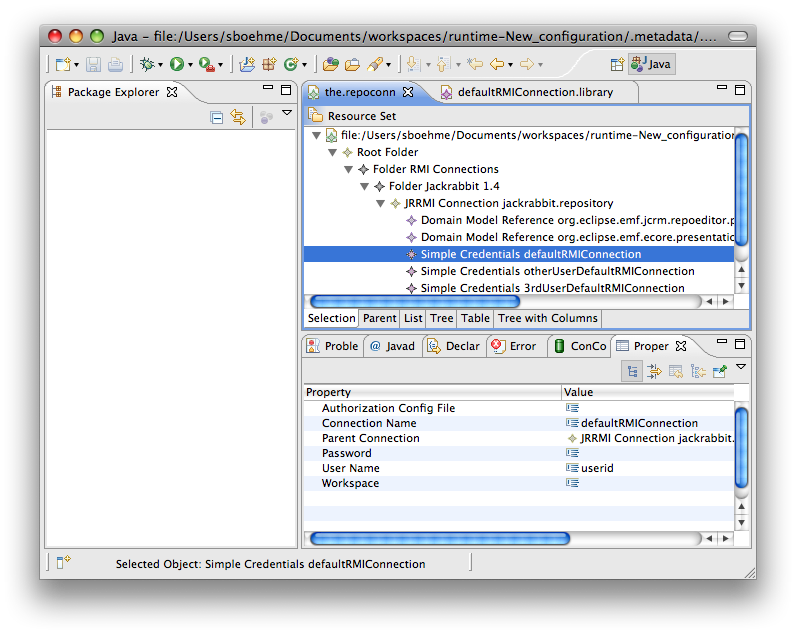
- Navigate to Window / Show View / Other / JCR Management / ConConFile. This opens the view that manages the ConCon file. This file contains all configured JCR connections. It is the frontend for the JCRM ConCon framework. This framework allows to create arbitrary connector models to different repositories. While all connectors with its own models will be displayed by this unified model editor and all connections are referencable by a unique JCRM-URI. The 'org.eclipse.emf.jcrm.jr.rmi' bundle is an example of such a connector implementation.
- Click on the link to open the file. It contains one preconfigured connection to a Jackrabbit 1.4 repository.
- Navigate down to a Simple Credentials element
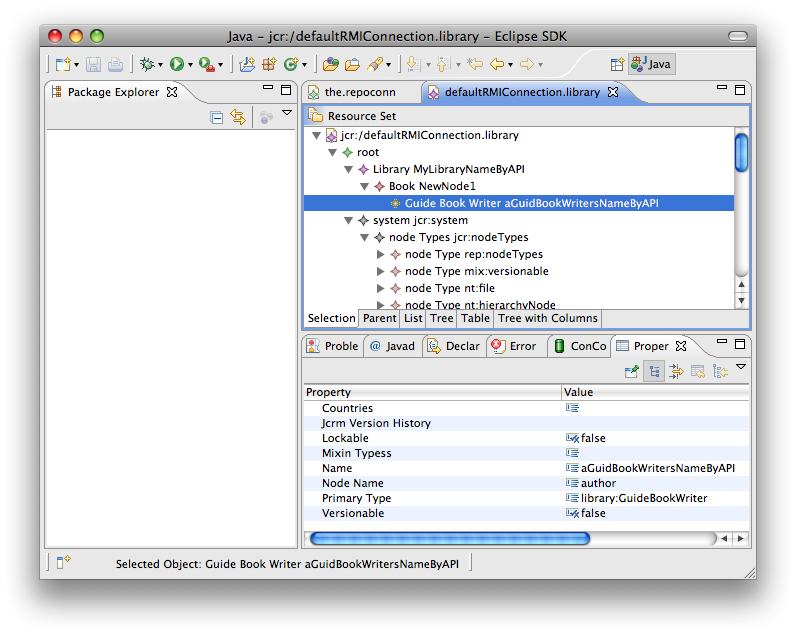
- If you right-click it you find a menu item for our library model. Clicking it opens the editor that we previously generated for our model. There you can edit your Jackrabbit backed EMF model.
The API
To test the JCRM API you can replace the Demo.tests/src/library.tests.LibraryExample.main() method with the content from the sections below. If you would like to see the changes in the generated editor you need to go to the ConCon model, duplicate a credentials object, give it a new name and start the editor from there. The reason is that the editor does not yet get refreshed if the content changes from outside of the editor. This creates a new and uncached EMF resource.
This adds some nodes and gives you a quick example of configuring the resource, navigation and modification with the JCRM runtime API. It uses the classes generated by EMF and the JCRM type mapping. At runtime you can see the JCRM object mapping at work.
	public static void main(String[] args) throws IOException {
		// Create a resource set to hold the resources.
		ResourceSet resourceSet = new ResourceSetImpl();

		// It registers the JCRM packages and the resource factory for the ConCon model.
		StandaloneSetup.initializeConCon();

		//  JCRM uses an own scheme for resources. After 'jcr:/' follows the connection name and
		//  the extension identifying the model. This makes it possible to configure many
                //  different connections for one model.
		//  Connections with its names can be configured in the singleton ConCon model
		//  by opening it from the ConConFile view at
		//  Window / Show View / Other / JCR Management / ConConFile
		URI resourceURI = URI.createURI("jcr:/defaultRMIConnection.library");


                // This file is automatically created with you create the first JCRM project within the workspace.
                // The name of the properties file is always jcrm.properties.
                // You can copy the path from the ConConFile view at
		// Window / Show View / Other / JCR Management / ConConFile
                // Just click at 'ConCon File Location' and copy the path of the folder.
		String path2jcrmProperties = "/Users/sboehme/Documents/workspaces/runtime-New_configuration_26/.metadata/.plugins/org.eclipse.emf.jcrm.repoconn/jcrm.properties";

		// The properties file is needed to read the path to the ConCon file that contains configuration of the
		// connection to the repository.
		ConConResourceFactoryImpl conConResourceFactoryImpl = new ConConResourceFactoryImpl(path2jcrmProperties);

		resourceSet.getResourceFactoryRegistry().getExtensionToFactoryMap().put("library",	conConResourceFactoryImpl);
		conConResourceFactoryImpl.addResource(resourceURI);

		// Register the package to ensure it is available during loading.
		resourceSet.getPackageRegistry().put(LibraryPackage.eNS_URI, LibraryPackage.eINSTANCE);

		try {
			// Create the resource to access the model
			Resource resource = resourceSet.createResource(resourceURI);

			// Create a domain object. The constructor is initially generated by EMF to be protected
                        // but you can make it public if you want.
			Library library = LibraryFactory.eINSTANCE.createLibrary();

			// In contrast to the JCR specification EMF generally allows to have many root nodes
                        // hence the content of the resource is designed to be a list in EMF even though the
                        // JCRM Framework needs only one element in the content.
                        // JCRM puts the root object containing the corresponding root node of the repository
                        // in the content of the resource where it can get retrieved. "root" is the class
                        // of the rootObject that corresponds to the node type of the root node. Generating
			// classes with a first capital letter is a feature that is still to implement.
			root rootNode = (root) resource.getContents().get(0);

			// As soon as an object is added to it's containing object it also get it's
                        // node injected. In this case the library object is added to the "bases"
                        // feature of the rootObject. That calls addNode() on the
                        // node that is contained within the rootObject. The resulting node
                        // is then injected in the library object.
			rootNode.getBases().add(library);

			// Every domain object contains it's corresponding node and every modification
                        // is delegated to the node. In this case setName...("MyLibraryNameByAPI") actually
                        // calls nodeOfTheObject.setProperty("name","MyLibraryNameByAPI")
                        // This way the objects don't need to have own copies of the property content.
                        // At the moment there is not something like a detached mode where you can
                        // modify properties without the object having an injected node.
			library.setName("MyLibraryNameByAPI");
			library.setNodeName("MyLibraryNodeNameByAPI");
	  		Book aBook = LibraryFactory.eINSTANCE.createBook();
	  		library.getBooks().add(aBook);
	  		Writer aWriter = LibraryFactory.eINSTANCE.createGuideBookWriter();
	  		aBook.setAuthor(aWriter);
	  		aWriter.setName("aGuidBookWritersNameByAPI");
	  		aBook.setTitle("Book-TitleByAPI");
	  		aBook.setPages("200ByAPI");

	  		// that calls session.save() and persists the changes made above.
			resource.save(System.out, null);
		} catch (IOException exception) {
			exception.printStackTrace();
		}
	}
Locking
	public static void main(String[] args) {
		// Information about configuring the resource and navigating in the model can
		// be found in the previous example
		ResourceSet resourceSet = new ResourceSetImpl();
		StandaloneSetup.initializeConCon();
		URI resourceURI = URI.createURI("jcr:/defaultRMIConnection.library");
		String path2jcrmProperties = "/Users/sboehme/Documents/workspaces/runtime-New_configuration_26/.metadata/.plugins/org.eclipse.emf.jcrm.repoconn/jcrm.properties";
		ConConResourceFactoryImpl conConResourceFactoryImpl = new ConConResourceFactoryImpl(path2jcrmProperties);
		resourceSet.getResourceFactoryRegistry().getExtensionToFactoryMap().put("library",	conConResourceFactoryImpl);
		conConResourceFactoryImpl.addResource(resourceURI);
		resourceSet.getPackageRegistry().put(LibraryPackage.eNS_URI, LibraryPackage.eINSTANCE);
		try {
			Resource resource = resourceSet.createResource(resourceURI);
			Library library = LibraryFactory.eINSTANCE.createLibrary();
			root rootObject = (root) resource.getContents().get(0);
			rootObject.getBases().add(library);
			library.setNodeName("Testlibrary for locking");
			library.setName("Testlibrary for locking");

			// Make this library lockable.
			library.setLockable(true);
			resource.save(System.out, null);

			// The JSR-170 javadoc says about the session scoped lock:
			// If isSessionScoped is true then this lock will expire upon the expiration of the
			// current session.
			boolean sessionScoped = true;

			// The JSR-170 javadoc says about the deep lock:
			// If isDeep is true then the lock applies to this node and all its descendant nodes;
			boolean deep = true;

			// Apply the lock to the library.
			library.lock(deep, sessionScoped);

			try {
				// This method tries to change the library in an other session.
				// But that throws an Exception as the library is locked.
				changeLibraryNameInANewSession(conConResourceFactoryImpl, resourceSet);
			} catch (Throwable t) {
				// Exception is throws as we try to modify a locked node.
				t.printStackTrace();
			}

			// Unlock the library.
			library.unlock();

			// Changing the library in an other session is possible now.
			changeLibraryNameInANewSession(conConResourceFactoryImpl, resourceSet);

			// that calls session.save() and persists the changes made above.
			resource.save(System.out, null);
		} catch (IOException exception) {
			exception.printStackTrace();
		}
	}

	private static void changeLibraryNameInANewSession(ConConResourceFactoryImpl conConResourceFactoryImpl, ResourceSet resourceSet) {
		URI resourceURI = URI.createURI("jcr:/otherUserDefaultRMIConnection.library");
		conConResourceFactoryImpl.addResource(resourceURI);
		Resource secondResource = resourceSet.createResource(resourceURI);
		root secondRootObject = (root) secondResource.getContents().get(0);
		EList<base> rootChildren = secondRootObject.getBases();
		// retrieve the last library
		Library libraryFromSecondResource = (Library) rootChildren.get(rootChildren.size() - 1);
		libraryFromSecondResource.setName("not settable as the node is locked");
	}
Versioning
	public static void main(String[] args) {
		// Information about configuring the resource and navigating in the model can
		// be found in the previous example
		ResourceSet resourceSet = new ResourceSetImpl();
		StandaloneSetup.initializeConCon();
		URI resourceURI = URI.createURI("jcr:/defaultRMIConnection.library");
		String path2jcrmProperties = "/Users/sboehme/Documents/workspaces/runtime-New_configuration_26/.metadata/.plugins/org.eclipse.emf.jcrm.repoconn/jcrm.properties";
		ConConResourceFactoryImpl conConResourceFactoryImpl = new ConConResourceFactoryImpl(path2jcrmProperties);
		resourceSet.getResourceFactoryRegistry().getExtensionToFactoryMap().put("library",	conConResourceFactoryImpl);
		conConResourceFactoryImpl.addResource(resourceURI);
		resourceSet.getPackageRegistry().put(LibraryPackage.eNS_URI, LibraryPackage.eINSTANCE);
		try {
			Resource resource = resourceSet.createResource(resourceURI);
	  		Library library = LibraryFactory.eINSTANCE.createLibrary();
	  		root rootObject = (root) resource.getContents().get(0);
	  		rootObject.getBases().add(library);
	  		library.setNodeName("MyVersionedLibrary1");
	  		library.setName("MyVersionedLibrary");
	  		// initial unversioned content
	  		resource.save(System.out,null);

	  		library.setVersionable(true);
	  		library.setName("MyLibraryVersion Zero");
	  		resource.save(System.out,null);
	  		// checkin the initial version
	  		// This makes the library read-only until checkout() is called.
	  		library.checkin();

	  		try {
				// The library is not changeable as it is not yet checked out.
				library.setName("New Text");
			} catch (Exception e) {
				//Trying to change versioned content that is not checked out throws an Exception.
			}

	  		library.checkout();
	  		library.setName("MyLibraryVersion One");
	  		resource.save(System.out,null);
	  		// Creates a second version.
	  		library.checkin();

	  		library.checkout();
	  		library.setName("MyLibraryVersion Two");
	  		resource.save(System.out,null);
	  		// Creates a third version.
	  		library.checkin();

	  		JCRMVersionHistory versionHistory = library.getJcrmVersionHistory();
	  		EList<JCRMVersion> allVersions = versionHistory.getAllVersions();
	  		for (JCRMVersion version : allVersions) {
				java.util.Date creationDate = version.getCreated();
				String versionName=version.getVersionName();
				System.out.println("Version: "+versionName+": created at: "+creationDate);
			}

	  		boolean removeExisting=true;
			library.restore("1.1", removeExisting);
			System.out.println(library.getName());

			// Non versioning use cases e.g. the generated EMF editor don't call
			// checkout()/checkin() before/after a model modification.
			// Set versionable to false to not force checkin()/checkout()
			// in these use cases later on.
			library.checkout();
			library.setVersionable(false);

	        // that calls session.save() and persists the changes made above.
	  		resource.save(System.out, null);
	  	}
	  	catch (IOException exception) {
	  		exception.printStackTrace();
	  	}
	  }


