Notice: This Wiki is now read only and edits are no longer possible. Please see: https://gitlab.eclipse.org/eclipsefdn/helpdesk/-/wikis/Wiki-shutdown-plan for the plan.
Triquetrum/Extending Triquetrum
Contents
Introduction
A Triquetrum runtime can be extended in several ways and to suit different purposes. But all extensions are based on normal OSGi and/or eclipse extension mechanisms. I.e. the base concept for an extension is always an OSGi bundle.
Depending on the particular situation, an extension may offer alternative implementations of Triquetrum service APIs, it may add extra actor implementations, add features to the RCP editor etc. In this text we will describe some common extension approaches, starting with how to add actor implementations.
Adding preexisting Java actor classes to Triquetrum
If you want to add existing Java actor classes to Triquetrum the main tasks are related to packaging them in an OSGi bundle and to providing a configuration to make them visible in the editor palette.
Overall this involves similar steps as for adding new actors, except for the actor implementation itself of course as it exists already. So the information below is of use here as well, except the section Implementing an actor.
For more details about porting existing Ptolemy II actors to Triquetrum, you can find more info on:
Adding new actors
Triquetrum fully exploits OSGi and eclipse plugin features to develop and use actors. The initial set of actors, directors and other model elements are contributed using the same mechanisms that can be used to add extra elements :
- actors must be developed/packaged in OSGi bundles. The same goes for new directors implementations or any other possible type of model element.
- to add new entries to the RCP editor palette, they must be registered using the provided extension points.
- to allow the model parser to instantiate new actor instances, an actor class provider must be registered as an OSGi service implementation.
The text below explains the process to implement and install a new actor in Triquetrum. It is assumed that the reader has a basic knowledge of Ptolemy II actors and their development in Java. For more information about Ptolemy II and its actor development please consult :
- Ptolemy II project site
- the Ptolemy II book, especially chapter 12, and its section 12.4 about Designing Actors in Java.
Scope
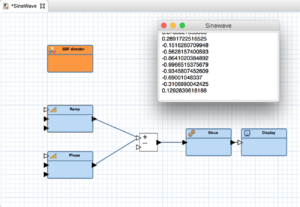
We start from a plain Triquetrum RCP editor, with its configured palette of actors. You can obtain it as described here. With this configuration we can for example create a sequence of sine values and show the numerical results in the plain Display actor.
As an example extension, we will now implement an actor that is able to show such numerical series as :
- plain sequence plots when only one data series is available
- XY plots combining data sequences for the X and Y values
We will implement this using a Nebula XYGraph widget embedded in a plain SWT Shell.
The important steps to achieve such an actor extension are described in more detail in the remainder of this text. The complete source code for the example actor and the installation feature can be found on the Triquetrum repository.
Creating an actor bundle
To implement the new actor, we start by creating a PDE plugin project org.eclipse.triquetrum.workflow.actor.plot . The main elements in this bundle are :
-
META-INF/MANIFEST.MF -
META-INF/p2.inf -
src/.../XYPlotActor.java -
src/.../support utilities -
src/.../Activator.java
The MANIFEST.MF imports packages from Ptolemy II, Nebula and one Triquetrum package that contains a utility to link Ptolemy II UI concepts to SWT.
 Manifest-Version: 1.0
 Bundle-ManifestVersion: 2
 Bundle-Name: Plot actors for Triquetrum
 Bundle-SymbolicName: org.eclipse.triquetrum.workflow.actor.plot
 Bundle-Version: 1.0.0.qualifier
 Bundle-Activator: org.eclipse.triquetrum.workflow.actor.plot.activator.Activator
 Bundle-RequiredExecutionEnvironment: JavaSE-1.8
 Bundle-Vendor: Eclipse Triquetrum
 Import-Package: org.apache.commons.lang;version="2.6.0",
  org.eclipse.draw2d,
  org.eclipse.nebula.visualization.xygraph.dataprovider,
  org.eclipse.nebula.visualization.xygraph.figures,
  org.eclipse.swt.layout,
  org.eclipse.swt.widgets,
  org.eclipse.triquetrum.workflow.ui;version="1.0.0",
  org.osgi.framework;version="1.8.0",
  org.ptolemy.classloading;version="11.0.0",
  org.ptolemy.classloading.osgi;version="11.0.0",
  org.ptolemy.commons;version="11.0.0",
  ptolemy.actor;version="11.0.0",
  ptolemy.data;version="11.0.0",
  ptolemy.data.expr;version="11.0.0",
  ptolemy.data.type;version="11.0.0",
  ptolemy.kernel;version="11.0.0",
  ptolemy.kernel.util;version="11.0.0",
  ptolemy.util;version="11.0.0"
 Export-Package: org.eclipse.triquetrum.workflow.actor.plot;version="1.0.0"
An important extra point of attention : to ensure that the actor bundle is auto-started upon its installation, we need to add a short p2.inf instruction file in the actor bundle, alongside its MANIFEST.MF file. This is a p2 instruction file containing a single, rather cryptic, line :
instructions.configure = setStartLevel(startLevel:4); markStarted(started: true);
Added Required Projects
In this case, we will use Nebula to display the data, so Nebula must be added to your Eclipse workspace
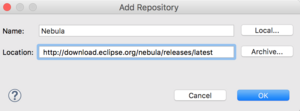
- Add the Nebula update site
- Help -> Install New Software
- Click on the Add button
- Enter the Name:
Nebula - Enter the Location:
http://download.eclipse.org/nebula/releases/latest
- Enter the Name:
- In the Install window, the open "Nebula Release Individual Widgets" and select "Nebular Visualization Widgets"
- Click on Next, Next, accept the license and Finish.
- Restart Eclipse when you are prompted to do so.
Implementing an actor
We will create a new actor in a class org.eclipse.triquetrum.workflow.actor.plot.XYPlotActor. The actor will have 2 input ports, to receive an (optional) X data series and a Y data series. It will provide 3 parameters, to configure the plot's title and the names/labels for the X and Y series.
 public class XYPlotActor extends TypedAtomicActor {
   /**
    * The title to put on top. Note that the value of the title overrides the value of the name of the actor or the display name of the actor.
    */
   public StringParameter title;
   /**
    * The name to be assigned to the X axis
    */
   public StringParameter xName;
   /**
    * The name to be assigned to the Y axis
    */
   public StringParameter yName;
   /**
    * The input receiving the X double values
    */
   public TypedIOPort inputX;
   /**
    * The input receiving the Y double values, paired to the X values received in the same iterations
    */
   public TypedIOPort inputY;
   //...
As is standard practice for Ptolemy II actors, ports and parameters are instantiated in the actor's constructor :
 public XYPlotActor(CompositeEntity container, String name) throws IllegalActionException, NameDuplicationException {
   super(container, name);

   inputX = new TypedIOPort(this, "inputX", true, false);
   inputX.setTypeEquals(BaseType.DOUBLE);

   inputY = new TypedIOPort(this, "inputY", true, false);
   inputY.setTypeEquals(BaseType.DOUBLE);

   title = new StringParameter(this, "title");
   xName = new StringParameter(this, "X name");
   xName.setExpression("X");
   yName = new StringParameter(this, "Y name");
   yName.setExpression("Y");
 }
In the actor's initialization, triggered once during a the start of a model execution, the plot wrapper is initialized and the x sequence counter is reset to 0. That counter is used to generate X values when the actor would only be connected on its inputY port, i.e. when it does not receive an X input series.
 public void initialize() throws IllegalActionException {
   super.initialize();
   xCounter = 0d;
   plot = new XYPlot();
   try {
     plot.init(this);
     plot.openWindow();
   } catch (Exception e) {
     throw new IllegalActionException(this, e, "error initialising XYPlot");
   }
 }
From then on, during each firing iteration, the actor will try to read an input from the inputX port (if it is connected) and from the inputY port. If the inputX is not connected, an incremented counter value is used for the X values. If a Y value has been received, the (X,Y) value pair is handed to the plot.
 public boolean postfire() throws IllegalActionException {
   boolean hasX = false;
   boolean hasY = false;
   double xValue = 0.0;
   double yValue = 0.0;
   if (inputX.getWidth() > 0) {
     if (inputX.hasToken(0)) {
       xValue = ((DoubleToken) inputX.get(0)).doubleValue();
       hasX = true;
     }
   } else {
     xValue = xCounter++;
     hasX = true;
   }
   if (inputY.hasToken(0)) {
     yValue = ((DoubleToken) inputY.get(0)).doubleValue();
     hasY = true;
   }
   if (hasX && hasY) {
     plot.addPoint(xValue, yValue);
   }
   return super.postfire();
 }
(For more details about the Ptolemy II actor API and the meaning of methods like prefire, fire, postfire, please read the Ptolemy II book mentioned above.)
The code for the XYPlot plot wrapper class can be found at the Triquetrum repository.
Providing the actor class to the runtime
In a Triquetrum runtime, actor implementation classes are made available by registering OSGi services that implement org.ptolemy.classloading.ModelElementClassProvider . This indirect approach to access actor classes serves the following purposes :
- Promote modular design, where groups of related actors can be developed and packaged and deployed as separate bundles
- Benefit from the dynamic features and lifecycle offered by using OSGi services :
- You can add actor bundles to a running Triquetrum system and the actors become available dynamically.
- Similarly actor maintenance can be done using standard OSGi bundle and service maintenance without system downtime.
- Version management for actor implementations can be supported by the combination of OSGi bundle version management and the API of the ModelElementClassProvider .
- Additional actor lookup-logic can be plugged in as needed (e.g. class-name aliasing, filtering logic, ...)
A default implementation org.ptolemy.classloading.osgi.DefaultModelElementClassProvider offers a simple way of passing the actor classes into its constructor. It can be used in a bundle activator for example, as follows :
public class Activator implements BundleActivator {
  public void start(BundleContext context) throws Exception {
   // FIXME figure out a more compact way to create a version-aware provider,
   // that uses the bundle version but is not too dependent on OSGi APIs itself.
   Version bundleVersion = context.getBundle().getVersion();
   VersionSpecification providerVersion = new ThreeDigitVersionSpecification(
       bundleVersion.getMajor(),
       bundleVersion.getMinor(),
       bundleVersion.getMicro(),
       bundleVersion.getQualifier());
   _apSvcReg = context.registerService(ModelElementClassProvider.class.getName(),
       new DefaultModelElementClassProvider(providerVersion, XYPlotActor.class),
       null);
 }
 public void stop(BundleContext context) throws Exception {
   _apSvcReg.unregister();
 }
 /** The svc registration for the actor provider */
 private ServiceRegistration<?> _apSvcReg;
}
Another ModelElementClassProvider implementation is org.ptolemy.classloading.osgi.PackageBasedModelElementClassProvider. It can be configured with package names where it should look for actor classes. Remark that a ModelElementClassProvider is also able to provide classes for other types of model elements, for example new Director implementations.
Packaging the plugin(s) for your RCP editor
To be able to add a new actor bundle to your RCP workbench, two extra things are required :
- Define the palette-related meta-data for your new actor(s), mainly :
- Group name(s) and actor names that should be used in the editor palette
- Images/icons that must be used
- Provide an eclipse feature project to package a deployable unit
Defining the palette entry
The palette definition is done using extension points. As this is purely GUI-related, and as it requires a "real" eclipse plugin, it is good practice to split this from the actual actor implementation bundle.
So we create a new simple plugin project (no need for any Java in here) org.eclipse.triquetrum.workflow.actor.plot.palette . In our example it contains following elements :
icons/plot.png
META-INF/MANIFEST.MF
build.properties
plugin.xml
The most important content is in the plugin.xml :
<extension
     name="Triquetrum palette XYPlot extension"
     point="org.eclipse.triquetrum.workflow.editor.paletteContribution">
  <group displayName="Examples">
     <entry
            class="org.eclipse.triquetrum.workflow.actor.plot.XYPlotActor"
            displayName="XY Plot"
            icon="icons/plot.png"
            type="Actor">
    </entry>
  </group>
</extension>
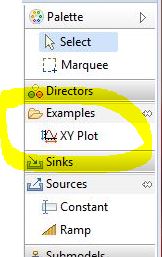
This creates an actor group called "Examples " with one entry, an actor called "XY Plot" with the given image file as icon, and implemented by the class we described above. In the editor palette this shows up as :
The MANIFEST is simply :
Manifest-Version: 1.0
Bundle-ManifestVersion: 2
Bundle-Name: Palette entry for XYPlotActor
Bundle-SymbolicName: org.eclipse.triquetrum.workflow.actor.plot.palette;singleton:=true
Bundle-Version: 1.0.0.qualifier
Require-Bundle: org.eclipse.triquetrum.workflow.editor;bundle-version="1.0.0"
Implementing an actor feature
Finally we need to provide a packaging feature. This is best achieved with a third project. Eclipse provides a dedicated feature project wizard that we can use to create this, in our case org.eclipse.triquetrum.workflow.actor.plot.feature .
Besides some meta-info, the main contents of the feature.xml are the plugins that should be packaged. In our plot example these are :
- org.eclipse.nebula.visualization.xygraph
- org.eclipse.triquetrum.workflow.actor.plot
- org.eclipse.triquetrum.workflow.actor.plot.palette
Optionally (but advisable) a feature.xml also allows you to specify prerequisite dependencies of your feature, i.e. things that should already be present in the RCP application where you want to add your feature. See the related Eclipse guides for more information on feature definitions.
Installing the feature in your workbench
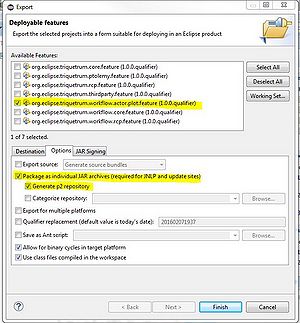
When the above is implemented, i.e. an actor bundle, the palette configuration and the feature definition, it is straightforward to provide an installable unit that can be uploaded e.g. in a Triquetrum RCP editor. The following steps are needed :
- Open the feature.xml editor on the Overview tab
- Select the Export Wizard link in the Exporting section
- Make sure your feature project is selected from the Available Features
- Choose 'Archive File' as Destination and specify its path and name
- In the Options tab, check the 'Package as individual JAR archives' and the 'Generate p2 repository' options.
- Do it!
Using an update site from a RCP project that has been launched from Eclipse is tricky. If the steps below do not work for you, then try downloading a prebuilt Triquetrum installation.
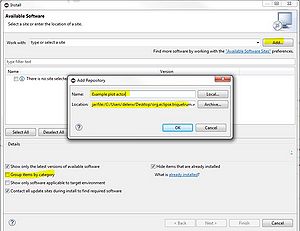
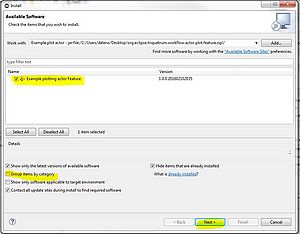
Then, in your Triquetrum RCP editor, go to the Help > Install New Software... menu and add your exported archive as repository.
You may need to uncheck the 'Group items by category' box, and then you should see your new actor feature!
From there on, follow the standard eclipse plugin installation steps in this wizard. After the requested restart, you should see your new actor in the editor palette, and you should be able to use it in your workflows!
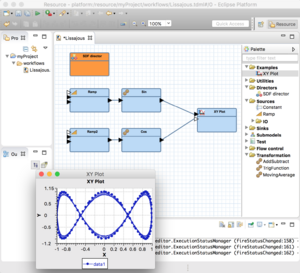
When the actor gets a sine and a cosine series at its X and Y inputs, a sample XY graph as below can be produced (an introduction to Lissajous curves can e.g. be found here):
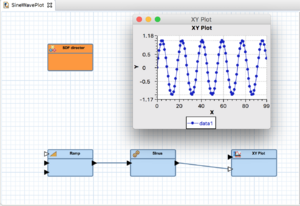
If you only connect the Y input, the actor creates a sequence plot, e.g. :

