Notice: This Wiki is now read only and edits are no longer possible. Please see: https://gitlab.eclipse.org/eclipsefdn/helpdesk/-/wikis/Wiki-shutdown-plan for the plan.
Teneo/Hibernate/GMF
This tutorial describes how the generated GMF editor can be adapted to operate on a relational database. Both the diagram data and the model data will be stored in the same relational database.
From the GMF website:
The Eclipse Graphical Modeling Framework (GMF) provides a generative component and runtime infrastructure for developing graphical editors based on EMF and GEF. The project aims to provide these components, in addition to exemplary tools for select domain models which illustrate its capabilities.
This tutorial shows you how to adapt the plugins from the GMF Mindmap Tutorial to operate on a relational database using Hibernate. The chosen approach is to make very small changes to the generated code and is not necessarily focused on an elegant or optimal solution.
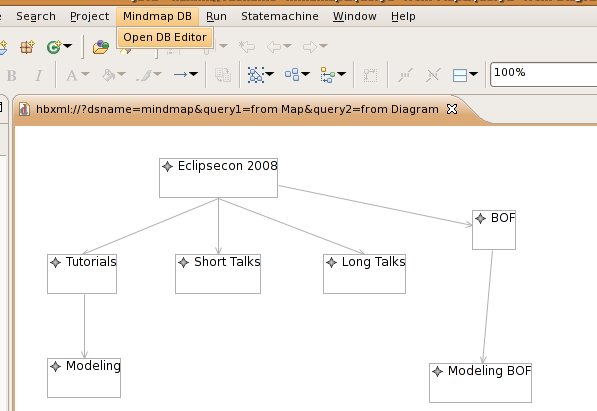
The result of this tutorial will be a displayed as a menu option in Eclipse which directly opens the editor on a relational database.
For additional information regarding GMF and Teneo (next to this tutorial), see the description provided in this bugzilla.
Initial Setup
This tutorial assumes that you have a running Eclipse with EMF and Teneo installed. In addition the Teneo dependencies (incl. HSQLDB and MySQL drivers) should be installed. See the Download & Install page for more information.
The tutorial uses hsqldb but it can easily be changed to use mysql or another database. For other databases than HSQLDB and MySQL you need to take make sure that the jdbc driver is in the classpath of the org.eclipse.gmf.examples.edit project.
For MySQL and other non-in-memory databases you have to create the database up-front (so not the tables inside the database but just the database itself). For this tutorial the database name should be: library.
Also GMF needs to be installed.
The GMF tutorial makes use of another set of example projects. These projects can be found in the gmf folder of the examples folder in CVS:
- dev.eclipse.org
- /cvsroot/modeling
- org.eclipse.emf/org.eclipse.emf.teneo/examples/gmf
Using console, you can checkout with:
cvs -d ':pserver:anonymous@dev.eclipse.org:/cvsroot/modeling' co org.eclipse.emf/org.eclipse.emf.teneo/examples/gmf
There are 3 projects:
- org.eclipse.gmf.examples.edit
- org.eclipse.gmf.examples.mindmap
- org.eclipse.gmf.examples.mindmap.diagram
Download all three projects into your workspace.
Adapting the generated mindmap plugins
This section describes how the generated mindmap code was adapted to facilitate the integration with Teneo. These changes have already been made in the projects you can download from CVS.
Setting dependendencies on Teneo and Hibernate
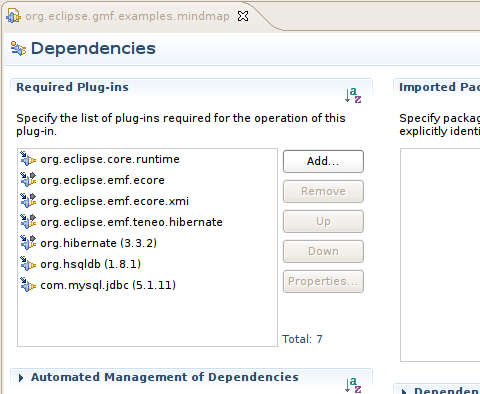
Additional dependencies have to be set in the org.eclipse.gmf.examples.mindmap MANIFEST.MF file:
Note: the additional dependencies have been re-exported for convenience.
Initialization of Teneo
The Teneo layer has to be activated when the diagram editor starts. Note that this code assumes that database has been created. This example uses mysql/hsqldb, replace the relevant options for your specific database.
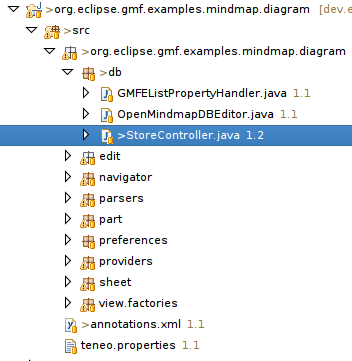
As a first step a new separate java package has been created in the org.eclipse.gmf.examples.mindmap.diagram plugin: org.eclipse.gmf.examples.mindmap.diagram.db. Three classes are present in this package (see the files in the ):
- StoreController: this class initializes and manages one Teneo datastore.
an annotations.xml file to map the GMF model to a relational store (download here). This file contains hints to Teneo on how to map the GMF model. It is required because the GMF model contains multiple-inheritance structures which can not be translated automatically to a relational store. See below for some more information.
- a specific EList property handler: this is to solve a minor technical detail with the GMF generated code and the GMF model, see here for more details.
- OpenbMindmapDBEditor: implements the menu choice to open a mindmap editor.
Then in the root of the src folder, 2 files are of importance:
- teneo.properties: contains hibernate and teneo properties. This file contains database connection information which probably has to be adapted to your specific case.
- annotations.xml: there are a number of GMF types (ShapeStyle, DiagramStyle and ConnectorStyle) which inherit from multiple other GMF types as well as the EMF EObject type. The EObject type is listed as the first supertype of these types. This means that Teneo will place these types in the EObject type hierarchy when mapping to a relational store. This will not work as for GMF these types are primarily subtypes of Style. The annotations.xml file in this tutorial ensures that the mentioned Style types are placed in the correct hierarchy (in the relational model).
Both the annotations.xml and teneo.properties file must be checked/flagged in the build.properties file so that they are copied to the build folder. To be sure check the contents of the build folder to ensure that these files are present.
StoreController: initializing the Teneo layer
The StoreController class initializes the Teneo layer using the properties in the teneo.properties file.
The class starts with a declaration of the URI to connect to the database:
public static final URI DATABASE_URI = URI.createURI("hbxml://?dsname=mindmap&query1=from Map&query2=from Diagram");
This uri has some specific parts: 1) the dsname parameter is the name of datastore (see below), 2) the queries in the uri ensure that the resource loads the Mindmap Map and the GMF Diagram as roots in the resource. The uri starts with hbxml to ensure that the HibernateXMLResource is used.
The next piece of code can be found in the initializeDataStore method:
// create and register the datastore using the mindmap name
final HbSessionDataStore localDataStore = new HbSessionDataStore();
localDataStore.setName("mindmap");
HbHelper.INSTANCE.register(localDataStore);
This code creates a datastore and registers it in the global datastore registry. There the HibernateXMLResource can find it using the dsname parameter and its value: mindmap.
A number of EPackages have to be registered with Teneo to persist the mindmap data as well as the GMF diagram data:
// now register the epackages. There are four epackages:
// 1) the model itself
// 2) the GMF model
// 3) the ecore model because GMF depends on it
// 4) and the ecore XML type package
final EPackage[] ePackages = new EPackage[] { MindmapPackage.eINSTANCE,
		NotationPackage.eINSTANCE, EcorePackage.eINSTANCE,
		XMLTypePackage.eINSTANCE };
localDataStore.setEPackages(ePackages);
The following code loads the teneo.properties and directs Teneo to use the annotations.xml file to influence the mapping to the relational model:
final Properties props = new Properties();
props.load(this.getClass().getResourceAsStream("teneo.properties"));

// handle multiple inheritance in the GMF model
props.setProperty(PersistenceOptions.PERSISTENCE_XML,
		"annotations.xml");

localDataStore.setProperties(props);
Note that it is possible that the annotations.xml and teneo.properties file are not found. In that case you can try to put them in the root of the source tree and let the build process copy them from there. In that case the references to these names in the source code have to be changed to resp. "/teneo.properties" and "/annotations.xml".
In GMF there is a difference between the generated code and the in-memory model. Teneo can not handle this out of the box and requires a different property handler (the GMFEListPropertyHandler from above) to handle this correctly. The following code registers this property handler using the Teneo extension mechanism (see here for more info on Teneo extensions).
// solve a specific issue with the GMF model
localDataStore.getExtensionManager().registerExtension(
		EListPropertyHandler.class.getName(),
		GMFEListPropertyHandler.class.getName());
As a last step the actual Teneo initialization has to take place. This step will also create the database tables.
localDataStore.initialize();
// print the hibernate mapping
System.err.println(localDataStore.getMappingXML());
The StoreController class will initialize the Teneo layer when it is used for the first time.
Initialize Teneo when plugin starts
To initialize Teneo when the diagram plugin starts add the following code to the start method of the generated MindmapDiagramEditorPlugin: StoreController.getInstance().initializeDataStore(). To stop the Teneo layer when the plugin stops, add this to the stop method: StoreController.getInstance().closeDataStore.
Change MindmapDiagramEditor
In this step of the tutorial the generated editor class will be changed to accomodate for a database resource. This editor is made available as a menu option in the main Eclipse window.
The generated MindmapDiagramEditor can be found in the org.eclipse.gmf.examples.mindmap.diagram.part package. The changes are required because the generated editor assumes that the information (resources) is stored in files. This assumption results in the following issues when directly using database resources:
GMF checks if the file containing the data exists in the workspace, for a database resource this will not work and always result in a save-as dialog. GMF will consider the database uri as a read-only uri as it is not a standard platform uri. To overcome these issue the following code has to be added to the MindmapDiagramEditor:
@Override
// register the resource as not being readonly
public void setInput(IEditorInput input) {
	// this part is copied from the super.setInput because
	// the catch block was hiding the underlying exception
	// for now a printStackTrace is added for better visibility
	// this should ofcourse be replaced by logging
	try {
		doSetInput(input, true);
	} catch (CoreException x) {
		x.printStackTrace(System.err);
		String title = x.getMessage();
		String msg = x.getMessage();
		Shell shell = getSite().getShell();
		ErrorDialog.openError(shell, title, msg, x.getStatus());
	}

	// set the resource in the resourcetoreadonly map
	final ResourceSet rs = getEditingDomain().getResourceSet();
	for (Resource res : rs.getResources()) {
		((AdapterFactoryEditingDomain) getEditingDomain())
				.getResourceToReadOnlyMap().put(res, new Boolean(false));
	}
}

@Override
// implement a more simple save as there are no save-as dialogs involved
public void doSave(IProgressMonitor progressMonitor) {
	updateState(getEditorInput());
	validateState(getEditorInput());
	performSave(false, progressMonitor);
}
Open editor action
Then the next step is to actually open the editor directly without going through a open file dialog.
For this you can use the OpenMindmapDBEditor.java which can be downloaded here. This class is fairly simple, the relevant code is:
initializeData();
final IWorkbenchPage page = window.getActivePage();
page.openEditor(new URIEditorInput(StoreController.DATABASE_URI),
		MindmapDiagramEditor.ID);
The initializeData call is to a method (see the source file) which makes sure that there is at least one Map and Diagram instance in the db. This is required by the editor.
The most relevant part is opening the generated MindmapDiagramEditor using the Database Uri.
To make this ActionDelegate available as a global Eclipse menu option the following has to be added to the plugin.xml of the gmf diagram project (just before the closing plugin tag):
<!--
Adds a global menu, note is a rather simplistic method of adding a global menu option (is always visible).
-->
<extension
   id="mindmap.gmf.editor.actions"
   point="org.eclipse.ui.actionSets">
	<actionSet
      id="mindmap.gmf.editor.actions"
      label="Mindmap DB"
      visible="true">
	   	<menu
	         id="mmMenu"
	         label="Mindmap DB">
	      		<separator name="mmgroup">
	      		</separator>
   		</menu>
   		<action
			 id="mindmap.teneo.gmf.action0"
			label="Open DB Editor"
			menubarPath="mmMenu/mmgroup"
			style="push">
	      		<class class="org.eclipse.gmf.examples.mindmap.diagram.db.OpenMindmapDBEditor">
	      		</class>
   		</action>
	</actionSet>
</extension>
Running the mindmap editor
To run the diagram start a second workbench. The second workbench should show a menu popup as displayed in the image.
Select this option and the diagram editor should open and allow you to maintain the diagram.
Hibernate XML Resource
This tutorial makes use of a specific implementation of EMF resource for Hibernate, nl. the HibernateXMLResource. For more information regarding the use of this type of resource see here.
Possible issues
If you get this exception then you did not set the Eclipse-BuddyPolicy in the plugin containing the Hibernate libraries (see here):
org.hibernate.MappingException: Could not determine type for:
	org.eclipse.emf.teneo.hibernate.mapping.econtainer.EContainerUserType, for columns: [org.hibernate.mapping.Column(econtainer_class), org.hibernate.mapping.Column(e_container)]
at org.hibernate.mapping.SimpleValue.getType(SimpleValue.java:266)
at org.hibernate.mapping.SimpleValue.isValid(SimpleValue.java:253)
at org.hibernate.mapping.Property.isValid(Property.java:185)


