Notice: This Wiki is now read only and edits are no longer possible. Please see: https://gitlab.eclipse.org/eclipsefdn/helpdesk/-/wikis/Wiki-shutdown-plan for the plan.
STP/BPMN Component/STP BPMN Presentation (Part 3)
- Quick access
STP BPMN Presentation (Part 1)
STP BPMN Presentation (Part 2)
STP BPMN Presentation (Part 3)
Reusing the modeler
- Introduction to the annotation system
This topic explains how to add to the bpmn diagram custom data. It also describes how to display and interact with that custom data.
The reader should be familiar with the Eclipse Modeling Framework (EMF) and in some cases the Graphical Modeling Framework (GMF) and the Graphical Editing Framework (GEF).
Every element of the domain model of the stp.bpmn modeler is an EMF EModelElement. This means that it can be attached arbitrary annotations.
Here are various techniques to use that ability.
- Displaying the value of the Annotation
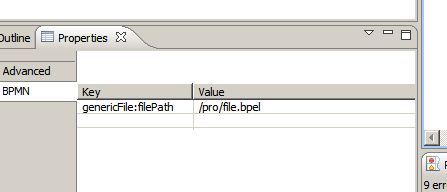
By default the EAnnotations added to the bpmn objects are displayed in the properties view inside the 'BPMN' tabulation.
EAnnotations are tied to their EModelElement through the source property which is a String. EAnnotations contain a HashMap of Strings to Strings.
The BPMN properties view display a table with two columns: The first column is the source of the EAnnotation concatenated to the key of the Details HashMap.
The second column is the value of the Details HashMap. You can edit this value and it will mark the editor dirty.
- Displaying the Annotation on the Diagram
Once the model has annotations it is possible to display in the diagram that the model element associated to a particular shape or connection has been annotated. In order to do this, we have implemented an extension point: org.eclipse.stp.bpmn.diagram.EAnnotationDecorator. You can have a look at it here.
The EAnnotation decorator extension point register a decorator for an annotation source. It then instanciates the IEAnnotation class declared in the extension point.
See this interface that the extension point class must implement.
- Annotating the elements: Drag and Drop
It is possible to drag and drop things to attach annotations to the shapes. Use the extension point: org.eclipse.stp.bpmn.diagram.EAnnotationDragAndDrop.
You will have to declare a IGenericEAnnotationDndHandler instance in your extension point that will provide callback method when the drop edit policy on the shape is asked for a command. The javadoc is pretty much explicit there. However, when coding the doPerformDrop method, you will have to use the GMF and GEF standards on the context handling. You are in a read-only context in this case, so you should add commands to the CompoundCommand that is given to you in parameter. If those commands are found to be non-executable, the drop will be canceled. The implementation of the extension point will define if the drop can execute and will show feedback in a balloon figure.
The object dragged must be an EAnnotation, or being able to be adapted into an EAnnotation through an AdapterFactory.
- More on the drag and drop extensibility
A simple implementation is provided in the org.eclipse.stp.bpmn.diagram plugin. See the file drop example.
- More than one choice
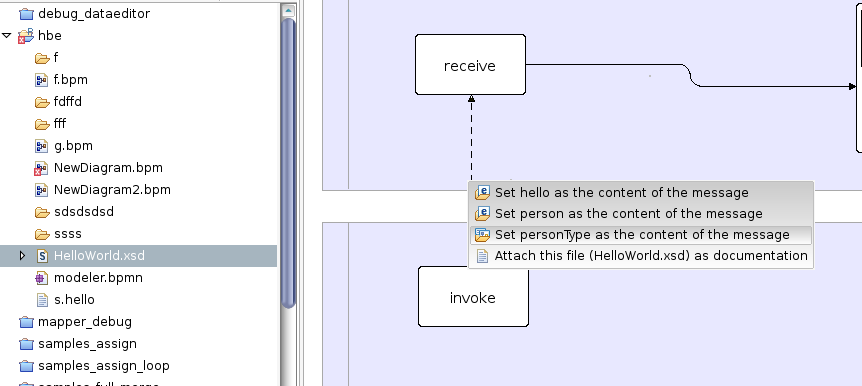
It might arrive that you can choose between different annotations to drop. In that case, a popup menu shows so that you can choose easily the annotation you want to drop:
- Other needs
The hardcore way to customize the editor consist of making your own BPMN Editor with its own EditPart factory. All you need to do is extend the stp.bpmn Editor and EditPartFactory.
We have made many packages public for now.
Also GMF validation services are very useful when adding extra rules are to analyze the code.
As we identify implementation of those services that are specialized to the stp.bpmn model they will be exposed as extension points.


