Notice: This Wiki is now read only and edits are no longer possible. Please see: https://gitlab.eclipse.org/eclipsefdn/helpdesk/-/wikis/Wiki-shutdown-plan for the plan.
SMILA/Documentation/HowTo/How to setup SMILA in a cluster
Contents
Introduction
SMILA is primarily thought of as a framework where you can plug in your own or third-party high-performant/high-scalable components (e.g. for data storage). Nevertheless, it is also possible to set up SMILA out-of-the-box on a cluster by using its default implementations. This permits horizontal scaling having the effect that importing and processing jobs/tasks will be shared across the cluster nodes. (Remark: We also have a vertical scaling on each cluster machine, but this is not new, because you also have this with a single-node SMILA.)
The following steps describe how to set up SMILA on multiple cluster nodes.
Install SolrCloud server
If you want to use Solr for indexing, you need to set up a separate Solr server, because the Solr instances embedded in SMILA cannot be shared with the other SMILA instances. We recommend using a SolrCloud setup. See the Solr documentation for setting up a SolrCloud on multiple servers.
Single node server
For example purposes you can easily setup a SolrCloud system on a single node:
- Download a Solr 4 archive from http://lucene.apache.org/solr/. This HowTo was tested with Solr v. 4.10.1 on Linux.
- Unpack the archive to a local directory; you will get a directory like /home/smila/solr/apache-solr-4.10.1.
- Start Solr in cloud example mode:
bin/solr -e cloud
- Answer the questions, for now the default values are fine.
- Check if Solr is running at http://localhost:8983/solr (replace localhost with the name of your Solr server, if necessary).
- Upload the Solr configuration files from SMILA to your SolrCloud (replace <SMILA> with your SMILA directory):
cd node1/scripts/cloud-scripts
zkcli.sh -cmd upconfig -zkhost 127.0.0.1:9983 -d <SMILA>/configuration/org.eclipse.smila.solr/solr_home/collection1/conf -n smila
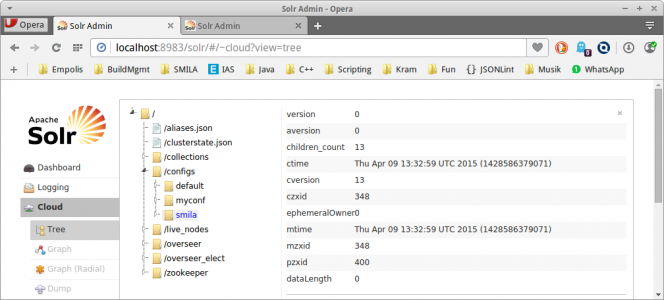
- In http://localhost:8983/solr/#/~cloud?view=tree you should now see a "smila" entry in the tree under "configs":
- Create a new core in your SolrCloud for use with SMILA: Do a HTTP POST request like this (e.g. using "curl -X POST ..." or your favorite ReST client in your favorite browser):
POST http://localhost:8983/solr/admin/collections?action=CREATE&name=smila&replicationFactor=2&numShards=2&collection.configName=smila&maxShardsPerNode=2&wt=json&indent=2
-->
{
  "responseHeader":{
    "status":0,
    "QTime":3640},
  "success":{
    "":{
      "responseHeader":{
        "status":0,
        "QTime":2533},
      "core":"smila_shard1_replica2"},
    "":{
      "responseHeader":{
        "status":0,
        "QTime":2950},
      "core":"smila_shard2_replica2"},
    "":{
      "responseHeader":{
        "status":0,
        "QTime":3332},
      "core":"smila_shard2_replica1"},
    "":{
      "responseHeader":{
        "status":0,
        "QTime":3486},
      "core":"smila_shard1_replica1"}}}
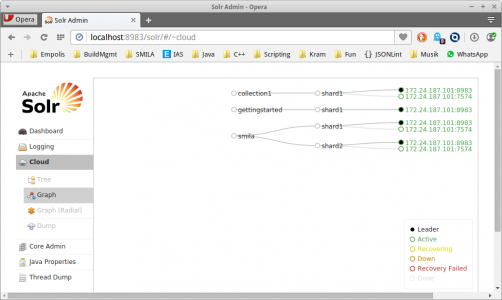
- You should see the new core "smila" in http://localhost:8983/solr/#/~cloud:
Distributed server
For larger data volumes you will need to set up Solr in a distributed way, too. However, using a distributed Solr setup is not yet fully supported by the SMILA integration (especially during indexing).
Configuring SMILA on cluster nodes
On each cluster node, you have to do the following SMILA configuration changes.
Cluster configuration
You have to define which nodes belong to the cluster.
Configuration file:SMILA/configuration/org.eclipse.smila.clusterconfig.simple/clusterconfig.json
Enter new section "clusterNodes" stating the host names of the individual cluster nodes:
{
  "clusterNodes": ["PC-1", "PC-2", "PC-3"],
  "taskmanager":{
  ...
}
Objectstore configuration
You have to define a shared data directory for all nodes ("shared" means that the selected directory must be accessbile from every machine in your cluster under the same path).
Configuration file:SMILA/configuration/org.eclipse.smila.objectstore.filesystem/objectstoreservice.properties
(Directory/File will not exist in older SMILA versions - just create it).
Set a root path to the shared directory:
...
root.path=/data/smila/shared
...
Solr configuration
You have to point to the Solr server that we installed above.
Edit configuration file:SMILA/configuration/org.eclipse.smila.solr/solr-config.json
- set "mode" to "cloud"
- set idField for the Solr core "smila" to "_recordid"
- enter name of host running the SolrCloud server
Your file should look something like this, if SMILA is running on the same machines as Solr (otherwise change all appearances of "localhost" to the name of a Solr server):
{
    "mode":"cloud",
    "idFields":{
        "smila":"_recordid"
    },
    "restUri":"http://localhost:8983/solr/",
    "ResponseParser.fetchFacetFieldType":"false",
    "CloudSolrServer.zkHost":"localhost:9983",
    "CloudSolrServer.updatesToLeaders":"true",
    "EmbeddedSolrServer.solrHome":"configuration/org.eclipse.smila.solr/solr_home",
    "HttpSolrServer.baseUrl":"http://localhost:8983/solr"
}
Jetty configuration
To monitor the cluster node, you have to make the SMILA HTTP server accessible from external.
File:SMILA/SMILA.ini
 ...
 -Djetty.host=0.0.0.0
 ...
See also Enabling Remote Access to SMILA
Monitoring
You can use the REST API to monitor SMILA cluster activities.
Startup
After having started SMILA, accessing http://<CLUSTER-NODE>:8080/smila should return the configured cluster nodes in the response:
...
cluster: {
  nodes: [
    "PC-1",
    "PC-2",
    "PC-3"
  ]
}
...
Running jobs
Before starting index import jobs, make sure that they are adding their records to Solr core "smila": In <SMILA>/configuration/org.eclipse.smila.scripting/js check the configurations of org.eclipse.smila.solr.update.SolrUpdatePipelet instances and ensure that "indexname" is "smila", e.g. in add.js check this part:
var solrIndexPipelet = pipelets.create("org.eclipse.smila.solr.update.SolrUpdatePipelet", {
  "indexname" : "smila",
  ...
}
Now you can start the crawl and index-update jobs just like in the SMILA/5_Minutes_Tutorial.
After having started a job run, you can check the number of tasks that are currently being processed on each node in ZooKeeper's state at http://<CLUSTER-NODE>:8080/smila/tasks. You can count the inprogress tasks under http://<CLUSTER-NODE>:8080/smila/tasks, which is the number of tasks currently processed in the whole cluster. This number can be compared with the maxScaleUp setting for a worker in the clusterconfig.json which is the max. number of tasks allowed to be processed on one node. (see also Taskmanager REST API).
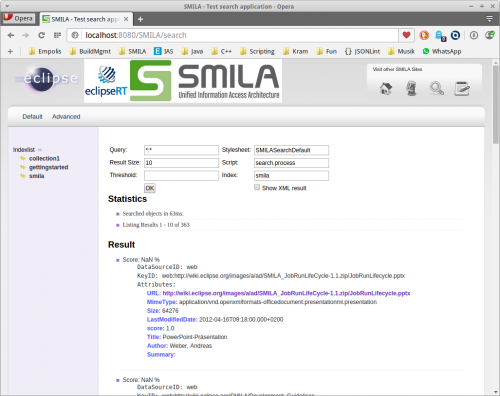
Finally, you should now be able to use the SMILA search page at http://localhost:8080/SMILA/search. In the "Indexlist" on the left side select index "smila" (the other indexes will not work because they don't have the necessary fields):


