Notice: This Wiki is now read only and edits are no longer possible. Please see: https://gitlab.eclipse.org/eclipsefdn/helpdesk/-/wikis/Wiki-shutdown-plan for the plan.
Gemini/Web
Gemini Web is a subproject of the Gemini project.
Gemini Web is a sister project of Virgo. Please refer to the Virgo wiki for salient information.
Contents
Trying out Gemini Web
1. Download the Equinox JAR, and move it to a suitable directory (e.g. ~/gemini-web-test). On the Download page first choose the Release for the appropriate Gemini Web version, then download the JAR from the Framework section.
  a. Gemini Web 1.1.x - for example org.eclipse.osgi_3.6.0.v20100517.jar
  b. Gemini Web 2.0.x, 2.1.x - for example org.eclipse.osgi_3.7.1.R37x_v20110808-1106.jar
  c. Gemini Web 2.2.x - for example org.eclipse.osgi_3.8.1.v20120830-144521.jar
  d. Gemini Web 3.0.x - for example org.eclipse.osgi_3.10.100.v20150529-1857.jar
2. Download Gemini Web and unzip it to ~/gemini-web-test/gemini-web.
3. Configure Equinox by creating a directory ~/gemini-web-test/configuration
  a. Gemini Web 1.1.x - Create files config.ini and Java6-server.profile in the configuration directory. Example files which works with 1.1.0.RELEASE are available in config.ini.zip and Java6-server.profile.zip.
  b. Gemini Web 2.0.x - Create file config.ini in the configuration directory. Example file which works with 2.0.1.RELEASE is available in config.ini.zip.
  c. Gemini Web 2.1.x - Create file config.ini in the configuration directory. Example file which works with 2.1.0.RELEASE is available in config.ini.zip.
  d. Gemini Web 2.2.x - Create file config.ini in the configuration directory. Example file which works with 2.2.0.RELEASE is available in config.ini.zip
  e. Gemini Web 3.0.x - Create file config.ini in the configuration directory. Example file which works with 3.0.0.RELEASE is available in config.ini.zip
Essentially config.ini ensures that Java6-server.profile is used and that the dependencies of Gemini Web, which come in the dep directory, are installed and then the Gemini Web bundles are installed and started. Java6-server.profile ensures that javax.xml.ws is exported at version 2.1.1 from the system bundle as the Tomcat bundles in Gemini Web depend on that version.
4. Start Equinox as follows:
  a. Gemini Web 1.1.x
     java -jar org.eclipse.osgi_3.6.0.v20100517.jar -console
  b. Gemini Web 2.0.x, 2.1.x
     java -jar org.eclipse.osgi_3.7.1.R37x_v20110808-1106.jar -console
  c. Gemini Web 2.2.x
     java -jar org.eclipse.osgi_3.8.1.v20120830-144521.jar
  d. Gemini Web 3.0.x
     java -jar org.eclipse.osgi_3.10.100.v20150529-1857.jar
5. You can then deploy WAR files (a trivial example is available in Osgi.web.app.zip) and web bundles using the install and start commands from the console. Refer to the documentation for more information.
osgi> install file:osgi.web.app.war
Bundle id is 42
osgi> start 42
6. Drive the WAR or web bundle using a web browser, e.g. http://localhost:8080/osgi-web-app.
Set as a Target Platform in PDE
The following steps enable you to develop Web Application Bundles that compile against the libraries of the Gemini Web container by using the existing Plug-in Development Environment (PDE) tooling in Eclipse.
- Open Window > Preferences from the main menu in the Eclipse IDE.
- Navigate to the Plug-in Development > Target Platform preferences page.
- Click the Add... button.
- Choose Nothing: start with an empty target definition and click Next >
- Give a Name for the new target definition (like "Gemini Web").
- Make sure the Locations tab is the active one and click the Add... button.
- Gemini Web 1.1.x
- Choose Directory and press the Next > button.
- Browse to the ~/gemini-web-test folder and click the Finish button.
- Repeat steps 7.1-7.3 to add the ~/gemini-web-test/gemini-web and ~/gemini-web-test/gemini-web/dep folders to the target definition.
- Gemini Web 2.0.x, 2.1.x, 2.2.x, 3.0.x
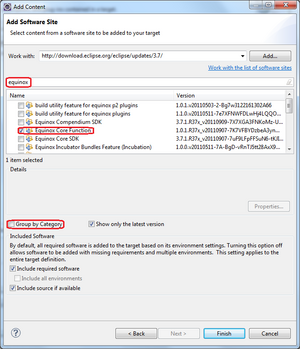
- Choose Software Site and press the Next > button.
- In Work with: field paste Eclipse update site link:
- In the filter field, type equinox.
- Make sure that the option Group by Category is unchecked.
- From the list with available items, choose Equinox Core Function. Click the Finish button.
- Click on the Content tab, deselect all bundles and then select only org.eclipse.osgi.
- Make sure the Locations tab is the active again and click the Add... button.
- Choose Software Site and press the Next > button.
- In Work with: field paste Gemini Web update site link
- Gemini Web 2.0.x - http://download.eclipse.org/gemini/updates/web/2.0.1/.
- Gemini Web 2.1.x - http://download.eclipse.org/gemini/updates/web/2.1.0/.
- Gemini Web 2.2.x - http://download.eclipse.org/gemini/updates/web/2.2.0/.
- Gemini Web 3.0.x - http://download.eclipse.org/gemini/updates/web/3.0.0/.
- Make sure that this time the option Group by Category is checked.
- From the list with available items, choose Eclipse Gemini Web. Click the Finish button.
- Click the Finish button to close the New Target Definition wizard.
- Select the newly created target definition and click the OK button to activate it for you PDE environment.
Run as OSGi Framework from the Eclipse IDE
The following steps enable you to deploy and run the Web Application Bundles in your Eclipse workspace on the Gemini Web container.
- Make sure you have set the Gemini Web container as a target platform as described in the previous section.
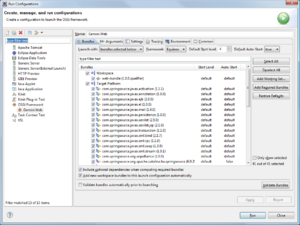
- Open Run > Run Configurations... from the main menu of the Eclipse IDE.
- Navigate to the OSGi Framework category.
- Right-click > New.
- Give a Name for you run configuration (like "Gemini Web").
- Open the Bundles tab.
- Make sure all of the bundles under the Target Platform node are selected.
- Select the bundles from the Workspace you want to deploy in the Gemini Web container.
- Gemini Web 1.1.x
- Switch to the Arguments tab.
- Add the following system property to the VM arguments: -Dosgi.java.profile=file:configuration/java6-server.profile
- Select the Other radio button in the Working directory group and specify the path to the ~/gemini-web-test folder.
- Switch to the Settings tab.
- Deselect the Use default location check box in the Configuration Area group.
- Specify the path to the ~/gemini-web-test/configuration folder in the Location text field.
- Gemini Web 2.0.x and above - no additional changes needed.
- Click the Run button.
You will see some logs dumped in the Console view. After a second the Gemini Web container is started and the Web Application Bundles from the workspace are deployed. You can now call you application from the browser using URLs like:
http://localhost:8080/<context-root>/...
The above steps are needed only for the first run of Gemini Web. Any subsequent runs can be executed much simpler:
- Right-click your Web Application Bundle project and call Run As > OSGi Framework. That's all.
How to stop Gemini Web?
The safest way to stop Gemini Web is to type close in the Console view and hit Enter.
You need to stop any old instance of Gemini Web before starting it again. Otherwise, the new instance won't start correctly, because the old one still occupies the http port (and, perhaps, other system resources).
How to run in debug mode?
Running in debug mode is done simply by:
- Right-click your Web Application Bundle project and call Debug As > OSGi Framework. That's all.
You will get all debug features (including hot code replace) from JDT and PDE for free.
Limitations
Gemini Web is a designed to be an application server component rather than a fully-functional application server. As such it has some limitations:
- Some resources are not available by URL (see bug 325578). Virgo, for example, works around this by installing an Equinox hook to ensure that all resource URLs returned have a "file:" protocol and not a "bundleresource:" protocol which is the default returned by Equinox.


