Notice: This Wiki is now read only and edits are no longer possible. Please see: https://gitlab.eclipse.org/eclipsefdn/helpdesk/-/wikis/Wiki-shutdown-plan for the plan.
EclipseLink/Examples/MOXy/NativeOxmJaxbContext
Contents
Overview
The following example will demonstrate how to use EclipseLink to:
- Use the EclipseLink Workbench to map Java classes to an XML Schema
- Unmarshal an XML Document using JAXB APIs
- Modify the XML data
- Marshal the modified data to XML
In this example, we will be mapping pre-existing Java classes to a pre-existing XML Schema. After the proper configuration, EclipseLink's native OXM support will allow us to use JAXB APIs to manipulate XML data.
This example also demonstrates an interesting use case: mapping Java objects to an XML schema when the two do not exactly line up. For instance, our Address object contains "province" and "postalCode" attributes, whereas our XML schema defines "state" and "zipCode" elements. Using EclipseLink's flexible XML mappings, we can specify exactly which XML element each Java attribute maps to.
Setup
- Ensure that you have EclipseLink correctly installed and configured for your environment. Please see EclipseLink/Installing and Configuring EclipseLink for more information.
- Ensure that you have ANT correctly installed and configured.
- Unzip the Example ZIP file to a new directory.
- Edit the env.properties file in the root directory of the example and specify the path to your EclipseLink jlib directory:
...
# Edit eclipselink.jlib to point to your EclipseLink jlib directory
eclipselink.jlib=C:/EclipseLink-1.0/eclipselink/jlib
...
You can compile and run the Example at any time by typing ant from the Example directory.
For Eclipse IDE users, a .project file is included in the Example directory. To setup this project in Eclipse:
- From the "File" menu, choose "Import..."
- In the Import dialog, choose "General > Existing Projects into Workspace", and click "Next".
- Click "Browse" to select a root directory, and point to the folder containing this example. After selecting the directory, you should see the project name in the "Projects" list. Click "Finish".
This project is configured to use a classpath variable, ECLIPSELINK_JLIB, to point to the required JAR files. After the project is imported, you should define a variable called ECLIPSELINK_JLIB to point to your EclipseLink jlib directory.
Configuring EclipseLink Mappings
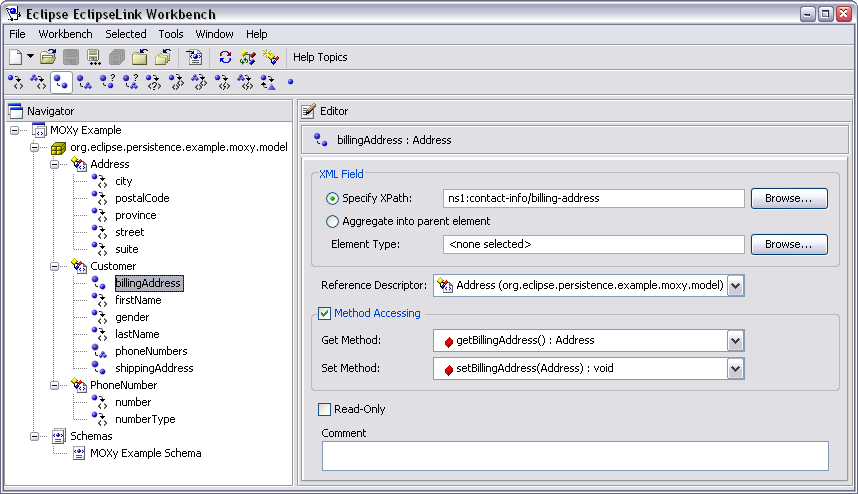
The first component to examine is the EclipseLink Workbench, which is used to specify the mappings between our Java objects and an XML schema. The Workbench project file for this example can be found in the workbench subdirectory.
By inspecting the Java classes in the Navigator, we can see how classes are associated with schema types (e.g. (Java) Address -> (XML) address-type), and Java attributes are associated with XML elements and attributes (e.g. (Java) province -> (XML) state/text()).
Instructions for specifying these mappings are beyond the scope of this article, for more information see Using Workbench (ELUG).
Creating the Sessions Configuration file
Each EclipseLink session is contained within a sessions configuration (sessions.xml) file. You can create a sessions configuration using the Workbench or Java code. There are two vital pieces of information to capture:
- The name of the session - This name must correspond to the context path you wish to use when creating the JAXBContent.
- The location of your mapping metadata.
<?xml version="1.0" encoding="UTF-8"?>
<sessions version="1.0" xmlns:xsd="http://www.w3.org/2001/XMLSchema" xmlns:xsi="http://www.w3.org/2001/XMLSchema-instance">
   <session xsi:type="database-session">
      <name>org.eclipse.persistence.example.moxy.model</name>
      <event-listener-classes/>
      <logging xsi:type="eclipselink-log"/>
      <primary-project xsi:type="xml">Customer-deployment.xml</primary-project>
      <login xsi:type="xml-login"/>
   </session>
</sessions>
See Creating a Session (ELUG) in the EclipseLink User Guide for complete information.
Creating a JAXBContext using jaxb.properties
The standard way to specify which JAXB implementation should be used is through a file called jaxb.properties, which contains a single property, javax.xml.bind.context.factory. This file must be available on the classpath in the corresponding package (in this example, "org.eclipse.persistence.example.moxy.model"). To specify that the EclipseLink JAXB implementation should be used, your jaxb.properties file should have the following content:
javax.xml.bind.context.factory=org.eclipse.persistence.jaxb.JAXBContextFactory
In our example, we create the JAXBContext as follows:
JAXBContext jaxbContext = JAXBContext.newInstance("org.eclipse.persistence.example.moxy.model");
Unmarshalling the XML Document
With a JAXBContext created, we can now unmarshal an XML document using the statically generated classes:
File file = new File("Customer-data.xml");
Unmarshaller unmarshaller = jaxbContext.createUnmarshaller();
Customer customer = (Customer) unmarshaller.unmarshal(file);
Modifying the Objects
Below are examples of manipulating the XML data using our pre-existing model classes.
Modifying the ShippingAddress ZipCode :
customer.getShippingAddress().setPostalCode("27601");
Adding a new PhoneNumber :
PhoneNumber homePhoneNumber = new PhoneNumber();
homePhoneNumber.setNumberType("home");
homePhoneNumber.setNumber("(613) 555-3333");
customer.getPhoneNumbers().add(homePhoneNumber);
Removing all "cell" PhoneNumbers :
ArrayList phoneNumbersToRemove = new ArrayList();
List phoneNumbers = customer.getPhoneNumbers();
Iterator it = phoneNumbers.iterator();
while (it.hasNext()) {
   PhoneNumber phoneNumber = (PhoneNumber) it.next();
   if (phoneNumber.getNumberType().equals("cell")) {
      phoneNumbersToRemove.add(phoneNumber);
   }
}
phoneNumbers.removeAll(phoneNumbersToRemove);
Marshalling the Objects to XML
The following code segment demonstrates how to marshal Customer objects back to XML. In this example the stream we are saving to is System.out, so the XML text will be printed to the console.
Marshaller marshaller = jaxbContext.createMarshaller();
marshaller.setProperty(Marshaller.JAXB_FORMATTED_OUTPUT, Boolean.TRUE);
marshaller.marshal(customer, System.out);
Download
Download the "Examples Zip" from the EclipseLink Downloads page. Code for this example will be found in the org.eclipse.persistence.example.moxy.zip file.

