Notice: This Wiki is now read only and edits are no longer possible. Please see: https://gitlab.eclipse.org/eclipsefdn/helpdesk/-/wikis/Wiki-shutdown-plan for the plan.
EMF/Setting up a development environment
This document describes how to set up a development environment suitable for working on the EMF, SDO and XSD components. It is also an interesting setup for working on components that depend on EMF/SDO/XSD, like EMFT components. It is not intended for people who just want to use these tools: the target audience are those who want to contribute to their development by adding features, fixing bugs, etc.
We assume some familiarity with CVS concepts and some experience working with the Eclipse workbench.
Experienced EMF & CVS users may want to skip to Using Team Project Set File (.psf).
Contents
- 1 Intricacies of working on EMF components
- 2 Software Environment
- 3 Setting up the Eclipse Workspace
- 4 Understanding the CVS Structure
- 5 Checking Out Code as an Anonymous User
- 6 Checking Out Code
- 7 Resolving Dependency Problems
- 8 Synchronizing your Local Sandbox with the HEAD Branch
- 9 Developing on Eclipse 3.4
- 10 More Info
Intricacies of working on EMF components
This section discusses some special considerations that need to be taken into account when working on EMF tools.
Workbench instances and workspaces
In order to discuss the intricacies of working on EMF, some definitions are in order:
- An Eclipse platform installation is a location on your disk that contains a distribution of the Eclipse IDE. When you unpack an Eclipse distribution to a location on your disk, you effectively create a local platform installation at that location. The installation contains a set of tools that were packaged together by the organization that created the distribution. Each of the tools in the platform installation contributes some functionality to the IDE. You may have several platform installations on your machine, each of which may contain a different set of tools.
- An Eclipse workbench instance is a runtime instance of the IDE. Every time you launch the Eclipse IDE, a workbench instance is created, making the tools in the platform installation from which the instance was loaded available for use.
- An Eclipse workspace is a location on your disk that is associated with a running workbench instance. It contains the resources (files, folders, etc.) that comprise the projects you work on. The tools contained in the platform installation from which the workbench instance was launched can be used to work with the projects in the workspace. Each workbench instance has exclusive access to its associated workspace: concurrently running workbench instances can not share the same workspace.
Developing eclipse tools
The Eclipse IDE can be used to develop new tools for itself. In such a scenario, you use your platform installation to launch a workbench instance and then create in its workspace projects that implement new tools for the platform.
Assume you've just created a new tool and want to test it. Your running workbench instance only has the tools of the platform installation from which it was launched available. In order to test the new tools you must launch a new workbench instance, in which the newly developed plug-ins from your workspace are included. You have two options:
- Create a platform installation to which you add the tools from your workspace. Then you may launch a new workbench instance from that installation, which will have your new tools available for testing. It is typical to exit a workbench instance, update the platform installation used to launch it with the newly created/updated tools from your workspace and then launch a new workbench instance.
- Create a launch configuration that will launch special nested workbench instance from within the workbench instance used to develop the new tools. Eclipse has the capability of launching nested workbench instances that have both the tools from a platform installation as well as those in the workbench instance's workspace.
The second option is more convenient, because you don't have to package your tools, update the platform installation and re-launch it. In addition, it allows you to easily set breakpoints in the source code of your tools and debug them, stepping through the code as needed.
The notorious bug 109137
Although the most convenient approach towards developing and testing new tools is to use a nested workbench instance, a known limitation of Eclipse (filed as bug #109137) prevents one from doing so. This section is a brief discussion of the situation. If you would like to learn more details, read through the bug report and take a look at this thread of the EMF newsgroup.
The basic problem facing EMF developers is that EMF is both an Eclipse tool, as well as runtime library. As an IDE tool, EMF can (for example) be used to generate code from an Ecore model. You may then use the generated model code in your applications.
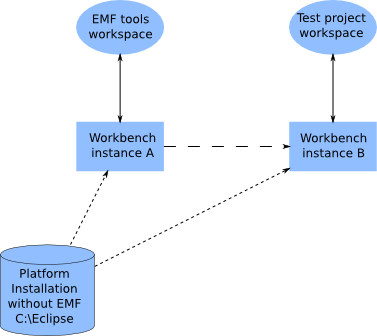
One would expect that while working with EMF, the following setup would be sufficient:
Basically, you install the IDE in your machine (e.g. in C:\eclipse) and launch workbench instance A. In that instance's workspace, you check out EMF's code and modify it to add features / remove bugs, etc. Then you launch a nested workbench instance B and in its workspace you create an EMF model, using the newly modified EMF tools to generate code. You have just tested the modified EMF tools.
However, the generated code depends on some EMF runtime libraries (which must be included with your application at runtime). These may also have been modified and may require testing. To check the new EMF runtime, you must launch the test project from within the nested workbench instance and see if any problems arise at runtime.
Unfortunately, Eclipse can not currently link code that resides in the nested workbench instance's workspace with code that resides in the parent workbench instance's workspace. This means that if you launch your test project from the nested workbench instance B, it can not run using the modified runtime from the workspace your parent workbench instance A.
As a result, the only viable approach to is to exit the Eclipse IDE, update the platform installation with your new EMF tools and runtime, then launch a new workbench instance. You can then place your test project in your EMF workspace (alongside EMF itself) and launch it to test the runtime. Whenever you modify the tools, you have to go through all this again so that the workbench instance picks up the new EMF tools. If however you just modify the runtime, you can skip updating the platform installation as Eclipse will link your test project against the EMF runtime in the workspace.
The rest of this page discusses how to set up a development environment with the compromises needed to work around bug #109137.
Software Environment
In order to develop on the EMF, SDO and XSD projects, you need Eclipse and an appropriate JRE.
When specifying directory paths on your system, remember to compensate for any difference between the environment presented in this article and your development environment.
Setting up the Eclipse Workspace
Workspace location
To minimize the inconvenience caused by bug 109137 and work against both the EMF IDE tools and runtime, we use the following trick: we create our workspace inside an extension location. Effectively, what this means, is that our workspace must be a location on the disk that adheres to the layout expected of extension locations (See: FAQ Can I install plug-ins outside the main install directory?).
For example, assume you want to keep your EMF work in C:\emf-dev. To create an extension location in that directory, you would create the sub-directories C:\emf-dev\eclipse\plugins and an empty file called ".eclipseextension" in C:\emf-dev\eclipse. This would produce the following layout:
C:\
   emf-dev\
      eclipse\
         .eclipseextension
         plugins\
To link the extension location to your base Eclipse SDK installation, you must create a "links" directory within your Eclipse installation and then create a file inside it with the name "emf.link". Assuming you've installed the Elipse SDK in "C:\eclipse" this would produce the following layout:
C:\
  eclipse\
     plugins\
        ... base installation plug-ins ...
     features\
        ... base installation features ...
     links\
        emf.link
The contents of the "C:\eclipse\links\emf.link" file must point to the path where you've decided to place your EMF extension location. For example:
path=c:\emf-dev
As a result, when you launch Eclipse from this installation, it will scan c:\emf-dev\eclipse\plugins to find plug-in JARs and make them available in the created workbench instance.
You will then have to use c:\emf-dev\eclipse\plugins as your workspace location and check out the EMF sources in that directory as described later in Checking Out Code as an Anonymous User. After you have reached that stage, you will finally have this layout:
C:\
   emf-dev\
      eclipse\
         .eclipseextension
         plugins\
            org.eclipse.emf\
               plugin.xml
            ... other EMF project directories ...
When working with this layout, to change the EMF tools for the IDE, you would make your modifications to the source code and then exit the workspace, create plug-in JARs in the extension location (c:\emf-dev\eclipse\plugins) and restart the workbench instance to load the new version of your tools. Your base installation will remain clean and all your work will be inside the extension location. Create a test project within the workspace to check the modified toolset.
When you only make modifications to the EMF runtime, you can simply launch code (JUnit tests, test applications, etc) that uses the EMF runtime, as Eclipse will link against the EMF runtime in your workspace (and not the JARs you created to test the tools).
The following script will create JARs in the extension location when you want to test modifications to the EMF tools. You will need Cygwin to run it if you are working on Windows:
#!/bin/sh

function createJar
{
  local jar="$1"
  local dataDir="$2"
  local cvsIgnore="$3"

  local jarDir=`dirname "$jar"`
  if [ ! -d "$jarDir" ] ; then
  {
    mkdir -p "$jarDir"
  }
  fi

  #if [ ! -f "$cvsIgnore".bak ] ; then
  #  cp $cvsIgnore $cvsIgnore.bak
  #fi

  #cat $cvsIgnore.bak > $cvsIgnore;
  #echo ".cvsignore" >> $cvsIgnore;
  #echo ".cvsignore.bak" >> $cvsIgnore;


  echo "$jar"
  cd "$dataDir"
  #echo "$jar" >> $cvsIgnore;
  zip -rq "$jar" *
}

function copyBin
{
  local dir="$1"
  local dataDir="$2"
  local cvsIgnore="$3"

  if [ ! -d "$dir" ] ; then
  {
    mkdir -p "$dir"
  }
  fi

  #if [ ! -f "$cvsIgnore".bak ] ; then
  #  cp $cvsIgnore $cvsIgnore.bak
  #fi

  #cat $cvsIgnore.bak > $cvsIgnore;
  #echo ".cvsignore" >> $cvsIgnore;
  #echo ".cvsignore.bak" >> $cvsIgnore;

  echo "$dir"
  cd "$dataDir"
  #ls >> $cvsIgnore;
  cp -r * "$dir"
  for i in $(find . -name "*.html"); do rm $dir/$i; done
}


dir=$1
if [ "0$dir" == "0" ]; then
  dir="plugins"
fi
rootDir=`readlink -f "$dir"`

# Change this line to select the plugins you want to create the jar for.
plugins="org.eclipse.emf* org.eclipse.jet* org.eclipse.xsd* org.eclipse.uml* org.eclipse.draw2d* org.eclipse.gmf* org.eclipse.gef*"
#plugins="org.eclipse.emf* org.eclipse.jet* org.eclipse.xsd*"
subdirectories=`for i in $plugins; do ls -d "$rootDir"/$i; done`

for directory in $subdirectories
do
(
  if [ -d "$directory/bin" -a -f "$directory/META-INF/MANIFEST.MF" ] ; then
  (
    jarName=`grep -e '^Bundle-ClassPath: ' "$directory/META-INF/MANIFEST.MF" | sed 's/^Bundle-ClassPath: //'`
    jarName=`echo $jarName | sed 's/\.jar.*/.jar/' | sed 's/[;,].*//'`
    if [[ $jarName == "." || $jarName == "" ]] ; then
      copyBin "$directory/" "$directory/bin" "$directory/.cvsignore"
    else
      createJar "$directory/$jarName" "$directory/bin" "$directory/.cvsignore"
    fi

    if [ -d "$directory/bin.tasks" ]; then
    (
      antJarName=`echo $jarName | sed 's/\.jar/.tasks.jar/'`
      createJar "$directory/ant_tasks/$antJarName" "$directory/bin.tasks" "$directory/.cvsignore"
    )
    fi
  )
  fi
)
done
You should place the above script in the "eclipse" folder of your extension location (in this example c:\emf-dev\eclipse).
Configuring the plug-in environment
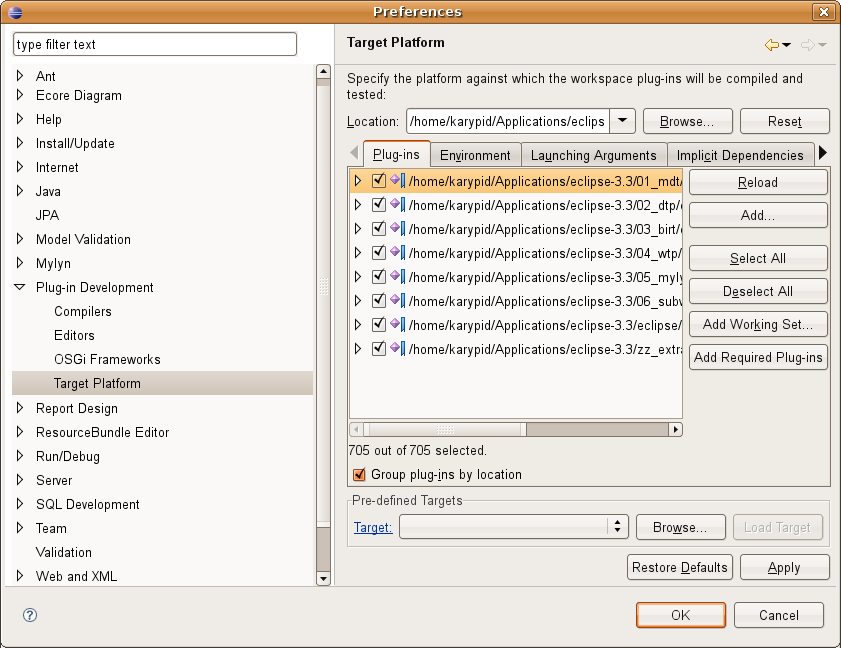
You need to specify where Eclipse should look for required plug-ins if they do not exist in the current workspace. To do this:
- In the Preferences dialog (Window > Preferences), with Plug-In Development expanded, select Target Platform.
- Click Select All so that all the plug-ins are selected.
- Click OK to close the Preferences dialog.
Configuring the the Eclipse CVS preferences
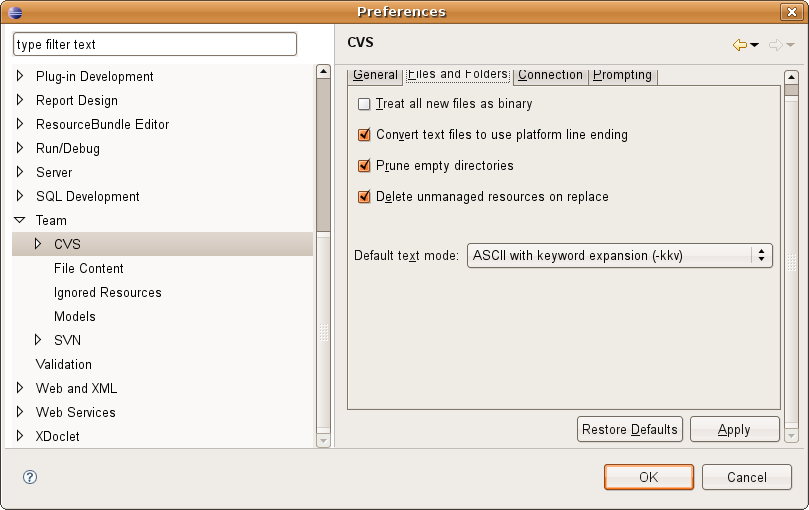
It is highly recommended to prune empty directories when extracting the code from the CVS repository. This is how you can set Eclipse to do that:
- Select Windows > Preferences > Team.
- Open CVS and select the Files and Folders tab, then select Prune empty directories.
- Click OK to close the Preferences
Configuring Code Templates, Code Formatter, and Import Order
Want to code like the EMF team? Here's how to use the same templates, formatting, and import order as the pros. If you're looking to submit a patch to the EMF team, this is a MUST.
- Select Windows > Preferences > Code Style > Java.
- Select Code Templates > Import... Browse for this file: EMF_codetemplates.xml
- Select Formatter > Import... Browse for this file: EMF_codeformatter.xml
- Select Organize Imports > Import... Browse for this file: EMF_imports.importorder
Understanding the CVS Structure
If you are unfamiliar with CVS concepts, there is a good list of resources on the CVS repository page.
Modules structure
The EMF, SDO and XSD sources are divided into three modules in CVS.
| CVS Repository | Module | Directories | |
| /cvsroot/modeling | org.eclipse.emf/org.eclipse.emf | ||
| plugins | contains the EMF plug-ins | ||
| features | contains the EMF features | ||
| doc | contains the EMF documentation plug-ins and features | ||
| tests | contains the EMF, SDO and XSD automated tests plug-ins and features | ||
| examples | contains the EMF examples | ||
| /cvsroot/modeling | org.eclipse.emf/org.eclipse.emf.ecore.sdo | ||
| plugins | contains the SDO plug-ins | ||
| features | contains the SDO features | ||
| doc | contains the SDO documentation plug-ins and features | ||
| /cvsroot/modeling | org.eclipse.mdt/org.eclipse.xsd | ||
| plugins | contains the XSD plug-ins | ||
| features | contains the XSD features | ||
| doc | contains the XSD documentation plug-ins and features | ||
| examples | contains the XSD examples | ||
EMF and SDO are components of the EMF Project. XSD is a component of the MDT Project.
Build tag and branch naming conventions
For each build, a new CVS tag is created. The name of the CVS tag follows this convention:
build_<build id>
where <build id> is usually the build timestamp in the yyyyMMddhhmmss format (for example, 20040211140643).
The HEAD branch always contains the latest file versions, which are currently under active development. If a fix is required for a particular past build (typically a release), a branch will be created. The branch naming convention is:
branch_<build id>
The structure of the CVS repository is shown below:
If for some reason you need to get files from a certain build, look under "Versions" for the tag that identifies that build.
Checking Out Code as an Anonymous User
An anonymous user has access only to check out files from the CVS repository. This user does not have the privileges to check in files.
Configuring the CVS client to check out files
- Open the CVS perspective in the Eclipse Workbench by selecting Windows > Open Perspective > CVS Repository Exploring.
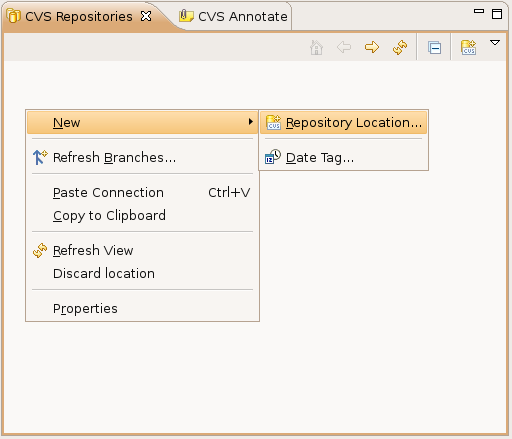
- Right click on the CVS Repositories view as shown below, and select New > Repository Location...
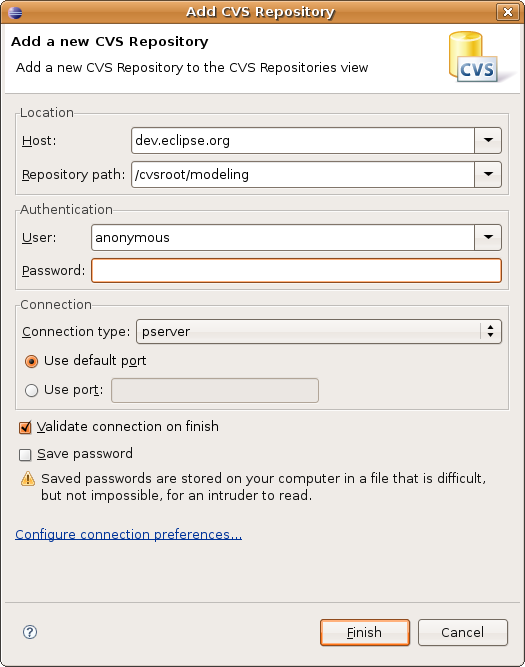
- Enter the information as shown below in the Add CVS Repository dialog and click Finish. This will establish a connection with the /cvsroot/modeling repository located on dev.eclipse.org, using the anonymous user ID. Make sure you set the connection type to pserver and use the default port, as shown.
Checking Out Code
If you followed the instructions in the previous section, you should see a new repository entry in the CVS Repositories view.
To check out code, you have two options. Either check out the projects automatically using a Team Project Set File, or manually.
Using Team Project Set File (.psf)
- Download the PSF file and save it somewhere memorable, like your desktop. You might also want a PSF for SDO or XSD.
- Back in Eclipse, switch to the Java perspective.
- From the File menu or Project Explorer context menu, select Import.
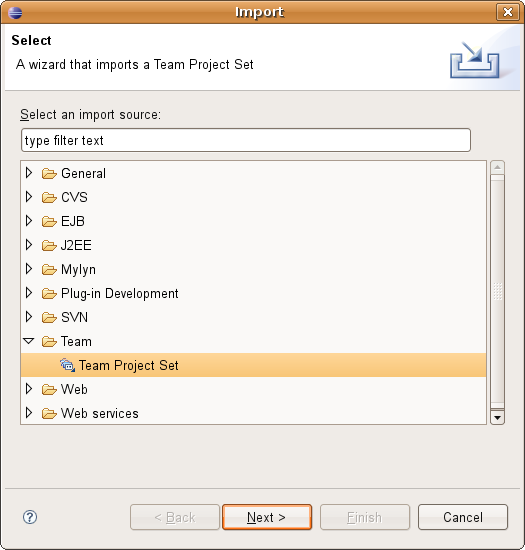
- Choose Team > Team Project Set, then click Next.
- Browse for the .psf file you want to use. Click Finish.
- Each feature & plugin will then be checked out as a project in the workspace.
Manual Checkout
- Switch to the CVS perspective if not already there.
- Expand the repository node.
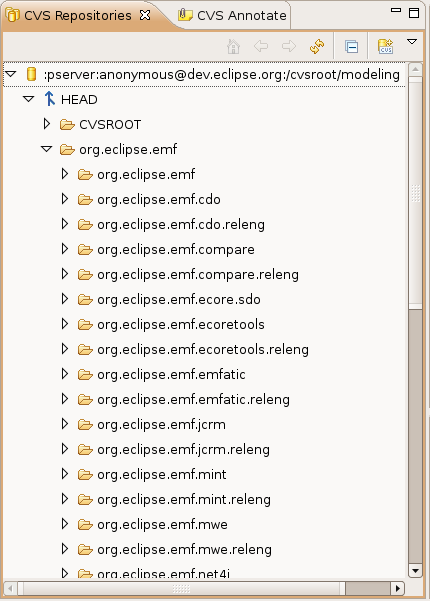
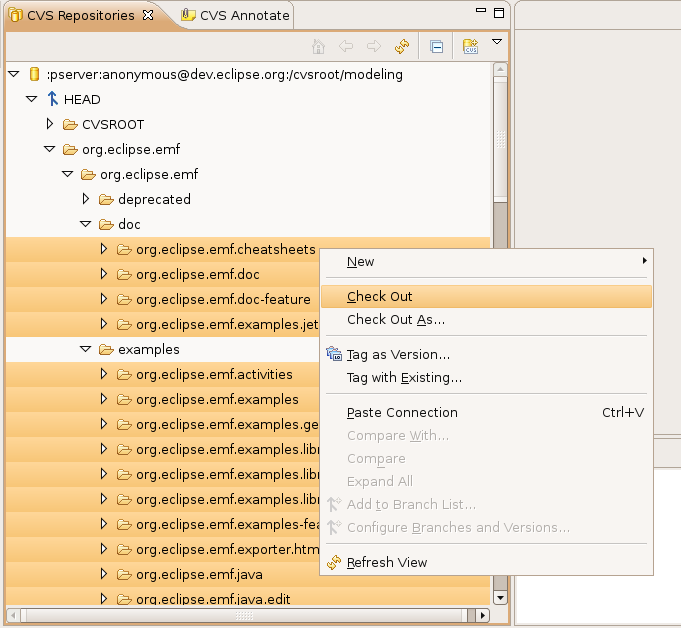
- Expand the HEAD node, as shown below, to view all the modules in the repository.
- Scroll down and expand the
org.eclipse.emf/org.eclipse.emfmodule, as shown below. Select the subdirectories of the features, plugins, docs, tests, and examples directories that you want to retrieve. - Repeat for
org.eclipse.emf/org.eclipse.emf.ecore.sdoandorg.eclipse.mdt/org.eclipse.xsd - Right click and select the Check Out menu option.
- Each selected directory as is checked out as a project in the workspace. Once the operation is complete, you can switch to the Java perspective to work with the projects.
Resolving Dependency Problems
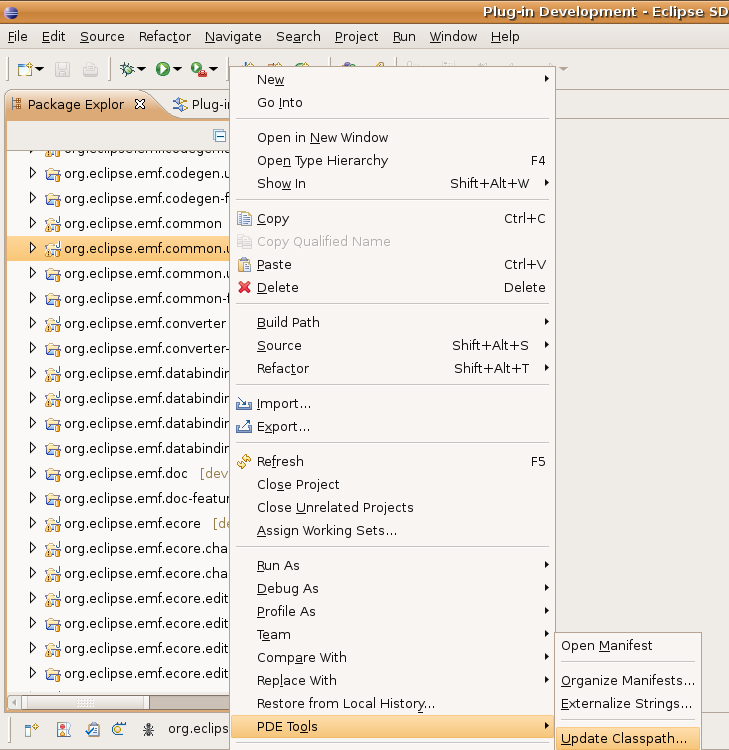
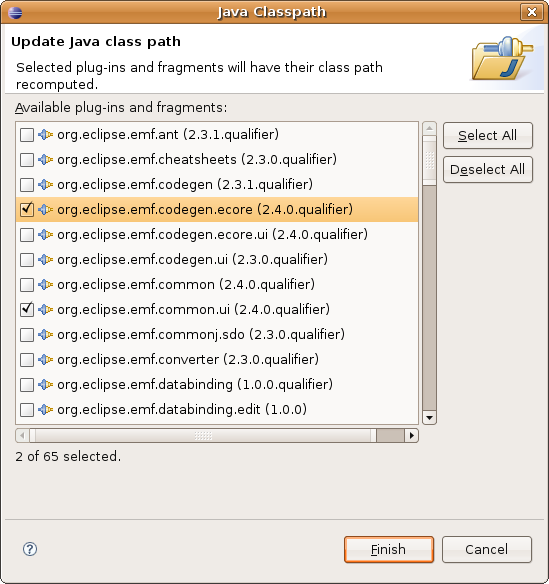
You may find that the projects have compilation errors after you check them out. To resolve these, update the classpath. Right click on the project and select the PDE Tools > Update Classpath... menu option as shown below. The Java Classpath dialog appears.
Ensure that any projects with dependency problems are checked in the list of available plug-ins and fragments, and then click Finish.
In addition, the performance tests (plug-in org.eclipse.emf.test.performance) have a dependency on the org.eclipse.test.performance plug-in which is part of the core Eclipse platform. You will have to manually check out this plug-in from repository location dev.eclipse.org/cvsroot/eclipse.
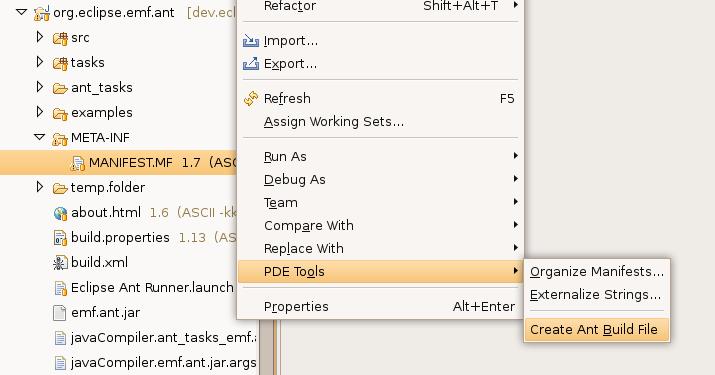
Finally, some EMF projects have a dependency on a JAR library with custom ant tasks. The source of the library is located in plug-in org.eclipse.emf.ant and in order to create the JAR file you must right-click on the MANIFEST.MF file of the project and select "PDE Tools->Create Ant Build File".
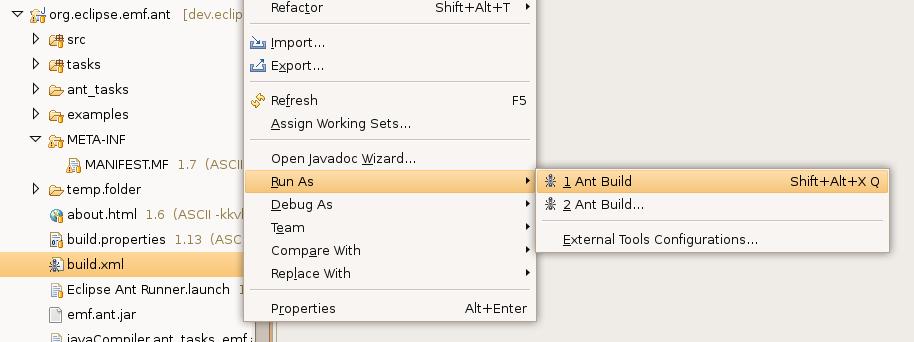
This will produce an Ant build file called build.xml. Right click on the file and select "Run As->Ant Build" to create the JAR library.
Synchronizing your Local Sandbox with the HEAD Branch
- As described above, the HEAD branch contains the latest version of the code. To synchronize your local changes with the HEAD, right click on the resource that you want to synchronize, and then select:
Team > Synchronize with Repository
- This opens the Synchronize view. For more on using this view, see CVS Workspace Synchronization.
- You can merge in the changes from the HEAD manually or automatically. To merge automatically, right click on the resource you want to merge. Select:
Team > Update
- If there are conflicts that cannot be resolved automatically, CVS will insert special markup in the file to indicate that those lines could not be merged. You will need to resolve the conflicts manually. See also Resolving conflicts
Developing on Eclipse 3.4
If you are using Eclipse 3.4 you can take advantage of a trick to make your development environment lighter. This section describes how you can achieve that.
Overall Idea
Note - We distinguish between the main eclipse instance (the instance that you start first) from the nested eclipse instance (the instance that was started from within the main instance)
The usual configuration is:
- the main instance is started with the basic plugins (without EMF plugins) and using a main workspace
- EMF sources are downloaded from CVS to this workspace
- the nested instance is started from the main instance using a runtime workspace
- you develop using the nested instance, which contains EMF plugins (so you can, e.g., open an Ecore Editor there)
The main problem with this approach is that you have 2 Eclipse instances using your computer's resources. You need the nested instance because you want to use EMF plugins, but you cannot install them directly on the main instance from the sources because you would have to package them properly.
The solution is to trick Eclipse into installing your EMF plugins in the main instance, even if they are not properly packaged. To do so, we will store the CVS sources into the dropins directory of your Eclipse installation and make Eclipse use those sources as real plugins.
Setup
Suppose you have downloaded Eclipse 3.4 and have it unzipped in c:/eclipse/ (your executable is c:/eclipse/eclipse.exe).
1 - Start the main instance using
eclipse.exe -data c:/eclipse/dropins $*
Note - you must use a directory called dropins at your eclipse installation. In Linux you can use any other location, but you must create a soft link from /path/to/eclipse/dropins to your workspace (e.g. by using ln -s /opt/workspaces/emf /opt/eclipse/dropins)
2 - Download the sources into this workspace and resolve any compilation issues. Just follow the directions from Checking Out Code as an Anonymous User to Resolving_Dependency_Problems.
3 - Start a nested instance. You can do it by opening one of the plugin.xml files and starting the instance from there or by using "Run->Run Configurations..." and creating a new Eclipse Application configuration. The latter is preferable because you can better control the configuration's name and workspace. Suppose your configuration was named Runtime Workspace.
4 - Close both Eclipse instances.
5 - Start the main instance using
eclipse.exe -data c:/eclipse/dropins $* -dev "file:/c:/eclipse/dropins/.metadata/.plugins/org.eclipse.pde.core/Runtime Workspace/dev.properties"
This will cause Eclipse to start the main instance using the dropins workspace, but using the plugins configuration from the Runtime Workspace that you created before. It's like having the EMF plugins installed (as in the nested instance), but without really packaging them. Now you can develop in the main instance, without having to open a nested instance to use EMF.
In case you face the following error while trying to open a '*.genmodel' file:
Could not open the editor: org.eclipse.core.runtime.CoreException: Plug-in org.eclipse.emf.examples.generator.validator was unable to load class org.eclipse.emf.examples.generator.validator.ValidatorGeneratorAdapterFactory.
1) Delete the org.eclipse.emf.examples.generator.validator plugin project including from the hard drive.
2) run the above command with -clean flag, i.e.,
eclipse.exe -data c:/eclipse/dropins $* -dev "file:/c:/eclipse/dropins/.metadata/.plugins/org.eclipse.pde.core/Runtime Workspace/dev.properties" -clean
Additional Notes and Troubleshooting
- make sure you have an appropriate JRE !!! If you follow the steps and EMF plugins are not working on the main instance, its likely that you have this problem. If you look at "Help->About Eclipse SDK->Configuration Details" and find that EMF plugins are "[Installed]", you probably have this problem (they should be marked as "[Starting]"). To force eclipse to use a certain vm, use -vm /path/to/vm.
- make sure you have the dev.properties file after you run the nested instance on step 3.
- you can get some logs using -consolelog. Currently, you will get some ProvisionExceptions for the feature projects, but you don't have to worry about those.
- if you don't want the validator plugin generating code, append -Dorg.eclipse.emf.examples.generator.validator=false to your eclipse.ini
More Info
- For more information on CVS, see:

