Notice: This Wiki is now read only and edits are no longer possible. Please see: https://gitlab.eclipse.org/eclipsefdn/helpdesk/-/wikis/Wiki-shutdown-plan for the plan.
EDT:Writing a Rich UI application
This page contains code snippets for Rich UI applications. For background information, see Web technology for EGL Rich UI.
You can run each of the snippets that follow:
- Create an EGL project for Web 2.0 client application with services.
- Copy the content of a given snippet to an EGL file named MyHandler and place that file in the package named client.
- Run the handler in the Preview tab.
- Change the content as you see fit and re-run the code.
- Save the content elsewhere if you want to keep your changes, and try the next snippet.
Even if you're an efficiency expert, you can play.
Contents
Create a Handler type of stereotype RUIHandler
Consider a grid layout on the design surface:
Here is the related code:
package client;

import org.eclipse.edt.rui.widgets.GridLayout;

handler MyHandler type RUIhandler{

   // sets one or more widgets at the root of the widget tree.
   initialUI =[ui],

   // specifies the function that runs initially and without user interaction.
   onConstructionFunction = start,

   // identifies the CSS file that helps you to design the page.
   cssFile = "css/MyProject.css",

   // sets the title that is displayed at the top of your browser or browser tab.
   title = "MyHandler"}

   ui GridLayout{columns = 3, rows = 4, cellPadding = 4, children =[]};

   function start()
   end
end
When you request a Rich UI handler in the IDE, the Rich UI editor includes a grid layout of 3 columns and 4 rows.
Declare and display a set of widgets
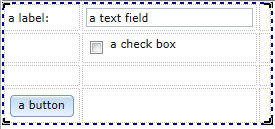
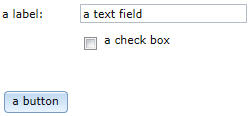
The grid layout now has four widgets in the first two columns:
The third column is present, but empty.
Here is the preview and related code:
package client;

import org.eclipse.edt.rui.widgets.Button;
import org.eclipse.edt.rui.widgets.CheckBox;
import org.eclipse.edt.rui.widgets.GridLayout;
import org.eclipse.edt.rui.widgets.GridLayoutData;
import org.eclipse.edt.rui.widgets.GridLayoutLib;
import org.eclipse.edt.rui.widgets.TextField;
import org.eclipse.edt.rui.widgets.TextLabel;
import eglx.ui.rui.RUIHandler;

handler MyHandler type RUIhandler{
   initialUI =[ui], onConstructionFunction = start,
   cssFile = "css/MyProject.css", title = "MyHandler"}

   ui GridLayout{columns = 3, rows = 4, cellPadding = 4,
   children =[myLabel, myTextField, myCheckBox, myButton]};

   myLabel TextLabel{ layoutData = new GridLayoutData{ row = 1, column=1},
     text = "a label: " };

   myTextField TextField{ layoutData = new GridLayoutData{ row = 1, column = 2},
                          text = "a text field"};

   myCheckBox CheckBox{ layoutData = new GridLayoutData{ row = 2, column = 2 },
                          text="a check box" };

   myButton Button{ layoutData = new GridLayoutData{ row = 4, column = 1 },
                    text="a button" };

   function start()
   end
end
Customize the display
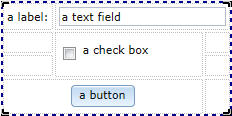
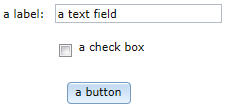
Widgets can span columns or rows:
Here is the preview and related code:
package client;

import org.eclipse.edt.rui.widgets.Button;
import org.eclipse.edt.rui.widgets.CheckBox;
import org.eclipse.edt.rui.widgets.GridLayout;
import org.eclipse.edt.rui.widgets.GridLayoutData;
import org.eclipse.edt.rui.widgets.GridLayoutLib;
import org.eclipse.edt.rui.widgets.TextField;
import org.eclipse.edt.rui.widgets.TextLabel;
import eglx.ui.rui.RUIHandler;

handler MyHandler type RUIhandler{
   initialUI =[ui], onConstructionFunction = start,
   cssFile = "css/MyProject.css", title = "MyHandler"}

   ui GridLayout{columns = 3, rows = 4, cellPadding = 4,
   children =[myLabel, myTextField, myCheckBox, myButton]};

   myLabel TextLabel{ layoutData = new GridLayoutData{ row = 1, column=1},
     text = "a label: " };

   myTextField TextField{ layoutData = new GridLayoutData{ row = 1, column = 2,
      horizontalSpan = 2 }, text = "a text field"};

   myCheckBox CheckBox{ layoutData = new GridLayoutData{ row = 2, column = 2,
      verticalSpan = 2 }, text="a check box" };

   myButton Button{ layoutData = new GridLayoutData{ row = 4, column = 1,
                    horizontalSpan = 2,
                    horizontalAlignment = GridLayoutLib.Align_Center },
                    text="a button" };

   function start()
   end
end
Assign and code event handlers
To assign an event handler:
- Decide on an event such as OnChange or OnClick.
- Add a name to the list of event handlers that respond to the event.
- Code the event handler.
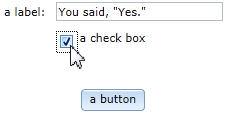
Here is the preview:
Here is the changed declaration of myCheckBox:
myCheckBox CheckBox{layoutData = new GridLayoutData{row = 2, column = 2},
                    text = "a check box",
                    onChange ::= checkBox_response};
If you use the Rich UI editor to change the myCheckBox declaration, you can press Ctrl-1 to add the following stub:
function checkBox_response(e Event in)

end
Here is the updated application:
package client;

import org.eclipse.edt.rui.widgets.Button;
import org.eclipse.edt.rui.widgets.CheckBox;
import org.eclipse.edt.rui.widgets.GridLayout;
import org.eclipse.edt.rui.widgets.GridLayoutData;
import org.eclipse.edt.rui.widgets.GridLayoutLib;
import org.eclipse.edt.rui.widgets.TextField;
import org.eclipse.edt.rui.widgets.TextLabel;
import eglx.ui.rui.Event;
import eglx.ui.rui.RUIHandler;

handler MyHandler type RUIhandler{
   initialUI =[ui],
   onConstructionFunction = start,
   cssFile = "css/MyProject.css",
   title = "MyHandler"}

   ui GridLayout{columns = 3, rows = 4, cellPadding = 4, children =[myLabel,
                 myTextField, myCheckBox, myButton]};

    myLabel TextLabel{layoutData = new GridLayoutData{row = 1, column = 1}, text = "a label: "};

    myTextField TextField{layoutData = new GridLayoutData{row = 1, column = 2},
                          text = "a text field"};

    myCheckBox CheckBox{layoutData = new GridLayoutData{row = 2, column = 2},
                        text = "a check box",

                        /*****  reference an event handler for the check box onChange event *****/
                        /************************************************************************/
                        onChange ::= checkBox_response};

    myButton Button{ layoutData = new GridLayoutData{ row = 4, column = 1,
                     horizontalSpan = 2,
                     horizontalAlignment = GridLayoutLib.Align_Center },
                     text="a button" };

    function start()
    end

    /**************  event handler for the check box onChange event **********************/
    /*************************************************************************************/
    function checkBox_response(e event)
        myMessage string;
        if (myCheckBox.selected == true)
           myMessage = "You said, \"Yes.\"";
        else
       	   myMessage = "You said, \"No.\"";
        end
        myTextField.text = myMessage;
    end
end
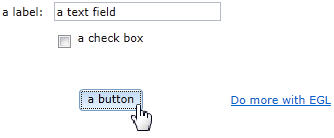
When you are attaching an event handler to a button, you typically use the OnClick event.
Here is a preview and the related code, which shows one way to add a new widget to the page, but no longer has the check box onChange event:
package client;

import org.eclipse.edt.rui.widgets.Button;
import org.eclipse.edt.rui.widgets.CheckBox;
import org.eclipse.edt.rui.widgets.GridLayout;
import org.eclipse.edt.rui.widgets.GridLayoutData;
import org.eclipse.edt.rui.widgets.GridLayoutLib;
import org.eclipse.edt.rui.widgets.HyperLink;
import org.eclipse.edt.rui.widgets.TextField;
import org.eclipse.edt.rui.widgets.TextLabel;
import eglx.ui.rui.Event;
import eglx.ui.rui.RUIHandler;

handler MyHandler type RUIhandler{
   initialUI =[ui],
   onConstructionFunction = start,
   cssFile = "css/MyProject.css",
   title = "MyHandler"}

   ui GridLayout{columns = 3, rows = 4, cellPadding = 4, children =[myLabel,
                    myTextField, myCheckBox, myButton]};

   myLabel TextLabel{layoutData = new GridLayoutData{row = 1, column = 1}, text = "a label: "};

   myTextField TextField{layoutData = new GridLayoutData{row = 1, column = 2},
                    text = "a text field"};

   myCheckBox CheckBox{layoutData = new GridLayoutData{row = 2, column = 2},
                    text = "a check box"};

   myButton Button{ layoutData = new GridLayoutData{ row = 4, column = 1,
                    horizontalSpan = 2,
                    horizontalAlignment = GridLayoutLib.Align_Center },
                    text="a button",

                    /*****  reference an event handler for the button onClick event ****/
                    /*******************************************************************/
                    onClick ::= button_Response};

   function start()
   end

   /**************  event handler for the button onClick event **************************/
   /*************************************************************************************/
   function button_response(e event)
      ui.appendChildren([myHyperLink]);
   end

   /************** a new widget definition *********************************************/
   myHyperlink HyperLink
   {
      layoutData = new GridLayoutData{row = 4, column = 3},
      text = "Do more with EGL",
      target = "_blank",
      href = "http://www.eclipse.org/edt/#gettingstarted"
   };
end
The code now includes a variable named counter, for use in the next section.
Write the on-construction function
The on-construction function is typically named start. The function might update the widgets, initialize variables, invoke a service, or schedule a job.
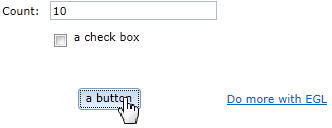
The example function changes a label text, initializes a counter, and schedules a job that increments the counter. The job begins when the on-construction ends. The job ends when the user clicks the button.
Here is the preview and related code:
package client;

import org.eclipse.edt.rui.widgets.Button;
import org.eclipse.edt.rui.widgets.CheckBox;
import org.eclipse.edt.rui.widgets.GridLayout;
import org.eclipse.edt.rui.widgets.GridLayoutData;
import org.eclipse.edt.rui.widgets.GridLayoutLib;
import org.eclipse.edt.rui.widgets.HyperLink;
import org.eclipse.edt.rui.widgets.TextField;
import org.eclipse.edt.rui.widgets.TextLabel;
import eglx.ui.rui.Event;
import eglx.ui.rui.RUIHandler;

handler MyHandler type RUIhandler{
   initialUI =[ui],
   onConstructionFunction = start,
   cssFile = "css/MyProject.css",
   title = "MyHandler"}

   /******** variable for use by the new job **********/
   /***************************************************/
   counter int;

   ui GridLayout{columns = 3, rows = 4, cellPadding = 4, children =[myLabel,
                    myTextField, myCheckBox, myButton]};

   myLabel TextLabel{layoutData = new GridLayoutData{row = 1, column = 1}, text = "a label: "};

   myTextField TextField{layoutData = new GridLayoutData{row = 1, column = 2},
                          text = "a text field"};

   myCheckBox CheckBox{layoutData = new GridLayoutData{row = 2, column = 2},
                        text = "a check box"};

   myButton Button{ layoutData = new GridLayoutData{ row = 4, column = 1,
                    horizontalSpan = 2,
                    horizontalAlignment = GridLayoutLib.Align_Center },
                    text="a button", onClick ::= button_Response};


   /**********  declare the new job ***********************************/
   /*******************************************************************/
   doThis Job{runFunction = myRunFunction};


   /********** create the run function for that job *******************/
   /*******************************************************************/
   function myRunFunction()
      counter = counter + 1;
      myTextField.text = counter;
   end

   /************ expand the on-construction function ******************/
   /*******************************************************************/
   function start()
      counter = 0;
      myLabel.text = "Count:";
      doThis.repeat(1000);
   end

   function button_response(e event)

      /****** cancel the job run when the user clicks the button *******/
      /*****************************************************************/
      doThis.cancel();

      ui.appendChildren([myHyperLink]);
    end

   myHyperlink HyperLink
   {
      layoutData = new GridLayoutData{row = 4, column = 3},
      text = "Do more with EGL",
      target = "_blank",
      href = "http://www.eclipse.org/edt/#gettingstarted"
   };
end

