Notice: This Wiki is now read only and edits are no longer possible. Please see: https://gitlab.eclipse.org/eclipsefdn/helpdesk/-/wikis/Wiki-shutdown-plan for the plan.
Building an RCP application with Hudson and Buckminster
This article is currently a draft and not all necessary resources are in place yet.
This tutorial will show how to set up a cross platform build of an RCP application with Buckminster and Hudson. The application to be built will be the Buckminster MailApp RCP which can be found in the Subversion Repository. Another tutorial about this: Building Eclipse RCP applications using Buckminster and Hudson.
Contents
Prerequisites
Before attempting this tutorial you need several things up and running
- A running instance of Hudson CI Server
- The Buckminster PlugIn for Hudson
Project Layout
The MailApp shows all the necessary parts to make a P2 enabled product buildable with Buckminster.
org.eclipse.buckminster.tutorial.mailapp
This is the actual PlugIn. It contains the source code of the example application as well as all product customizations like the splashscreen and the product extension.
org.eclipse.buckminster.tutorial.rcpp2.feature
This feature project includes all the necessary plugins to make the resulting RCP self-managed (i.e. enable the p2 update manager)
org.eclipse.buckminster.tutorial.mailapp.product.feature
This feature will be the main feature to be installed. It contains the actual plugin, the product definition, all necessary dependencies and a build script along with a CSPECX to make this build script known to Buckminster. A product definition is similar to a feature in a way that both aggregate features and plugins. However, a product definition can only be feature-based, or plugin-based, not both at the same time, whereas a feature can have both included plugins and features. That's why it is common practice to have your product feature-based and delegate all the work to the single feature you are including in your product.
Note that the feature contains the org.eclipse.equinox.executable feature besides the plugin itself, org.eclipse.rcp and org.eclipse.buckminster.tutorial.rcpp2.feature. This feature is necessary for all products that contain native launcher artifacts and it is included in the Delta Pack.
Buckminster will create an update site from that feature that contains all the plugins, features and binary artifacts. Once that is done, the build script will then utilize the p2 director application to create the actual product from the update site's content. To make this action known to Buckminster a CSPECX is required for that feature.
<?xml version="1.0" encoding="UTF-8"?>
<cspecExtension
	xmlns:com="http://www.eclipse.org/buckminster/Common-1.0"
	xmlns="http://www.eclipse.org/buckminster/CSpec-1.0">
	<actions>
		<public name="create.product" actor="ant">
            <actorProperties>
                <property key="buildFile" value="build/product.ant"/>
                <property key="targets" value="create.product"/>
            </actorProperties>
            <properties>
                <property key="profile" value="MailProfile"/>
                <property key="iu" value="org.eclipse.buckminster.tutorial.mailapp.product"/>
            </properties>
			<prerequisites alias="repository">
				<attribute name="site.p2"/>
			</prerequisites>
            <products alias="destination" base="${buckminster.output}">
            	<path path="MailApp/"/>
            </products>
		</public>
		<public name="create.product.zip" actor="ant">
            <actorProperties>
                <property key="buildFileId" value="buckminster.pdetasks"/>
                <property key="targets" value="create.zip"/>
            </actorProperties>
			<prerequisites alias="action.requirements">
				<attribute name="create.product"/>
			</prerequisites>
            <products alias="action.output" base="${buckminster.output}">
            	<path path="MailApp.zip"/>
            </products>
		</public>
	</actions>
</cspecExtension>
This will make the two actions (create.product and create.product.zip) known to Buckminster. If you materialized the MailApp Tutorial into your workspace and have the Delta Pack installed, you should have everything in place now to create the product with Buckminster just by right clicking on org.eclipse.buckminster.tutorial.mailapp.product.feature and selecting buckminster -> invoke action -> create.product.zip.
Configuring the Build Environment
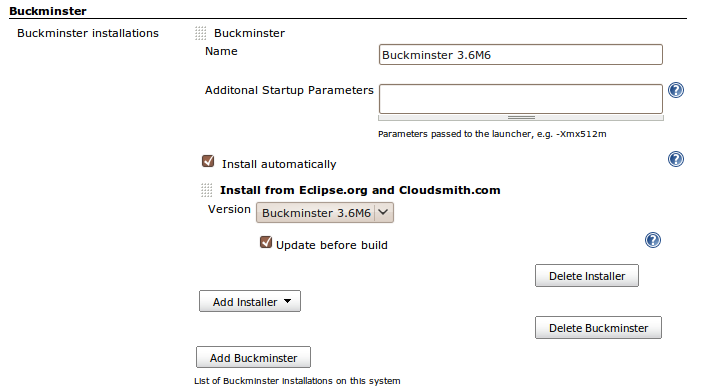
In order to execute Buckminster Builds on Hudson you need at least one configured Buckminster Tool Installation. The easiest way to do that is to have the Hudson Plugin install Buckminster on demand. To do so, open the Hudson web interface and navigate to 'Manage Hudson' -> 'Configure System' and press 'Add Buckminster' at the Buckminster section.
This tool installation will be made available to your build jobs under the name you assign in the form. If you activate the 'install automatically' checkbox, buckminster will be downloaded and configured when the first Buckminster Job gets executed. You can also configure that your buckminster installation gets updated automatically every time you execute a build.
Building a Target Platform
The Target Platform contains the set of features and plugins that your source is build against. Since the MailApp does not have many dependencies, you only need the org.eclipse.platform feature and the org.eclipse.equinox.executable feature. There are several ways to create a target platform. You could either just manually create an eclipse installation that contains all plugins and features that you want to be in the target platform, or you can build it on the fly. In this tutorial the target platform will be created on the fly by requesting Buckminster to import MSPECs into an empty location using the p2 materializer.
For the two required features org.eclipse.platform and org.eclipse.equinox.executable, we therefore create two CQUERYs and two MSPECs that point to those CSPECs.
<?xml version="1.0" encoding="UTF-8"?>
<cq:componentQuery xmlns:cq="http://www.eclipse.org/buckminster/CQuery-1.0" resourceMap="MailAppTargetPlatform.rmap">
    <cq:rootRequest name="org.eclipse.platform" componentType="eclipse.feature"/>
    <cq:advisorNode namePattern=".*" useTargetPlatform="false" useWorkspace="false"/>
    <cq:property key="target.arch" value="*"/>
    <cq:property key="target.os" value="*"/>
    <cq:property key="target.ws" value="*"/>
</cq:componentQuery>
<?xml version="1.0" encoding="UTF-8"?><mspec xmlns="http://www.eclipse.org/buckminster/MetaData-1.0" name="Target Platform MSPEC" materializer="p2" installLocation="${targetPlatformPath}" url="org.eclipse.platform.cquery"> <property key="target.arch" value="*" /> <property key="target.os" value="*" /> <property key="target.ws" value="*" />
</mspec>
The CQUERY and MSPEC for the org.eclipse.equinox.feature looks exactly the same except for the component name. Note the Wildcard (*) for target.arch, target.os and target.ws. This will ensure that the materialized target platform works for all operating systems and architectures. The installLocation is set to ${targetPlatformPath} so this property has to be passed to the buckminster runtime to specify where the materialization should take place. The CQUERY also contains an Advisor Node. This Advisor Node will ensure that nothing is resolved from the current Buckminster Runtime, itself so that everything will be downloaded freshly.
Both querys use a resolver map to find the required components. The RMAP is very simple in this case because all required features and plugins can be found in a single update site.
<?xml version="1.0" encoding="UTF-8"?>
<rmap xmlns="http://www.eclipse.org/buckminster/RMap-1.0" xmlns:xsi="http://www.w3.org/2001/XMLSchema-instance"
	xmlns:mp="http://www.eclipse.org/buckminster/MavenProvider-1.0"
	xmlns:pmp="http://www.eclipse.org/buckminster/PDEMapProvider-1.0"
	xmlns:bc="http://www.eclipse.org/buckminster/Common-1.0">
	<searchPath name="org.eclipse.platform">
		<provider readerType="eclipse.import" componentTypes="osgi.bundle,eclipse.feature" mutable="false" source="false">
			<uri format="http://download.eclipse.org/releases/galileo?importType=binary"/>
		</provider>
	</searchPath>
	<locator searchPathRef="org.eclipse.platform"/>
</rmap>
Creating the Hudson Job
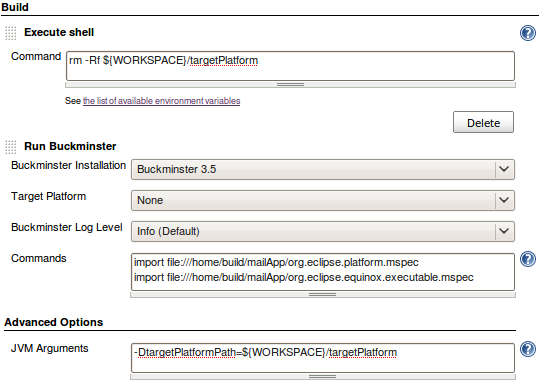
Start with a new Free-Style project that will create and publish the target platform for the MailApp. The job needs two build steps: Execute Shell and Run Buckminster. The execute shell step will delete the directory where the target platform is materialized to ensure a clean build every time.
rm -Rf ${WORKSPACE}/targetPlatform
In the Run Buckminster build step you need to import the two MSPECs defined above:
import file:///home/build/mailApp/org.eclipse.platform.mspec
import file:///home/build/mailApp/org.eclipse.equinox.executable.mspec
Those MSPECs will materialize the target platform to the directory set in ${targetPlatformPath} so open the advanced section of the build step and set that property to directory in the workspace:
-DtargetPlatformPath=${WORKSPACE}/targetPlatform
The last thing that needs to be done in the target platform is archiving the build result and publishing it. In order to do so, activate the post build action "Archive and publish an Eclipse Target Platform", set the directory to the value of ${targetPlatformPath} and name the resulting artifact.
Now your configuration should look like this:
Creating the Build Job
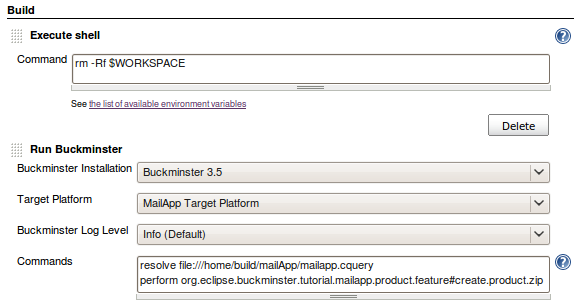
Next you need to create a new Job to build the product. This can be either a freestyle project for just one product, or a multiconfiguration project if you want to build your RCP for several different platforms at once. This tutorial will use the multiconfiguration project. First add an 'Execute Shell' build step into the Job configuration to always start with a clean workspace:
rm -Rf $WORKSPACE
The next build step will be 'Run Buckminster', where the actual work takes place. First select the target platform to build against. There should be only one available (the one published by the other hudson job). This will make the target platform available during the build run and also introduces the job that depends on the target platform as a downstream project of the project that publishes the target platform. Two commands need to be performed to build the RCP:
- resolve the MailApp (bring all pieces into the workspace)
- invoke the create.product.zip action
After those steps, you most likely want Hudson to archive the MailApp.zip artifact. This can be done with the following expression for the 'Archive Artifacts' post build action:
buckminster.output/org.eclipse.buckminster.tutorial.mailapp.product.feature*/MailApp.zip
This is what the result should look like now:
To stay informed about the build stability it is often a good idea to install the Warnings plugin for hudson and have it search the build output (a Buckminster parser is available)
Building for multiple platforms
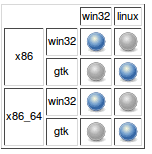
The above configuration should already be sufficient to build your RCP with Hudson. However, so far it will only build for the platform Hudson is running on. To build for several different platforms you need to add three new axes to the multiconfiguration project. For example:
| Axis | Values |
| os | win32, linux |
| ws | win32, gtk |
| arch |
x86, x86_64 |
Next, a combination filter needs to be added to filter out the impossible combinations:
!((os=="linux" && ws=="win32") || (os=="win32" && ws=="gtk"))
The multiconfiguration project will now execute the build steps with all possible combinations of the values of the three axes (except for the filtered ones). To pass the currently selected values to Buckminster, we simply need to add additional JVM properties in the 'Advanced' configuration of the Buckminster build step.
-Dtarget.os=${os}
-Dtarget.ws=${ws}
-Dtarget.arch=${arch}
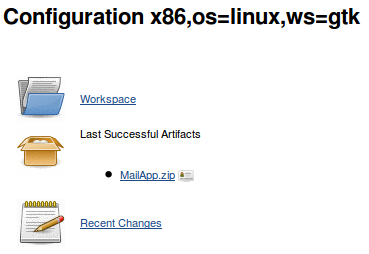
Now everything should be in place to execute the job. Once it has successfully completed, the configuration matrix should show the following result:
Clicking on of the executed combinations will reveal the built artifact for this platform configuration

