Notice: This Wiki is now read only and edits are no longer possible. Please see: https://gitlab.eclipse.org/eclipsefdn/helpdesk/-/wikis/Wiki-shutdown-plan for the plan.
BIRT/FAQ/Birt Project
< To: BIRT/FAQ
Contents
- 1 Release Schedule
- 2 Project Source
- 2.1 Q: Where can I find the BIRT coding Styles?
- 2.2 Q: Where can I find the BIRT project source?
- 2.3 Q: I'm behind a firewall and cannot access CVS. Is there another way to access the source?
- 2.4 Q: How do I build BIRT using the PSF File?
- 2.5 Q: How to build BIRT 2.5 from CVS?
- 2.6 Q: How to Build BIRT 3.7.1+ from GIT?
- 2.7 Q: How do I build the 2.5 and 2.6 BIRT RCP Report Designer?
- 2.8 Q: How do I build the 2.2/2.3/2.5 BIRT Viewer?
- 2.9 Q: How do I export the 2.2/2.3 BIRT web viewer?
- 2.10 Q: How do I export the 2.3.1 BIRT web viewer?
- 2.11 Q: How do I export the 2.5 BIRT web viewer?
- 2.12 Q: How do I export the 2.5 BIRT chart viewer?
- 2.13 Q: How do I export the 3.7 BIRT web viewer?
- 2.14 Q: How do I export org.eclipse.birt.report.runtime jar for 3.7 BIRT web viewer?
- 2.15 Q: How can I generate org.eclipes.birt.api.jar for ReportEngine?
- 2.16 Q: How can I check out BIRT source code according to certain map files?
- 2.17 Q: How do I run BIRT JUnit Tests?
- 2.18 Q: How do I use BIRT Test Package to setup test framework?
- 3 Project Update Site
- 4 Contribution
- 5 Futures
Release Schedule
Q: What is the BIRT release schedule?
The latest BIRT release schedule can be found on the BIRT Project Development Plan pages.
Project Source
Q: Where can I find the BIRT coding Styles?
If you are interested in downloading BIRT's coding styles, this is the style file Media:BIRT_java_formatter.zip.
Q: Where can I find the BIRT project source?
BIRT source is in the Eclipse CVS system. Full information for obtaining and building the source is available on the BIRT Build page.
Q: I'm behind a firewall and cannot access CVS. Is there another way to access the source?
Eclipse provides an HTML interface into CVS. Be sure to select the BIRT Project to see the BIRT sources.
Q: How do I build BIRT using the PSF File?
There are almost 300 individual source projects that are combined into the BIRT and Data Tools project. Rather than force you to pull each of these files from their respect repositories, the BIRT team provides Team Project Sets which bundle the projects into appropriate and useful collections of projects.
Builds Available
Each tagged build (Milestones and Releases) has a team project published through the download page. In addition, there is a Team Project Set for the Head release available Media:birt_psf_head.zip.
Available Project Sets
BIRT has twelve different team project sets that cover the functional pieces of BIRT (Engine, UI, Model,etc.) In order to pull a team project set, you use one of the project set files (PSF). If you would like to pull all of the BIRT and Data Tools projects, use the all_files.psf.
| File | Description |
| all_files.psf | All of the source projects for BIRT (more than 200 projects) |
| birt_chart.psf | Charting projects for BIRT |
| birt_crosstab.psf | Crosstab components |
| birt_data.psf | Aggregation and ODA projects |
| birt_doc.psf | All of the BIRT Documentation |
| birt_engine.psf | The BIRT Report Engine source |
| birt_features.psf | The features projects for BIRT |
| birt_gui.psf | BIRT Graphic UI projects including preview, editors, and sample reports |
| birt_i18n.psf | All of the i18n language bundles for BIRT |
| birt_model.psf | The BIRT Report Object Model and related projects |
| birt_test.psf | All of the test code for BIRT |
| dtp_i18n.psf | The Data Tools i18n language bundles |
| orbit_bundles.psf | The orbit projects that BIRT uses. Currently does not work correctly. |
Using Project Sets: Step By Step
- From the Java Perspective, select File => Import
- Select Team => Project Set
- Navigate to the PSF file that you want to use
- You should probably select Run the Import in the background or plan on going for a long cup of coffee
If you have issues, please file a bugzilla entry.
Q: How to build BIRT 2.5 from CVS?
Building BIRT 2.5 under Windows
- 1. Install the Galileo EPP Reporting Package
- a) Download Galileo EPP Reporting Package or BIRT Designer Full Eclipse Install (birt-report-designer-all-in-one-2_5_0.zip)
- b) Open it with your favorite ZIP utility.
- c) Extract all files (with paths preserved) to a base directory (I used c:\birtdev250). This should create a single eclipse subdirectory (c:\birtdev250\eclipse) containing all the needed files.
- d) Create a shortcut to c:\birtdev250\eclipse\eclipse.exe.
- a) Download Galileo EPP Reporting Package or BIRT Designer Full Eclipse Install (birt-report-designer-all-in-one-2_5_0.zip)
- 2. Initial configuration.
- a) Start the eclipse program.
- b) Append "\birtdev250" to the workspace path to keep it separate from your other workspaces.
- c) Select the checkbox "Use this as the default..." then press OK.
- d) Click on the workbench icon.
- e) Select Windows|Preferences from the menu.
- f) Under Java|Compiler, set the Compiler Compliance Level to 5.0.
- g) Under Java|InstalledJREs, add a Java 5 compiler (I used Suns latest Java 5, setting the JRE name to jre1.5.0 and the JRE home directory to C:\Program Files\Java\jre1.5.0_11, its default install location).
- h) Make this the default for new projects by selecting its checkbox under Java|InstalledJREs.
- i) Under General|Workspace, set Text file encoding as UTF-8
- j) Let the workspace do its full rebuild.
- a) Start the eclipse program.
- 3. Attach to the CVS repository.
- a) Use Window|OpenPerspective|Other to list the available perspectives.
- b) Select CVS Repository Exploring and click on OK.
- c) Right-click in the CVS Repositories pane and select New|RepositoryLocation.
- d) Enter dev.eclipse.org for the Host, /cvsroot/birt for the Repository Path and anonymous for the User. Click on Finish button.
- a) Use Window|OpenPerspective|Other to list the available perspectives.
- 4. Check out and build source.
- a) Under CVS Repositories, expand :pserver:anonymous@dev.eclipse.org:/cvsroot/birt, then expand Versions, then source.
- b) Expand source BIRT_2_5_0_Release_200906170630.
- c) Select ALL projects by clicking on com.lowagie.itext, scrolling down and shift-clicking on org.w3c.sac.
- d) Deselect (using control-click) features, nl, org.apache.commons.codec, org.eclipse.birt.build, org.eclipse.birt.releng.birtbuilder, org.eclipse.birt.releng.util, org.eclipse.birt.testsuite.feature and all projects beginning with org.eclipse.birt.report.tests (that one plus .chart, .engine, .engine.emitter.html, .model and .viewer).
- e) Right-click on one of the selected projects and choose Check Out option.
- f) It should start checking out 116 folders. Click the Run in Background button and switch back to the Java perspective (menu item Window|ClosePerspective).
- g) At the bottom of the window, you should see the text "Checking out 116 folders from CVS (0%)". You can click on the "conveyer belt" icon to the right of this to open the Progress tab for more detail.
- h/ Auto build will then start, this will also take some time and you'll see a lot of activity in the Progress tab if you opened it.
- a) Under CVS Repositories, expand :pserver:anonymous@dev.eclipse.org:/cvsroot/birt, then expand Versions, then source.
- 5. After all the projects have been built, you'll end up with 4 errors (see bug 281454 and 281453) and 24,284 warnings (see the Problems tab in the lower pane).
- a) Copy the com.ibm.icu_*.jar from your ${eclipse.home}/plugins to org.eclipse.birt.chart.viewer/WebContent/WEB-INF/lib/.
- b) Add "org.eclipse.jem.util" to the Require-Bundle in MANFIEST.MF of org.eclipse.birt.integration.wtp.ui and org.eclipse.birt.chart.integration.wtp.ui
- c) Clean and re-build workspace, there should be 0 errors and 24,405 warnings.
- a) Copy the com.ibm.icu_*.jar from your ${eclipse.home}/plugins to org.eclipse.birt.chart.viewer/WebContent/WEB-INF/lib/.
Note that, if you don't have installed eclipse source bundles in your eclipse home, you may get errors in the org.eclipse.birt.report.designer.ui plugin. Please see details from Bug 310987
Q: How to Build BIRT 3.7.1+ from GIT?
According to Eclipse schedule, we start to build 3.7.1 from GIT repository
- 1. Install platform
- a) Download Eclipse SDK 3.7, EMF+XSD SDK 2.7.0, GEF runtime 3.7.0, DTP 1.9.0, WTP 3.3.0, Birt Report Framework 3.7.0
- b) Extract all packages to a same directory (I used d:\birt37x). This should create a single eclipse subdirectory (d:\birt37x\eclipse) containing all the needed files.
- c) Create a shortcut to d:\birt37x\eclipse\eclipse.exe.
- a) Download Eclipse SDK 3.7, EMF+XSD SDK 2.7.0, GEF runtime 3.7.0, DTP 1.9.0, WTP 3.3.0, Birt Report Framework 3.7.0
- 2 Install EGit
- a) Start the eclipse program.
- b) Append "birt37x" to the workspace path to keep it separate from your other workspaces.
- c) Select the checkbox "Use this as the default..." then press OK.
- d) Click on the workbench icon.
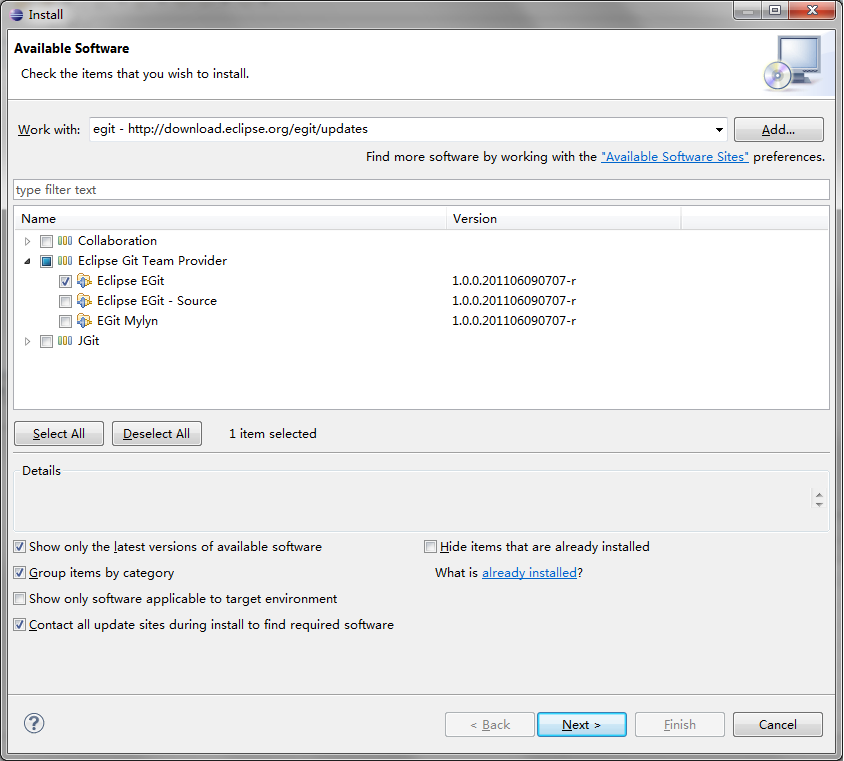
- e) Select menu: Help -> Install New Software...
- f) Click "Add..." in new "Install" dialog.
- g) Input Name: egit; Location: http://download.eclipse.org/egit/updates, then press OK.
- h) Select "Eclipse EGit", then press Next.
- i) Click "Next" button to enter the ”Install Details" page.
- j) Press Next and on the following page, accept the license terms.
- k) Press Finish and Update Manager will download the required components.
- l) Restart Eclipse when finished software update.
- a) Start the eclipse program.
- 3. Initial configuration.
- a) Select menu: Windows -> Preferences from the menu.
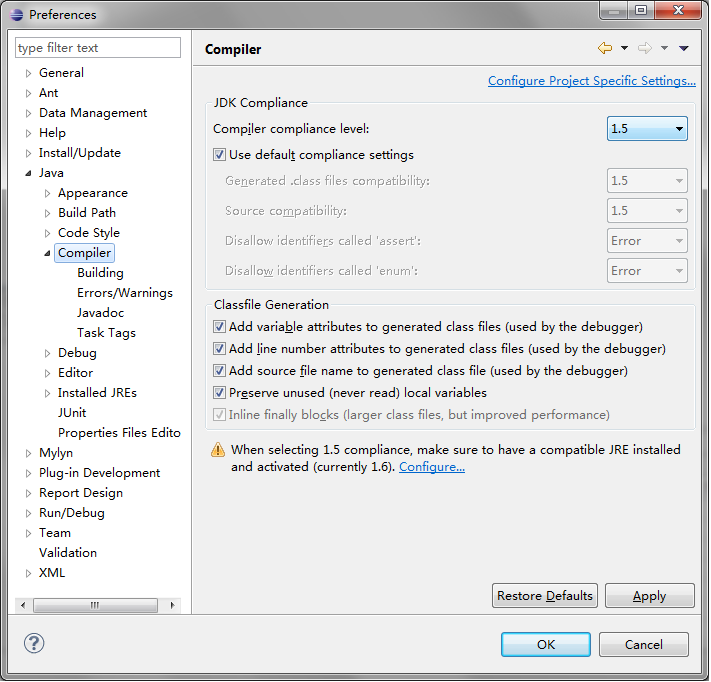
- b) Under Java -> Compiler, set the Compiler Compliance Level to 1.5.
- c) Under Java -> InstalledJREs, add a Java 1.5 compiler (I used Suns Java 1.5, setting the JRE name and the JRE home directory).
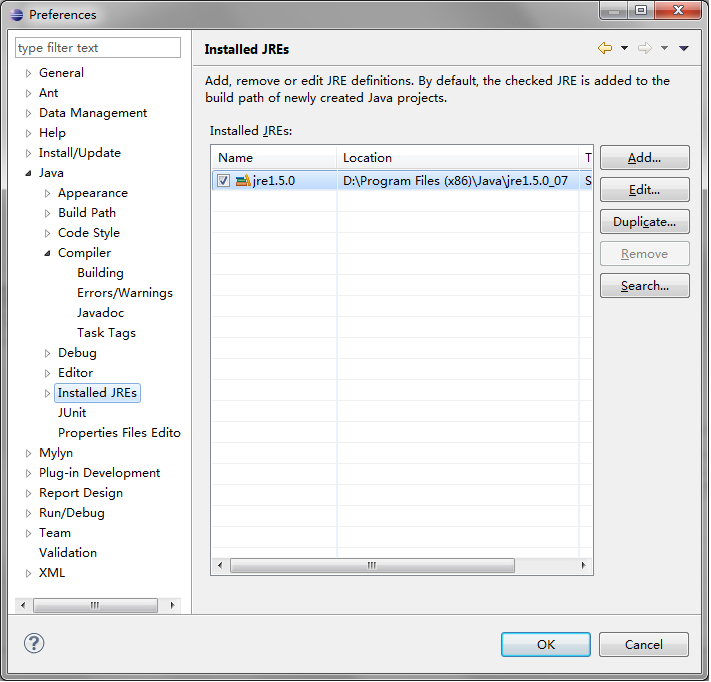
- d) Under General -> Workspace, set Text file encoding as UTF-8
- e) Let the workspace do its full rebuild.
- a) Select menu: Windows -> Preferences from the menu.
- 4. Clone the remote GIT Birt repository to local
- a) Select menu: Window -> Open Perspective -> Other
- b) In Open Perspective, select Git Repository Exploring and press OK.
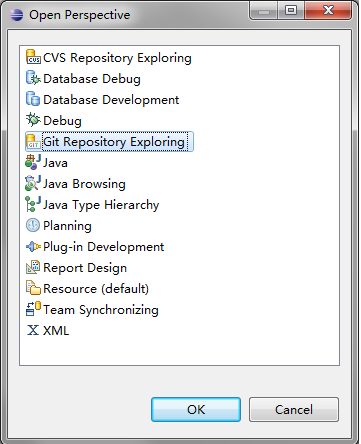
- c) In "Check Home Directory ..." dialog, click "Do not show again" and press OK.
- d) Use the "Clone a Git Repository" button from the view's toolbar to start the Clone wizard.

- e) In "Clone Gir Repository" dialog, set the following values and press Next:
- URI: dev.eclipse.org; Host: git.eclipse.org; Repository path: /gitroot/birt/org.eclipse.birt.git; Protocol: git
- URI: dev.eclipse.org; Host: git.eclipse.org; Repository path: /gitroot/birt/org.eclipse.birt.git; Protocol: git
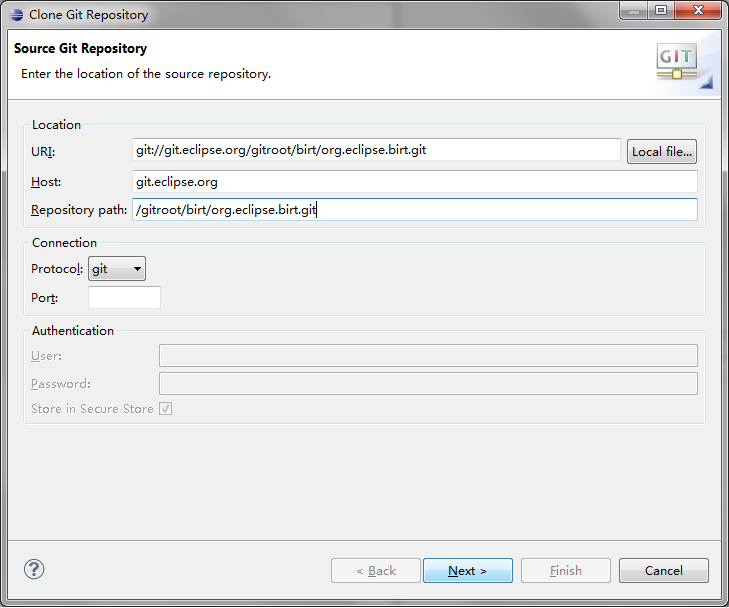
- f) In Branch Selection, keep default,press Next.
- g) In Local Destination, change Directory to your workspace path, then press Finish.
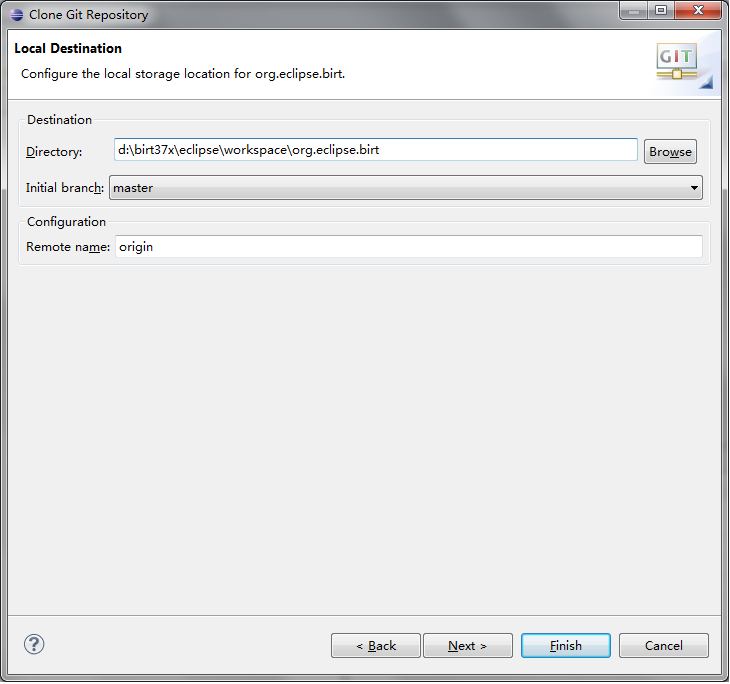
- h) This will clone eclipse birt repo to your local, This will take some time.
- a) Select menu: Window -> Open Perspective -> Other
- 5. Import and build source.
- a) Switch to Java Perspective.
- b) Right-click in the Package Exlorer pane and select Import...
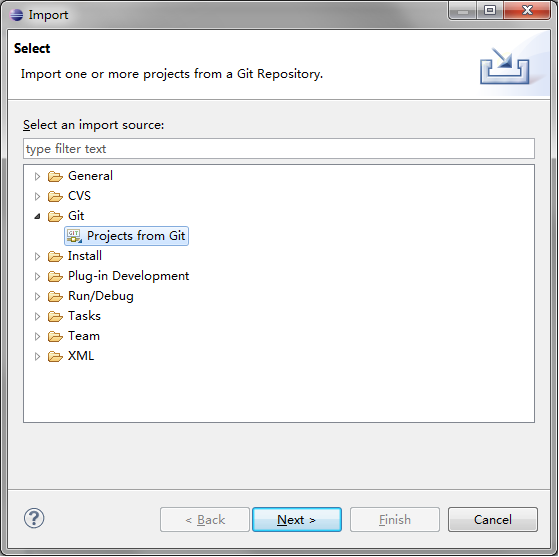
- c) In "Select", choose Git -> Projects from Git, then press Next.
- d) In "Select a Git Repository", choose repo created in step 4, press Next.
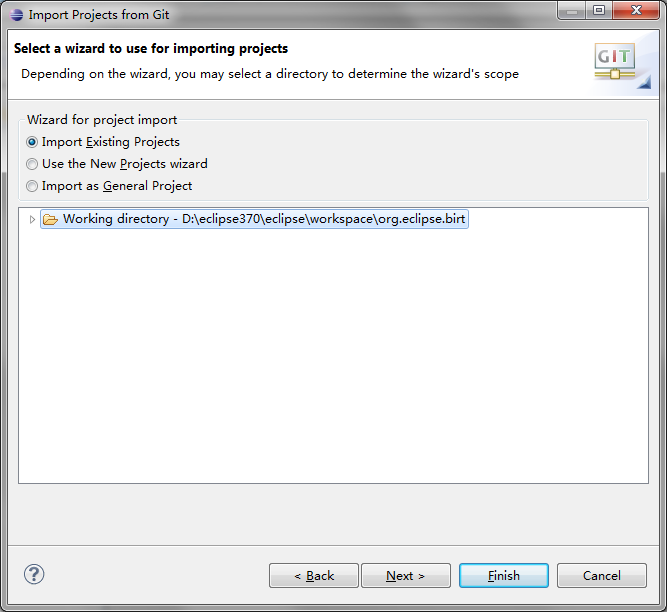
- e) In "Select a wizard to use for importing projects", keep default, press Next.
- f) In "Import Projects", Deselect extension-*, *.features, *.nl, *osgi*, *test*, org.eclipse.birt.build, org.eclipse.birt.releng.birtbuilder, org.eclipse.birt.releng.util.
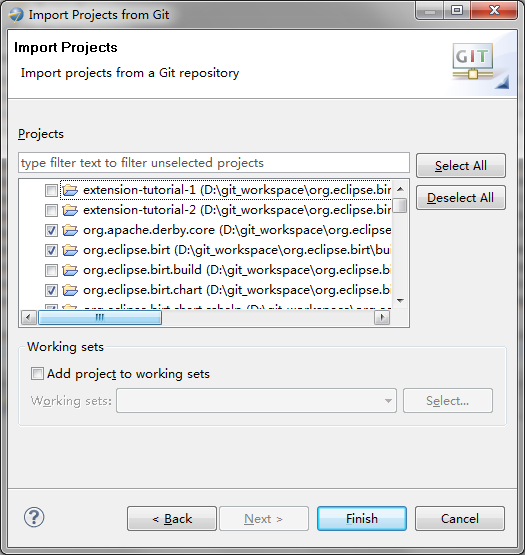
- g) Press Finish, it should start to import plugins.
- h) Auto build will start when finish importing, this will also take some time.
- a) Switch to Java Perspective.
- 6. Fix errors.
- a) After all the projects have been built, you'll end up with 1 error: An API baseline has not been set for the current workspace : org.eclipse.birt.report.engine.dataextraction
- a) Select menu: Preferences -> Plug-in Development -> API Baselines. Press "Add Baseline...", then in the "New API Baseline" dialogue, press "Browse..." and choose the folder where your eclipse locates, then pick a name and Finish. Press OK in Preferences.
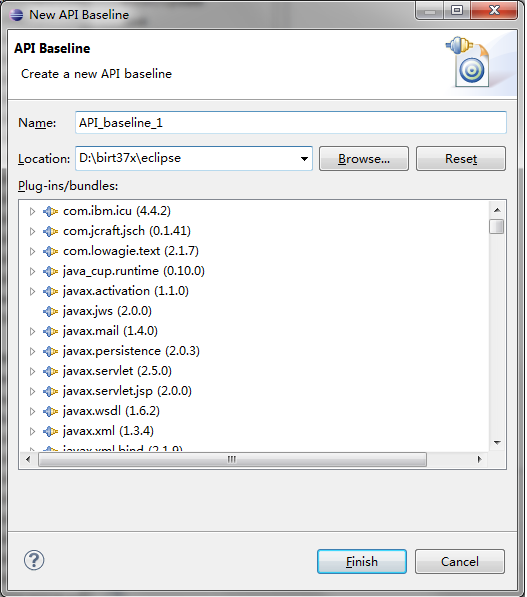
- c) Clean and re-build workspace, there should be 0 errors.
Q: How do I build the 2.5 and 2.6 BIRT RCP Report Designer?
1. Install BIRT prerequisite in Eclipse home. (You can use the allinone download to get all prerequisites.)
2. Download or import BIRT source code in workspace, including org.eclipse.birt.report.designer.ui.rcp
3. Open BIRT.product file which is under org.eclipse.birt.report.designer.ui.rcp with Product Configuration Editor
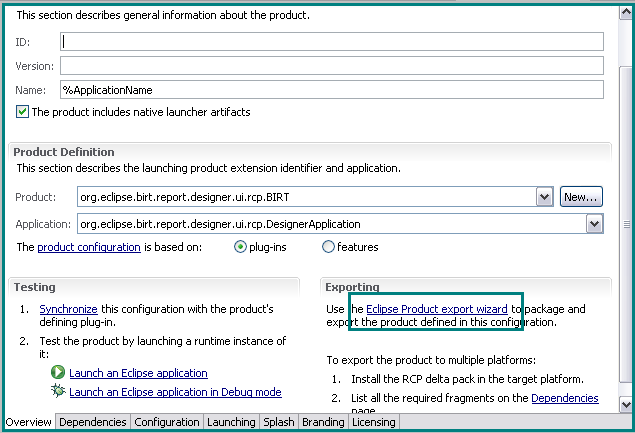
4. In the "Overview" tab -> Exporting section, open the "Eclipse Product export wizard".
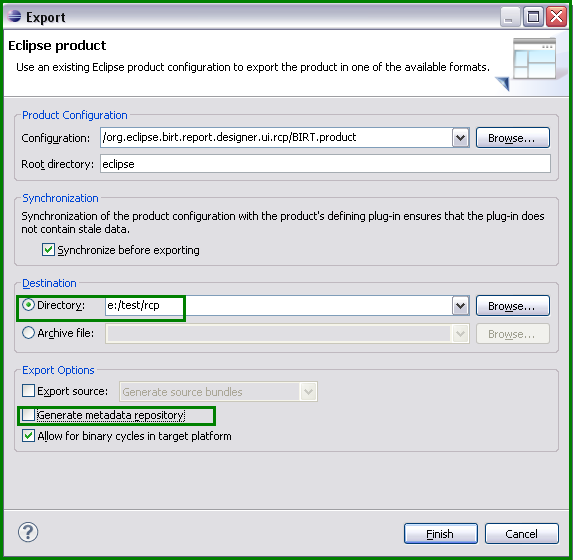
5. In the Export dialog, Set the exported Directory.
Deactivate the option "Generate metadata repository" in the Export dialog, which is not a necessary option when exporting a RCP product.
Then click "Finish".
The exporting of RCP should be started automatically and you will get the RCP under the directory when it finishes.
Q: How do I build the 2.2/2.3/2.5 BIRT Viewer?
1. Install BIRT prerequisite in Eclipse home. (You can use the allinone download to get all prerequisites.)
2. Download or import BIRT source code in workspace.
3. Change viewer code.
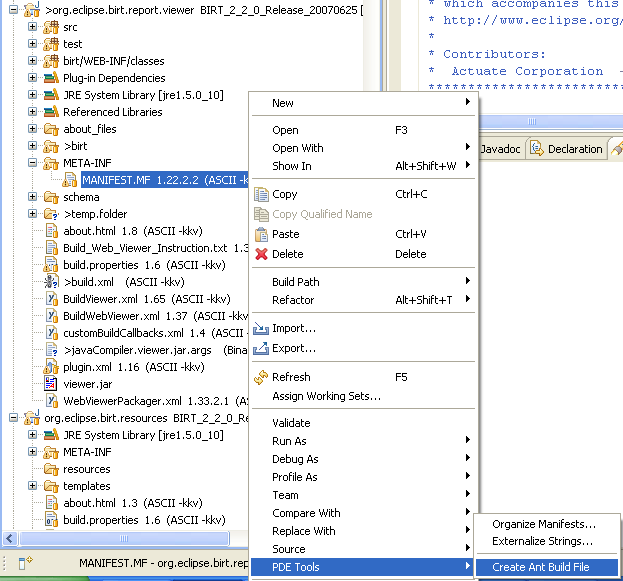
4. Right click on the MANIFEST.MF of org.eclipse.birt.report.viewer.
Select “PDE tools”-> “Create Ant Build File.
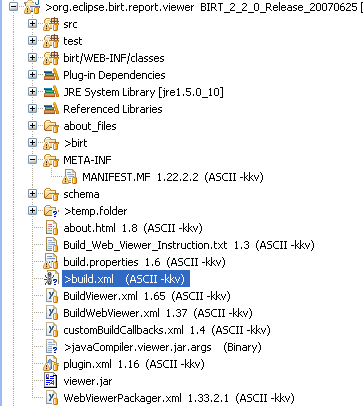
5. The PDE build will generate the build.xml under the root folder of org.eclipse.birt.report.viewer.
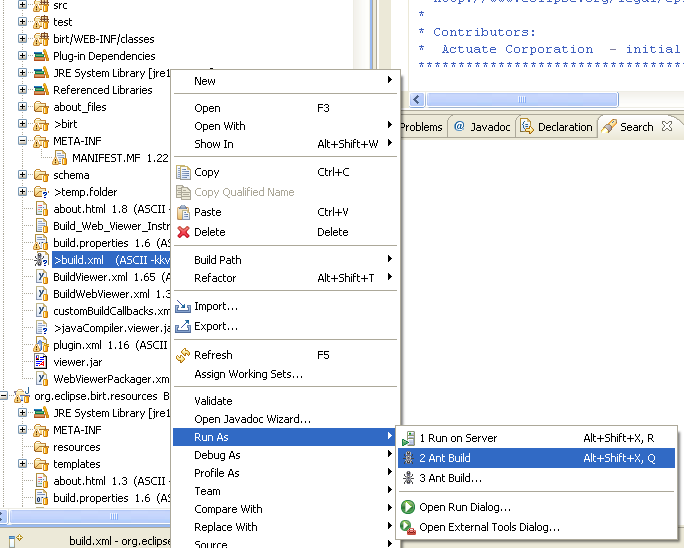
6. Right click on the build.xml. Select "Run As" -> "Ant Build..." to open the build configuration dialog.
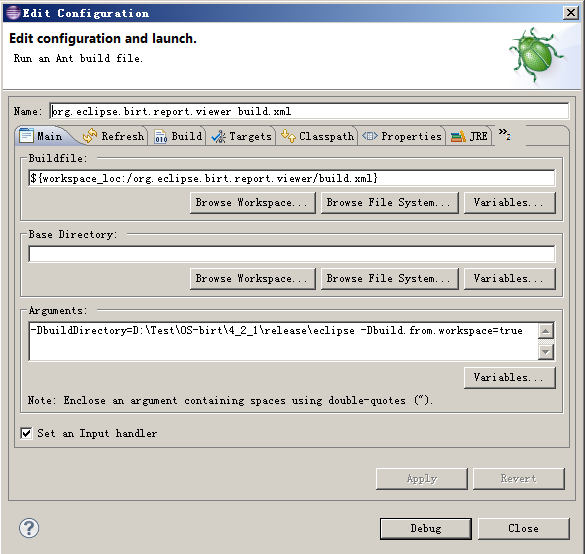
7. In the build configuration dialog, switch to Main tab, set param ${buildDirectory} to your All-In-One home directory and ${build.from.workspace} to true. After setting, click "run" to start the build process.
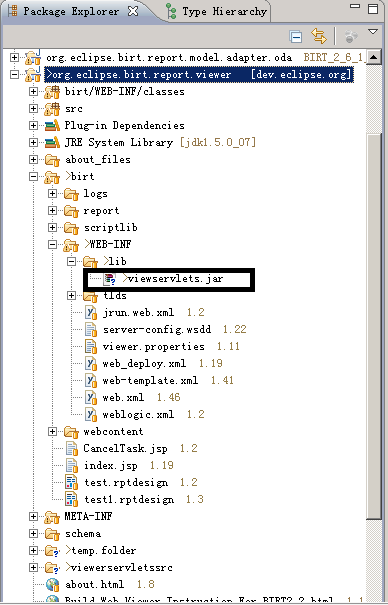
8. When the build process is finished, refresh the project and viewservlets.jar can be found under birt/WEB-INF/lib/ folder. This jar is used with the Viewer when it is deployed as a J2EE application. Replace this jar in your existing deployment. The viewer.jar can be found under root folder. This jar is used when the Web Viewer is used in plugin format.
Q: How do I export the 2.2/2.3 BIRT web viewer?
1. Downloaded and installed the birt-report-designer-all-in-one.
2. Download 2.2.2 runtime package birt-runtime-2_2_2.zip.
3. Configure the cvs repository and checked out the project BIRT_2_2_2_Release 20080227 (Excluding org.eclipse.birt.build and all *.test, *.tests, *.releng.*, *.doc.isv, *.cshelp and org.eclipse.birt.report.engine.emitter.Prototype_excel).
4. Created build file from MANIFEST.MF in the org.eclpse.birt.report.viewer project
- Run build.xml as ant file.
(Set ${buildDirectory} to your All-In-One installation home in build configuration dialog. Please see http://wiki.eclipse.org/BIRT/FAQ/Birt_Project#Q:_How_do_I_build_the_2.2.2F2.3.2F2.5_BIRT_Viewer.3F, step 7)
- You will get viewservlets.jar under org.eclipse.birt.report.viewer/birt/WEB-INF/lib/
5. Create api jars for web viewer. - Create build.xml for below BIRT plugins from MANIFEST.MF files by PDE tools:
* org.eclipse.birt.core
* org.eclipse.birt.data
* org.eclipse.birt.report.model
* org.eclipse.birt.report.model.adapter.oda
* org.eclipse.birt.report.engine
* org.eclipse.birt.report.data.adapter
- Run the auto-generated build.xml files of above plugins in workspace seperately. Api jars (coreapi.jar, dteapi.jar, modelapi.jar, modelodaapi.jar,odadesignapi.jar,engineapi.jar,scriptapi.jar,dataadapterapi.jar) will be generated automatically under those plugins.
6. Right click on ant file org.eclipse.birt.report.viewer/WebViewerPackager.xml -> Run As -> Ant Build...-> Swtich to "Main" tab -> Add ant arguments: -Declipse.home=<YOUR ALL-IN-ONE INSTALL DIR> -Dintegrate.dir=<YOUR ALL-IN-ONE INSTALL DIR>
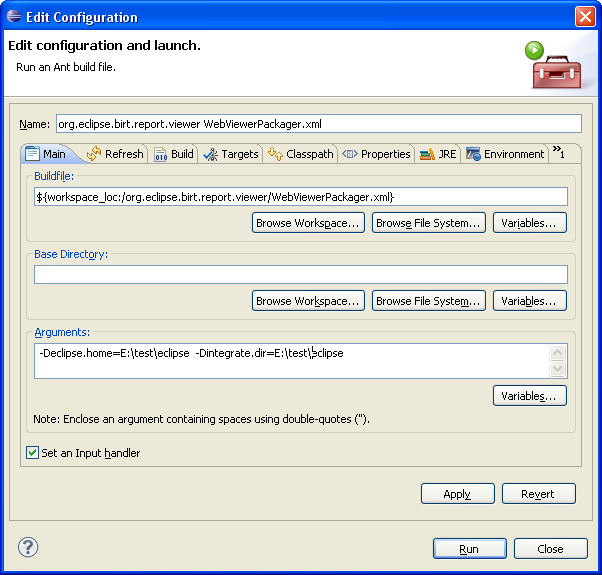
7. Press "Run" button of the configuration dialog.
8. Right click on ant file org.eclipse.birt.report.viewer/WebViewerPackager.xml -> Run As -> Ant Build...-> Swtich to "Main" tab -> Append one more argument: -Dexport.dir=<output dir of web viewer>
If you don't add this argument, the birt viewer will be exported under org.eclipse.birt.report.viewer/export by default.
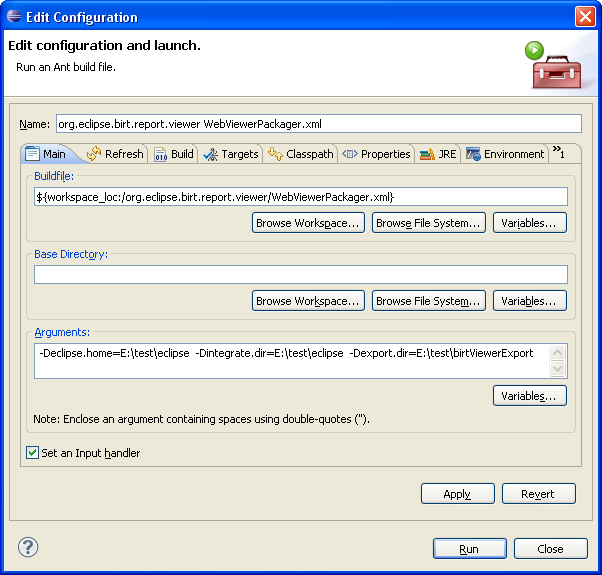
9. Switch to "Targets" tab -> Choose "Export" target -> press "Run" button. After the process, birt viewer will be exported under the directory ${export.dir}.
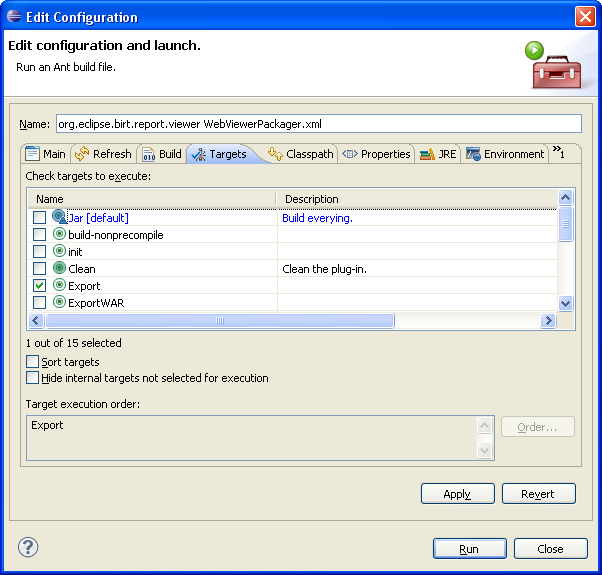
10. Copy the file org.eclipse.birt.api_1.0.0.jar from the \birt-runtime-2_2_2\WebViewerExample\WEB-INF\platform\plugins directory to ${export.dir}\org.eclipse.birt.report.viewer\birt_web\WEB-INF\platform\plugins directory
11. Before deploy your web viewer to app server, rename the web_deploy.xml to web.xml (overwrite the original one).
Q: How do I export the 2.3.1 BIRT web viewer?
- Download and install the Birt 2.3.1 All-In-One file birt-report-designer-all-in-one-2_3_1.zip.
- Download the Birt 2.3.1 Runtime file birt-runtime-2_3_1.zip.
- Run Eclipse. Ensure that the default JRE is for Java 1.5 and that the compiler complience is set to 1.5
- Configure the CVS repository :pserver:anonymous@dev.eclipse.org:/cvsroot/birt
- Under the Head/source folder select all the packages except for;
- org.eclipse.birt.build
- *.test,
- *.tests.*,
- *.testhelper
- *.releng.*,
- *.doc.isv,
- *.cshelp.
- Right-Click and selcet Check-Out-As. Refresh the tags and select the BIRT_2_3_1_Release_200809221151 version.
- For the following projects,
- Create a build.xml file from the META-INF/MANIFEST.MF file using the Right-Click/PDE Tools/Create Ant Build File option.
- Run the ant build.xml file by using the Right-Click/Run-As/Ant Build option and generate the corresponding jar files. (For org.eclipse.birt.report.viewer, please set ${buildDirectory} to your All-In-One installation home in build configuration dialog. Please see http://wiki.eclipse.org/BIRT/FAQ/Birt_Project#Q:_How_do_I_build_the_2.2.2F2.3.2F2.5_BIRT_Viewer.3F, step 7)
- org.eclipse.birt.report.viewer
- birt.temp.folder/birt/WEB-INF/lib/viewservlets.jar.bin
- org.eclipse.birt.core
- coreapi.jar
- org.eclipse.birt.data
- dteapi.jar
- org.eclipse.birt.data.aggregation
- dataaggregationapi.jar
- org.eclipse.birt.report.model
- modelapi.jar
- org.eclipse.birt.report.model.adapter.oda
- modelodaapi.jar
- odadesignapi.jar
- org.eclipse.birt.report.engine
- engineapi.jar
- scriptapi.jar
- org.eclipse.birt.report.engine.dataextraction
- dataextraction.jar
- org.eclipse.birt.report.data.adapter
- dataadapterapi.jar
- org.eclipse.birt.report.item.crosstab.core
- crosstabcoreapi.jar
- Create <Eclipse-Birt-Project-Home>\extras directory (WebViewerPackager.xml will fail without this directory)
- Modify WebViewerPackager.xml and comment-out lines 608-612. The java command here is not necessary and will throw errors.
- Run ant file WebViewerPackager.xml to build the web viewer with the following command;
- ant Jar -Declipse.home=<BIRT-ALL-IN-ONE-INSTALL-DIR> -Dintegrate.dir=<BIRT-ALL-IN-ONE-INSTALL-DIR>
- -Dorg.apache.axis=1.4.0.v200807230600 -Djavax.xml.rpc=1.1.0.v200806030420
- -Djavax.xml.soap=1.2.0.v200806030421 -Dorg.apache.commons.discovery=0.2.0.v200806030120
- -f WebViewerPackager.xml
- ant Jar -Declipse.home=<BIRT-ALL-IN-ONE-INSTALL-DIR> -Dintegrate.dir=<BIRT-ALL-IN-ONE-INSTALL-DIR>
- Copy the file commons-logging-api-1.1.jar into the <Eclipse-Birt-Project-Home>\org.eclipse.birt.report.viewer\birt_web\WEB-INF\lib directory (needed for running under apache 6)
- Copy the file org.eclipse.birt.api_1.0.0.jar from the \birt-runtime-2_3_1\WebViewerExample\WEB-INF\platform\plugins directory to <Eclipse-Birt-Project-Home>\org.eclipse.birt.report.viewer\birt_web\WEB-INF\platform\plugins directory
- Your can either drop the <Eclipse-Birt-Project-Home>\org.eclipse.birt.report.viewer\birt_web\ directory into your application server's applications directory or Run the "Export" target of WebViewerPackager.xml and set the variable export.dir=<output dir of web viewer>.
Q: How do I export the 2.5 BIRT web viewer?
- Download and install the Birt 2.5.0 All-In-One file birt-report-designer-all-in-one-2_5_0.zip or Galileo EPP reporting package.
- Download the Birt 2.5.0 Runtime file birt-runtime-2_5_0.zip.
- Run Eclipse. Ensure that the default JRE is for Java 1.5 and that the compiler complience is set to 1.5
- Configure the CVS repository :pserver:anonymous@dev.eclipse.org:/cvsroot/birt
- Under the Head/source folder select all the packages except for;
- org.eclipse.birt.build
- *.test,
- *.tests.*,
- *.testhelper
- *.releng.*,
- *.doc.isv,
- *.cshelp,
- features/,
- nls/,
- *.integration.wtp.ui*,
- org.eclipse.birt.chart.viewer.
- Right-Click and selcet Check-Out-As. Refresh the tags and select the BIRT_2_5_0_Release_200906170630 version.
- For the following projects,
- Create a build.xml file from the META-INF/MANIFEST.MF file using the Right-Click/PDE Tools/Create Ant Build File option.
- Run the ant build.xml file by using the Right-Click/Run-As/Ant Build option and generate the corresponding jar files. (For org.eclipse.birt.report.viewer, please set ${buildDirectory} to your All-In-One installation home in build configuration dialog. Please see http://wiki.eclipse.org/BIRT/FAQ/Birt_Project#Q:_How_do_I_build_the_2.2.2F2.3.2F2.5_BIRT_Viewer.3F, step 7)
- org.eclipse.birt.report.viewer
- birt.temp.folder/birt/WEB-INF/lib/viewservlets.jar.bin
- org.eclipse.birt.core
- coreapi.jar
- org.eclipse.birt.data
- dteapi.jar
- org.eclipse.birt.data.aggregation
- dataaggregationapi.jar
- org.eclipse.birt.report.model
- modelapi.jar
- org.eclipse.birt.report.model.adapter.oda
- modelodaapi.jar
- odadesignapi.jar
- org.eclipse.birt.report.engine
- engineapi.jar
- scriptapi.jar
- org.eclipse.birt.report.engine.dataextraction
- dataextraction.jar
- org.eclipse.birt.report.data.adapter
- dataadapterapi.jar
- org.eclipse.birt.report.item.crosstab.core
- crosstabcoreapi.jar
- org.eclipse.birt.report.engine.emitter.config
- emitterconfig.jar
- Modify WebViewerPackager.xml and comment-out lines 608-618. The java command here is not necessary and will throw errors.
- Run ant file WebViewerPackager.xml to build the web viewer with the following command;
- ant Jar -Declipse.home=<BIRT-ALL-IN-ONE-INSTALL-DIR> -Dintegrate.dir=<BIRT-ALL-IN-ONE-INSTALL-DIR>
- -Dorg.apache.axis=1.4.0.v200905122109 -Djavax.xml.rpc=1.1.0.v200905122109
- -Djavax.xml.soap=1.2.0.v200905122109 -Dorg.apache.commons.discovery=0.2.0.v200905122109
- -f WebViewerPackager.xml
- ant Jar -Declipse.home=<BIRT-ALL-IN-ONE-INSTALL-DIR> -Dintegrate.dir=<BIRT-ALL-IN-ONE-INSTALL-DIR>
- Copy the file commons-logging-api-1.1.jar into the <Eclipse-Birt-Project-Home>\org.eclipse.birt.report.viewer\birt_web\WEB-INF\lib directory (needed for running under apache 6)
- Copy the file org.eclipse.birt.api_1.0.0.jar from the \birt-runtime-2_5_0\WebViewerExample\WEB-INF\platform\plugins directory to <Eclipse-Birt-Project-Home>\org.eclipse.birt.report.viewer\birt_web\WEB-INF\platform\plugins directory
- Your can either drop the <Eclipse-Birt-Project-Home>\org.eclipse.birt.report.viewer\birt_web\ directory into your application server's applications directory or Run the "Export" target of WebViewerPackager.xml and set the variable export.dir=<output dir of web viewer>.
Q: How do I export the 2.5 BIRT chart viewer?
1. Download and install the Birt 2.5.0 All-In-One file birt-report-designer-all-in-one-2_5_0.zip or Galileo EPP reporting package.
2. Run Eclipse. Ensure that the default JRE is for Java 1.5 and that the compiler complience is set to 1.5
3. Configure the CVS repository :pserver:anonymous@dev.eclipse.org:/cvsroot/birt
4. Under the Head/source folder select org.eclipse.birt.chart.viewer
5. Right-Click and select Check-Out-As. Refresh the tags and select the BIRT_2_5_0_Release_200906170630 version.
6. Swtich to Java perspective.
7. Create a folder named "export" under org.eclipse.birt.chart.viewer.
8. Right-click on the BuildChartWebViewer.xml under org.eclipse.birt.chart.viewer, choose "Run As" -> "Ant Build..."
9. In "Main" tab, set Arguments: -Declipse.home=E:\test\epp\eclipse -Dintegrate.dir=E:\test\epp\eclipse (E:\test\epp\eclipse is my Eclipse installation directory)
10. In "Target" tab, select target "Export", click "Run" button to start the build process.
11. Refresh the org.eclipse.birt.chart.viewer folder after the build process finished.
12. You can find chart-viewer-sample.war under the export directory.
Q: How do I export the 3.7 BIRT web viewer?
- Download and install the Birt 3.7.0 All-In-One file birt-report-designer-all-in-one-3_7_0.zip or Indigo EPP reporting package.
- Run Eclipse. Ensure that the default JRE is for Java 1.5 and that the compiler complience is set to 1.5
- Configure the CVS repository :pserver:anonymous@dev.eclipse.org:/cvsroot/birt
- Under the Head/source folder select :
- org.eclipse.birt.report.engine
- org.eclipse.birt.core
- org.eclipse.birt.report.engine.dataextraction
- org.eclipse.birt.report.model
- org.eclipse.birt.data
- org.eclipse.birt.report.data.adapter
- org.eclipse.birt.report.viewer
- org.w3c.sac
- org.apache.derby.core
- Right-Click and selcet Check-Out-As. Refresh the tags and select the BIRT_3_7_0_Release_201106091010 version.
- Right-Click the org.eclipse.birt.report.viewer project and choose "Switch to...", choose tag v20110723. We have update the build script a little to avoid failures when exporting viewer for the 3.7.0 version.
- Create viewsevlets.jar, please see http://wiki.eclipse.org/BIRT/FAQ/Birt_Project#Q:_How_do_I_build_the_2.2.2F2.3.2F2.5_BIRT_Viewer.3F, step 7)
- Create org.eclipse.birt.report.runtime_*.jar. (Please see http://wiki.eclipse.org/BIRT/FAQ/Birt_Project#Q:_How_do_I_export_org.eclipse.birt.report.runtime_jar_for_3.7_BIRT_web_viewer.3F ) Copy the org.eclipse.birt.report.runtime_*.jar to org.eclipse.birt.report.viewer/birt/WEB-INF/lib/ in your workspace.
- Since BIRT has migrated from CVS to Git since 3.7.2, you need to manually add a target in the WebViewerPackage.xml before running(#400702, this has been fixed in latest master branch for 4.2.2 release)
<target name="setRelativePath">
 <echo message="build.from.workspace flag: ${build.from.workspace}"/>
 <condition property="workspace.core" value="../../core" else="..">
  <equals arg1="${build.from.workspace}" arg2="true" />
 </condition>
 <condition property="workspace.data" value="../../data" else="..">
  <equals arg1="${build.from.workspace}" arg2="true" />
 </condition>
 <condition property="workspace.engine" value="../../engine" else="..">
  <equals arg1="${build.from.workspace}" arg2="true" />
 </condition>
 <condition property="workspace.model" value="../../model" else="..">
  <equals arg1="${build.from.workspace}" arg2="true" />
 </condition>
 <echo message="workspace.data: ${workspace.data}"/>
 <echo message="workspace.core: ${workspace.core}"/>
 <echo message="workspace.engine: ${workspace.engine}"/>
 <echo message="workspace.model: ${workspace.model}"/>
</target>

<target name="post.viewer.jar" depends="setRelativePath">
...
</target>
- Run ant file WebViewerPackager.xml to build the web viewer with the following command;
ant Jar -Declipse.home=<BIRT-ALL-IN-ONE-INSTALL-DIR> -Dintegrate.dir=<BIRT-ALL-IN-ONE-INSTALL-DIR>

-Dorg.apache.axis=1.4.0.v201005080400 -Djavax.xml.rpc=1.1.0.v201005080400
-Djavax.xml.soap=1.2.0.v201005080501 -Dorg.apache.commons.discovery=0.2.0.v201004190315
-Dbuild.from.workspace=true -f WebViewerPackager.xml
- Copy the file commons-logging-api-1.1.jar into the <Eclipse-Birt-Project-Home>\org.eclipse.birt.report.viewer\birt_web\WEB-INF\lib directory (needed for running under apache 6)
- Your can either drop the <Eclipse-Birt-Project-Home>\org.eclipse.birt.report.viewer\birt_web\ directory into your application server's applications directory or Run the "Export" target of WebViewerPackager.xml and set the variable export.dir=<output dir of web viewer>.
- Note that, please delete the <Eclipse-Birt-Project-Home>\org.eclipse.birt.report.viewer\birt_web\WEB-INF\platform before using. Since 3.7.0 release, birt no longer have WEB-INF\platform directory in runtime package.
Q: How do I export org.eclipse.birt.report.runtime jar for 3.7 BIRT web viewer?
Starting from BIRT 3.7.0 release, there is no platform/ folder under the WEB-INF/ in the runtime package(230149). There is only one single jar "org.eclipse.birt.report.runtime_*.jar" under the WEB-INF/lib folder, which includes all the BIRT classes.
Below are the steps how you can export the single org.eclipse.birt.report.runtime_*.jar from your workspace.
- Download and install the Birt 3.7.0 All-In-One file birt-report-designer-all-in-one-3_7_0.zip or Indigo EPP reporting package.
- Download the Birt 3.7.0 Runtime file birt-runtime-3_7_0.zip.
- Run Eclipse. Ensure that the default JRE is for Java 1.5 and that the compiler complience is set to 1.5
- Configure the CVS repository :pserver:anonymous@dev.eclipse.org:/cvsroot/birt
- Under the Head/source folder select
- org.eclipse.birt.build,
- org.eclipse.birt.releng.birtbuilder,
- Right-Click and selcet Check-Out-As. Refresh the tags and select the BIRT_3_7_0_Release_201106091010 version.
- Download dom4j 1.6.1 jar file(dom4j-1.6.1.jar) from http://sourceforge.net/projects/dom4j/files/ . Copy it to org.eclipse.birt.build/lib.
- Right-Click the project org.eclipse.birt.build -> Export... -> Plugin Development -> Deployable plug-ins and fragments -> Next. Set the destination directory and click "Finish" to export the org.eclipse.birt.build_2.2.0.jar, which has a util to integrate BIRT classes into single jar.
- Copy the exported org.eclipse.birt.build_2.2.0.jar to org.eclipse.birt.releng.birtbuilder/extras/
- Right-Click org.eclipse.birt.releng.birtbuilder/buildAll.xml -> Select "Ant Build..."
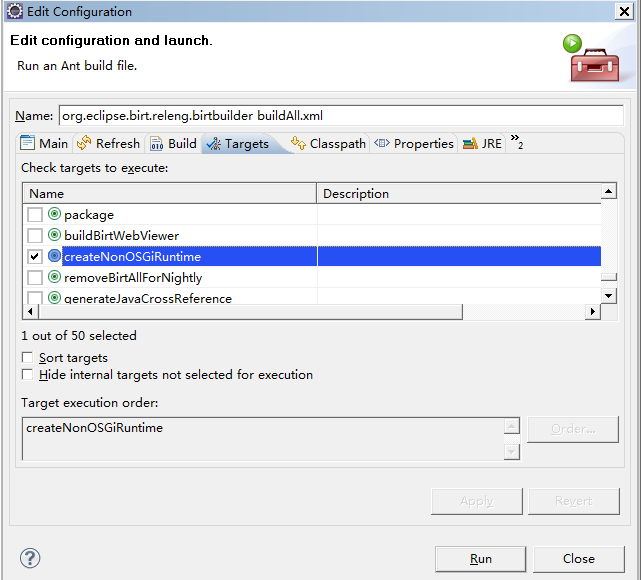
- In the pop-up configuration dialog, choose "Targets" tab, select the target "createNonOSGiRuntime" target to run.
- Switch to the "Main" tab, set the 4 properties for the ant target:
- # where to find the birt plugins to integrate
- -DbuildOutputDir=D:\eclipse\eclipse-reporting-helios-SR1-win32-x86_64\eclipse\plugins
- # temp directory to generate the org.eclipse.birt.report.runtime jar
- -DbuildOutputDir.tmp=D:\eclipse\temp
- # directory where the org.eclipse.birt.report.runtime jar will be output
- -DoutputDir=D:\eclipse\birt-runtime
- # the plugin version of org.eclipse.birt.report.engine_*.jar. We need to exclude the 3rd party jars when integrate BIRT classes.
- -Dorg.eclipse.birt.report.engine=2.6.1.v20100915.
-
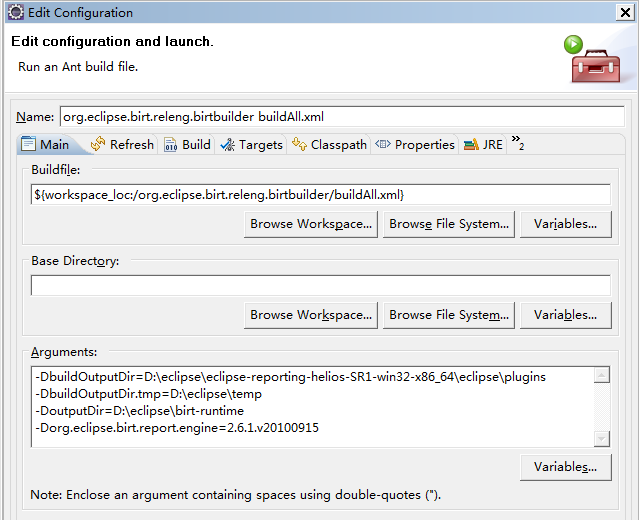
- Click "Run". After process, the org.eclipse.birt.report.runtime_*.jar will be outputed under ${outputDir}
Q: How can I generate org.eclipes.birt.api.jar for ReportEngine?
The framework fragment org.eclipse.birt.api is used to import the BIRT API jars into the OSGi framework, so the ReportEngine can be embedded into other framework (such as main app or J2EE).
The org.eclipse.birt.api bundle only contains a manifest file which exports all the packages defined in the BIRT API jars (include coreapi.jar, modelapi.jar, chartapi.jar etc). It locates under WEB-INF/platform/plugins folder.
You can get a tool from org.eclipse.birt.build/org.eclipse.birt.build.ExportManifestUtils which can be used to export the packages from the jars. Below are suggested steps:
1. Check out org.eclipse.birt.build project (:pserver:anonymous@dev.eclipse.org:/cvsroot/birt,,source/org.eclipse.birt.build)
2. Run ExportManifestUtils.java as "Java Application". (There might be compile errors which is caused by missning dom4j library. Please see the readme.txt for resolve the error. Those errors won't affect the generating of birt.api jar )
3. In configuration dialog of "Java Application", set lib folder as the parameter. For example: "C:\Documents and Settings\Farrah\Desktop\WebViewerExample\WEB-INF\lib"
4. Press "Run". All packages of jars under lib will be output in the Console view.
5. Create the MAINFIEST.MF file that export all the packages got by step (4) and create the org.eclipse.birt.api jar that only contain this MANIFEST.MF
6. Copy org.eclipse.birt.api bundle to WEB-INF/platform/plugins folder.
Note that, this jar no longer exist/required in BIRT 3.7 runtime.
Q: How can I check out BIRT source code according to certain map files?
This is only supported in BIRT 2.2 and above. You need to know the exact version of map file(org.eclipse.birt.releng) before you perform the steps.
An easier way is to use the org.eclipse.releng.tools plug-in (at the end of the platform download page for each build):
- Install org.eclipse.releng.tools into your Eclipse
- Check out the map project: org.eclipse.birt.releng with the tag you like
- Select the cvs project(s) you're interested in
- Choose context menu > Replace With > Released
This should fetch each project's tag from the map files and check out the correct version.
Q: How do I run BIRT JUnit Tests?
Please follow instructions on Build-Junit page.
Q: How do I use BIRT Test Package to setup test framework?
The BIRT Test Package contains all the test plugins and the required resources. Integrating with Eclipse test framework, it’s easy to run the Junit test cases in batch. In this section, we will give out the instructions about usage of birt-test-suite package and how to run the automated JUnit test plugin.
Prerequisites
Before running the JUnit test, users need to download 3 packages:
1. birt-report-designer-all-in-one-<package.version>.zip or birt-report-designer-all-in-one-<package.version>-linux-gtk.tar.gz (http://download.eclipse.org/birt/downloads)
2. birt-test-suite-<package.version>.zip ( http://download.eclipse.org/birt/downloads)
3. eclipse-test-framework-I20070625-1500.zip (http://www.eclipse.org/downloads/download.php?file=/eclipse/downloads/drops/R-3.3-200706251500/eclipse-test-framework-3.3.zip )
Note:
1.Only BIRT 2.2.0 or above support the automated JUnit test.
2.Suggest to download BIRT2.2.1 test framework which contains the newest BIRT bootstrap script (BirtRunner.sh and BirtRunner.bat).
Setup Steps
1. Make sure JDK1.5 or above version is installed in the test environment. JAVA_HOME is pointing to the correct directory and $JAVA_HOME/bin has been added to system classpath.
2. Make sure ant is installed in the test environment. ANT_HOME is pointing to the correct directory and $ANT_HOME/bin has been added to system classpath
3. Unzip birt-report-all-in-one-<package.version>.zip
4. Unzip birt-test-suite-<package.version>.zip into the same folder as birt-report-all-in-one package
5. Unzip eclipse-test-framework-<package.version>.zip into the same folder as above.
6. If any duplicated plugins, please choose overwrite
Run Tests
Run All Tests on Windows
The top level ant script for start the whole JUnit tests is BirtRunner.xml, which can be found under the root folder of birt-test-suite.zip package. Please see the <target> “Start” in BirtRunner.xml to find out which tests will be called by bootstrap script.
Set three variables correctly in ant property file BirtRunner.properties:
1. test.home=<test directory, birt-test-suite.zip is unzipped to this folder>
2. jvm.15.home=< where the jvm 1.5 installed>
3. os=windows
4. test-output-dir=<test report output directory>
The bootstrap script for Windows OS is BirtRunner.bat. Double-click the BirtRunner.bat. Double-click the BirtRunner.bat to start the tests.
Run All Tests on Linux
The bootstrap script for Linux is BirtRunner.sh. Double-click the BirtRunner.sh,
Set three variables correctly in ant property file BirtRunner.properties:
1. test.home=<test directory, birt-test-suite.zip is unzipped to this folder>
2. jvm.15.home=< where the jvm 1.5 installed>
3. os=linux
4. test-output-dir=<test report output directory>
Start the test by command:
>./BirtRunner.sh start
Check Test Results
The output result files are in xml format. They can be found in folder ${test-output-dir}.
Run Single Test Plugin
If you like to run certain test plugin instead of all test plugins, follow below steps:
1. Switch to command mode(Windows)
2. Enter into the test plugin directory. (e.g. D:\tmp\eclipse\plugins\org.eclipse.birt.report.engine.tests_2.2.1.v20070821-0630 )
3. Start the JUnit test by command:
Windows
ant -f test.xml -Dos=windows -Declipse-home=<main test directory> -Dtest-output=<output file path> -Djvm=<JVM path> -Dvmargs=<vm args>
Linux
ant -f test.xml -Dos=linux -Declipse-home=<main test directory> -Dtest-output=<output file path> -Djvm=<JVM path> -Dvmargs=<vm args>
The output xml file can be found at the ${test-output}.
Generate HTML Test Reports
The xml test reports can be transformed to html reports by JUNIT.XSL, which locates in org.eclipse.birt.tests plugin.
Note:
Before transforming, all xml reports need to add root node <testsuites>. The original root node is <testsuite>.
Following steps are transforming to HTML reports by ant script.
1. Modify all xml reports’ root node to <testsuites> manually.
2. Set variable test-output-html-dir to the html result folder you want.
3. Enter to ${test.home} directory
4. Run ant command: ant -f BirtRunner.xml -propertyfile BirtRunner.properties genHtml
After the execution, the html reports can be found under folder ${ test-output-html-dir }
Update Test Plugins
If BIRT plugins/test plugins were changed and users like to rerun the automated tests with changed plugin, they can export changed BIRT plugins/test plugins by PDE and updated to the test environment.
Please follow below steps:
1. Make sure the source code pass compilation in Eclipse workbench
2. Right click the BIRT plugin/test plugin that need to be export.
3. Choose “Export…”->“Plug-in Development”->“Deployable plug-ins and fragments”, press “Next”
4. Set the “Destination” with the directory you like to export to.
5. Switch to “Options” tab, uncheck the option “Package plug-ins” as individual JAR archives” for test plugins
6. Click “Finish”.
7. The exported binary test plugins can be found in destination folder after execution. Update the export plugins to your own test environment and rerun the tests.
Project Update Site
Q: Where can I find update site for BIRT Project?
BIRT 2.3.x updates can be found on below update site:
- BIRT 2.3 Update Site - http://download.eclipse.org/birt/update-site/2.3
- Ganymede Update Site - http://download.eclipse.org/releases/ganymede
(Note that, only BIRT 2.3.2 is available at Ganymede update site)
BIRT 2.5.x updates can be found on below update site:
- BIRT 2.5 Update Site - http://download.eclipse.org/birt/update-site/2.5
- Galileo Update Site - http://download.eclipse.org/releases/galileo
Q: How to install BIRT 2.5 based on Galileo EPP packages?
If you are using Galileo EPP packages, which is not EPP reporting package, you can install BIRT via update site by below steps:
Step 1: Start Eclipse and navigate to Help > Install New Software...
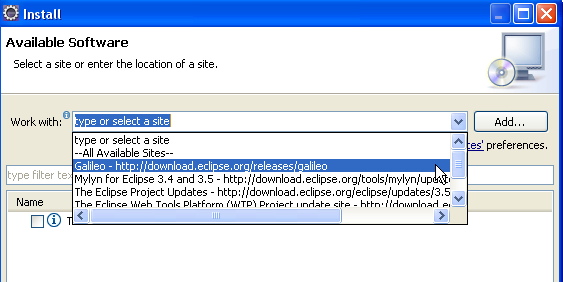
Step 2: Open the update site drop-down list and choose Galileo update site. Galileo update site should be the built-in site of all EPP packages.
Step 3: After Update Manager checks for available features, spread out the "Business
Intelligence,Reporting and Charting" category
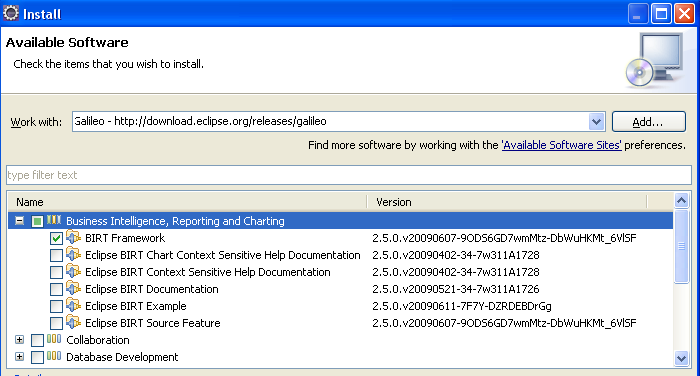
Step 4: Choose the BIRT feature you are interested in, for example: BIRT Framework
Step 5: Click "Next" button to enter the ”Install Details" page.
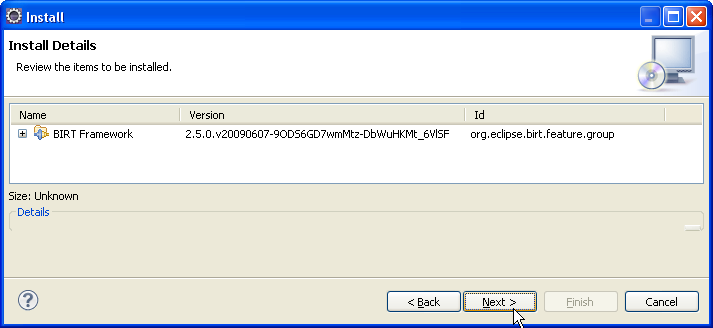
Step 6: Press Next and on the following page, accept the license terms.
Step 7: Press Finish and Update Manager will download the required components.
Step 8: Restart Eclipse.
Step 9: You can now start designing BIRT reports by selecting the Report Design perspective.
Choose Window > Open Prespective > Other... and then Report Design.
Q: How to upgrade to BIRT 2.3.2.2 based on Ganymede EPP reporting package?
If you are using Ganymede EPP reporting package, you can upgrade BIRT 2.3.2 to 2.3.2.2 release by following steps.
Step 1: Start Eclipse and navigate to Help > Software Updates...
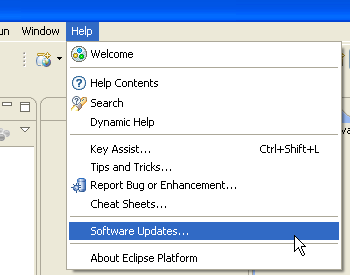
Step 2: Switch to "Available Software" tab. If BIRT 2.3 update site is listed already, please jump to step 5 to continue. If it is not, click "Manage Sites..." button.
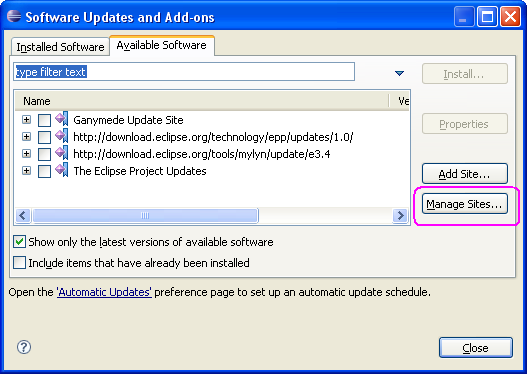
Step 3: Tick BIRT 2.3 update site to enable it. If you are not going to install other projects updates, you can un-tick the other update sites. This will reduce the time for searching feature updates in next steps.
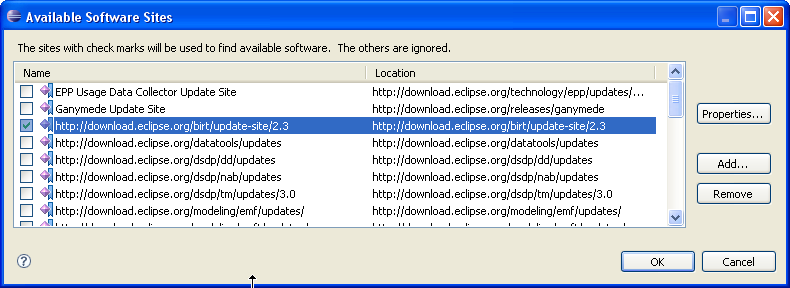
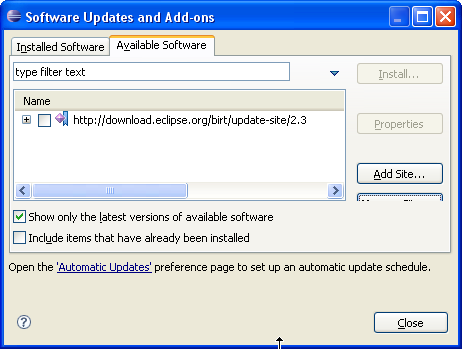
Step 4: Press "OK". BIRT 2.3 update site is listed in the available softeware list.
Step 5: Switch to the "Installed Software" tab, find and choose "Eclipse BIRT Report Designer Framework" feature.
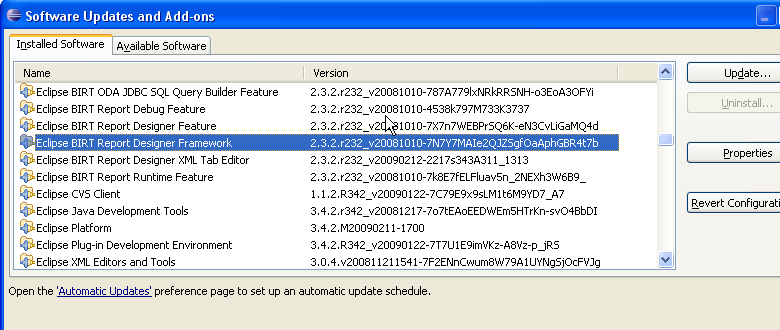
Step 6: Press "Update..." button to let update manager search the updates of selected feature.
Step 7: Update Manager will contact with available software site and BIRT 2.3.2.2 release will be found, which is available on BIRT update site
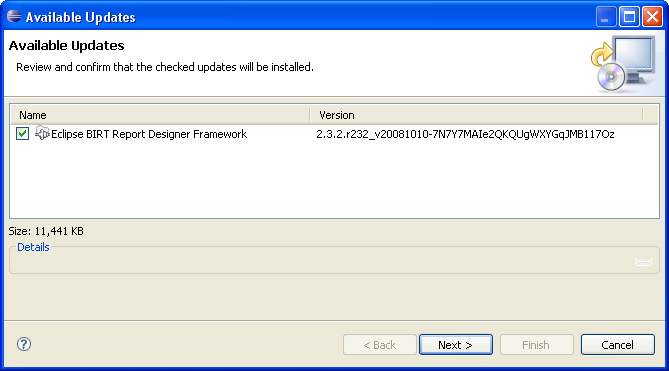
Step 8: Press Next and on the following page, accept the license terms.
Step 9: Press Finish and Update Manager will download the required components.
Step 10: Restart Eclipse.
Step 11: You can now start designing BIRT reports with BIRT 2.3.2.2 release version.
Contribution
Q: How can I contribute to the BIRT Project?
BIRT is an open source project and seeks contributions in many areas:
- Answer questions in the newsgroup. – As BIRT grows, new people will come to BIRT and ask questions that more experienced users have already answered. A great way to "give back" to the BIRT community is to answer such questions.
- Try out new builds & features and report suggestions & problems. – BIRT uses an incremental development process: "release early and often." If you're adventerous, try out new builds & features and let us know about bugs, or ways to improve the product.
- Platform, driver, app server and other integration issues. – The team tests BIRT on a set of plaforms identified in the Project Plan. If you work on a different platform, please try BIRT and report any problems that you find. File bugs using Bugzilla. Please be as specific as possible, since the development team does not have access to your platform.
- Examples. – Examples help users quickly see what BIRT can do, show how to accomplish tasks, and help the development team visualize how BIRT is used in practice. You can contribute a static example (HTML output of a report), a report design, a code example and more. Please let us know on the newsgroup that you've got an example and we'll work with you to get it onto the web site.
- Articles. – Articles can include how-to, tutorials, case studies, or brief notes about how to solve a particular problem, integrate with a particular bit of sofware and so on. Please let us know via the newsgroup and we'll work with you to get it onto the web site.
- Bug fixes. – If you discover a problem or enhancement, and have the time & skills to track down the problem and find a fix; you can submit the fix to the development team as a Bugzilla entry.
Q: How can I help develop BIRT by contributing code?
Interested in joining the BIRT project as a code contributor? Maybe you found a bug and made a patch to the source code to address this, or perhaps you would like to make significant contribution in a specific area.
Eclipse has an extensive process for code contributions and you can find more information on this topic on the How to Contribute to the BIRT Project page.
In brief, you have to earn the right to be Committer. This is done by submitting code patches, bug fixes, etc. or by making a significant contribution in some other way.
Q: Which codeline do I check out from CVS to create my patch?
Instructions about which codeline to use, and contributing to already released versions of BIRT are available on the Which Codeline page.
Futures
Q: How do I find out what the BIRT Project Team is working on next?
The development team publishes Development Plans for all upcoming releases to keep the community informed and provide a mechanism for feedback.
In addition, the Eclipse Bugzilla system is used to track all projects, big and small, that are being worked on for the BIRT project. You can query the Bugzilla system to find out what is assigned to any particular BIRT release.
Q: What other projects might fit within the BIRT project?
The BIRT Project has chosen to focus on reporting for the initial releases. Other possible projects could expand BIRT into many of the dimensions of Business Intelligence:
- Data Modeling tools for defining schemas, meta data.
- ETL (Extract, Transform, Load) tools for creating and maintaining the data warehouse.
- APIs and Frameworks to build business-user query tools for with flexible ad hoc access to data.
- Analysis tools that enable power-users to slice-and-dice the same data.
Q: How does the BIRT project relate to TPTP, Data Tools, etc.
Eclipse is an active, growing community with new top-level projects being created at a lively pace. The BIRT PMC has an active dialog with these other projects to understand where BIRT can leverage existing or proposed functionality. With a community as dynamic as Eclipse, we adjust our plans to incorporate new functionality as the community evolves.

