Notice: This Wiki is now read only and edits are no longer possible. Please see: https://gitlab.eclipse.org/eclipsefdn/helpdesk/-/wikis/Wiki-shutdown-plan for the plan.
ATL/How Install ATL (Dev) From CVS
Contents
Installation of the development version of ADT (ATL Development Toolkit) from CVS
Install Eclipse and EMF
In order to use the development branch of ADT (ATL Development Tools), you need Eclipse and EMF. ADT has been developed to be compatible with Eclipse 3.4 and EMF 2.4. You can download Eclipse here: http://www.eclipse.org/downloads/ and EMF here: http://www.eclipse.org/emf/.
Unzip the Eclipse zip file; this will create an eclipse directory with every Eclipse files in it.
Unzip the EMF zip file from the same directory (it also contains an eclipse directory, with the EMF additional files to Eclipse).
When you have finished to install Eclipse and EMF, you can run it.
Configuration of CVS access
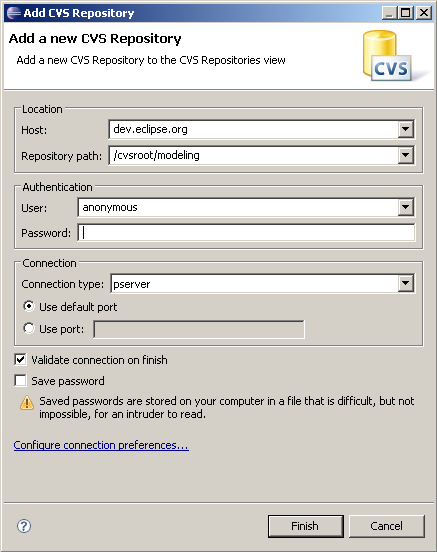
You should go to CVS Repository view (Window -> Open Perspective). Then you should add a new repository location. The required parameters are the followings:
You do not need a password.
Then, you can right-click on "Branches" and do "Refresh branches...". When you will be asked for, select the "CVSROOT" & "org.eclipse.m2m" projects and click on "Finish" (you also have to click on "Search deeply" when the corresponding dialog appears). Note that this action may take several minutes.
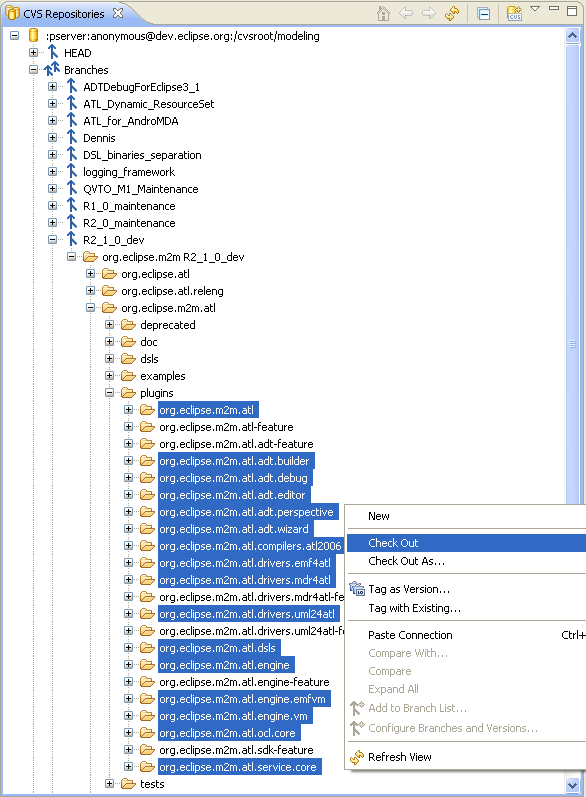
After that, you can follow the path shown on the next screenshot, select the corresponding projects and check them out (this action is available in the context menu).
You also need to install ANTLR which is managed, within Eclipse, by the Orbit project. To checkout this plugin, similarly follow those steps :
- Open an anonymous/commiter CVS connection to dev.eclipse.org, repository /cvsroot/tools
- Right-click on the repository location, then choose "Refresh branches"
- In the wizard, check the org.eclipse.orbit project
- In the branches, select the one named v3_0_0
- Checkout org.antlr.runtime
Configuration of ADT
Now, you need to go to the Plug-in perspective. Some external libraries are required for the plug-in org.eclipse.m2m.atl.drivers.mdr4atl but not available on the CVS repository (a README file is available in this plug-in). You need to download the jar files into the lib/ directory of these projects.
Download mdr-standalone.zip from http://mdr.netbeans.org/download/ and put the included jar files into lib/ of plugin org.eclipse.m2m.atl.drivers.mdr4atl.
Note that mdr-standalone.zip is updated more often on the MDR website than in our development source. As a consequence, bugs may appear when using the last-in-date mdr-standalone version of MDR.
When you have finished this operation, there is normally no error left.
Note that you can skip this last step and close the org.eclipse.m2m.atl.drivers.mdr4atl plugin's project if you are not going to use MDR.
ADT is ready to be tested. There are two ways to use it:
- In the "Plug-in Development perspective", you can launch a Run-time workbench (Click on Run -> Run as -> Run-time workbench).
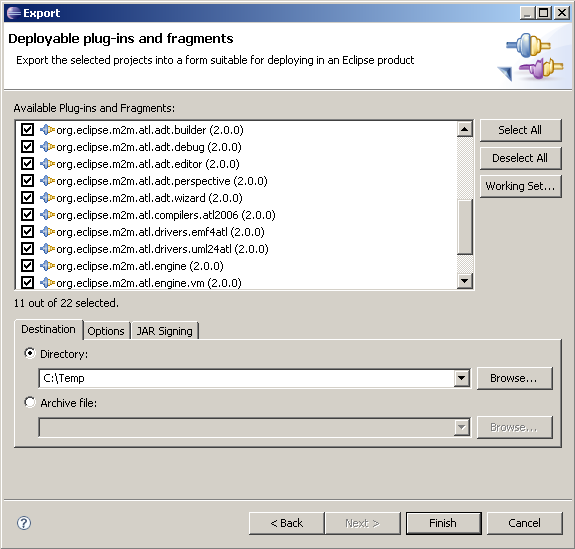
- You can install ADT in your copy of Eclipse. Go in the Plug-in perspective and select all the plug-in projects. In the context menu choose Export -> Deployable Plug-ins and Fragments.
In the screen Export Plug-ins and Fragments, check if all the projects are selected and choose the output folder.
Now you need to close Eclipse. Enter the "eclipse" directory (which contains plug-ins and features directories) then copy the created Jar files into the "plugins" directory. After that you can restart Eclipse.
You are ready to use ADT.


