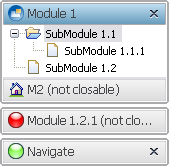
Notice: This Wiki is now read only and edits are no longer possible. Please see: https://gitlab.eclipse.org/eclipsefdn/helpdesk/-/wikis/Wiki-shutdown-plan for the plan.
Riena/Navigation
The motivation for Riena's navigation scheme is that the user-interface flexibility RCP offers (all views are resizable/movable/closable), while great for "power users" like software developers, is intimidating and confusing to the average business user - the flexilibity makes the GUI overly complex.
The goal of Riena's navigation concept is therefore to make it as easy and comfortable as possible for the enterprise user to navigate between different parts of the application. Riena's navigation model consists of a hierarchy of sub-applications, module groups, modules, and sub-modules. These parts are arranged in the application's GUI in a certain pre-set layout.
For example, a Riena application's navigation tree might look like this:
- sub-application
- module group
- module
- sub-module
- sub-module
- module
- sub-module
- module
- module group
- module
- sub-module
- module
- module group
- sub-application
- module group
- module
- sub-module
- module
- module group
A note on typeId values
- typeIds must be unique over the whole application.
- typeIds are never concatenated.
- typeIds are actually keys in a hashmap.
- You can have only one typeId for a node in the assembly, no matter which type the node has (modulegroup, module, submodule etc.).
- typeIds must be unique in the same way in the life tree at runtime, with the exception that you can have 2 typeIds with the same value if it has different instance IDs. instanceIds are used to distinguish different nodes with the same typeId but for different data (e.g. different customers displayed using a shared view).
Adapted from a post on the riena-dev mailing list.
Subapplications
The Riena application is made up from possibly multiple subapplications identifyable by the "tabs" in the top area of the application window.
This example shows a Riena client application with 2 subapplications called 'Navigation' and 'Playground'. The 'Navigation' subapplication is currently selected.
Module Groups, Modules and Submodules
Each subapplication may contain multiple module groups, each module group may contain multiple modules and each module may contain multiple submodules. Submodules may be organized in a hierarchical way, ie a submodul may have zero (probably the most common case), one or more submodules as children.
The Riena navigation therefore can be thought of as a tree where the root is the application node and the leafs are the submodule nodes.
There are some properties that can be defined for all navigation nodes:
- id - The id is made up from two parts, a type and an instance part. The type part identifies the kind of dialog and is equal for all nodes representing the same kind of dialog, ie they are required to use the same view id and controller class (in case a controller is used). The instance part is used in conjunction with the type part to uniquely identify instances of the same dialog.
If the customer overview dialog for example has type 'com.acme.customer.overview' the dialog instance for cutomer with the unique customer id '1234567' would be identified by NavigationNodeId('com.acme.customer.overview', '1234567')). - children - The children of the node. The type of children depends on the parent:
- subapplications can only have module group nodes
- module groups can only have module nodes
- modules and submodules can only have submodule nodes
Navigation nodes except module group nodes may also have a label and/or an icon.
There are three different ways to create navigation nodes for Riena applications:
- Programmatic Creation
- Using method calls to the Riena API.
- Using Extension Points
- Providing the navigation nodes as extensions.
- Navigation Node Assemblers
Programmatic Creation
All navigation structures may easily be created programmatically. If the application class configured in extension org.eclipse.core.runtime.applications extends org.eclipse.riena.navigation.ui.application.AbstractApplication the method createModel() would be sent within the start(IApplicationContext context) method. The default implementation just returns an application node without any children:
public static final String DEFAULT_APPLICATION_TYPEID = "application";

protected IApplicationNode createModel() {
	NavigationNodeId applicationNodeId = new NavigationNodeId(DEFAULT_APPLICATION_TYPEID);
	IApplicationNode applicationModel = new ApplicationNode(applicationNodeId);
	return applicationModel;
}
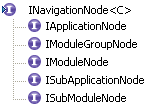
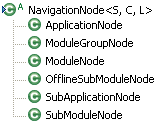
All navigation node interfaces extend a common super interface, org.eclipse.riena.navigation.INavigationNode. The implementation classes form a corresponding hierarchy where all non abstract navigation node classes inherit from org.eclipse.riena.navigation.model.NavigationNode:
|
|
Using Custom createModel() method
Let's now try to create the 'Navigation' subapplication and the first module group from the screenshot above. We start our implementation of the createModel() method with a call to the super implemetantion to receive an IApplicationNode and configure label and application icon:
@Override
protected IApplicationNode createModel() {
	IApplicationNode applicationNode = super.createModel();
	applicationNode.setLabel("Riena Navigation Example");
	applicationNode.setIcon(getIconPath(ExampleIcons.ICON_APPLICATION));

// ... everthing described below goes here ...

	return applicationNode;
Creating a Subapplication
To be able to create a subapplication we need one more thing: As subapplications in Riena correspond to RCP perspectives we need to contribute the corresponding extension. The view class representing the subapplication perspective in Riena is org.eclipse.riena.navigation.ui.swt.views.SubApplicationView, so we will configure our subapplication as follows (of course the id is not required to be 'subapplication.1'):
<extension point="org.eclipse.ui.perspectives">
   <perspective
         class="org.eclipse.riena.navigation.ui.swt.views.SubApplicationView"
         id="subapplication.1"
         name="subapplication.1">
   </perspective>
</extension>
We can now
- create a subapplication node with a certain node id
- register it with the WorkareaManager to assign the perspective we configured
- finally add it to the application node
// Navigation SubApplication
NavigationNodeId nodeId = new NavigationNodeId("org.eclipse.riena.example.navigation.subapplication");
ISubApplicationNode subApplication = new SubApplicationNode(nodeId, "Navigation");
WorkareaManager.getInstance().registerDefinition(subApplication, "subapplication.1");
applicationNode.addChild(subApplication);
This would bring up the Riena application with one subapplication called 'Navigation' that does not contain any content (please ignore menu and toolbar for now - those are there because I lazily abused the Riena example client and did not remove them):

Creating a Module Group
Creating a module group is rather easy in as there is no label, icon or work area that could require configuration. As we also do not need a node id here we can simply write:
// create a module group and add it to subapplication
IModuleGroupNode moduleGroup = new ModuleGroupNode(null);
subApplication.addChild(moduleGroup);
This does not change anything in the visualization of our example client as we do not yet have any modules within our module group and empty groups are not displayed. Therefore let's proceed creating our first module...
Creating a Module
// create a module and add it module group
IModuleNode module = new ModuleNode(null, "Module 1");
module.setIcon(getIconPath(ExampleIcons.ICON_APPLICATION));
moduleGroup.addChild(module);
...and add a submodule right away.
Creating Submodules
As the submodule has a presentation in the work area the associated view needs to be configured using the eclipse 'org.eclipse.ui.views' extension point:
<extension point="org.eclipse.ui.views">
   <view allowMultiple="true"
         class="org.eclipse.riena.example.client.views.CustomerDetailSubModuleView"
         id="org.eclipse.riena.example.client.views.CustomerDetailSubModuleView"
         name="org.eclipse.riena.example.client.views.CustomerDetailSubModuleView">
   </view>
</extension>
The association from node to view is done, just like for the subapplication, via the WorkareaManager.
// create "SubModule 1.1" and add it to "Module 1"
nodeId = new NavigationNodeId("org.eclipse.riena.example.customerDetail");
ISubModuleNode subModule = new SubModuleNode(nodeId, "SubModule 1.1");
subModule.setIcon(getIconPath(ExampleIcons.ICON_FILE));
WorkareaManager.getInstance().registerDefinition(subModule,
     CustomerDetailSubModuleController.class, CustomerDetailSubModuleView.ID);
module.addChild(subModule);
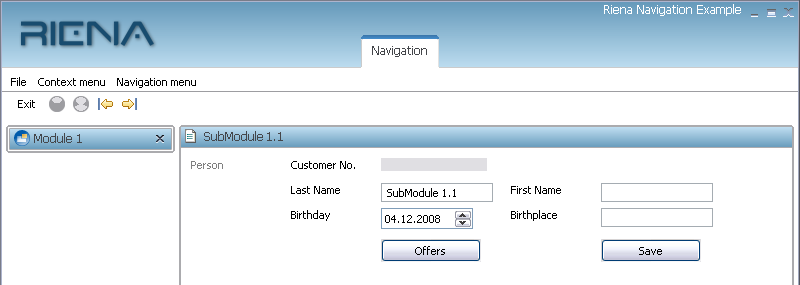
Starting the application would bring up the example appliation like this:
Note that
- the first submodule found within the whole application (ie. first submodule within first module within first module group within first subapplication) is automatically selected by default
- the module cannot be expanded as it has only one submodule (expanding would not make too much sense as with one submodule you do not have too many options to select another submodule)
Final Steps
It should now be easy to add some more submodules
// create "SubModule 1.1.1" and add it to "SubModule 1.1"
nodeId = new NavigationNodeId("org.eclipse.riena.example.customerDetail");
ISubModuleNode subModule2 = new SubModuleNode(nodeId, "SubModule 1.1.1");
WorkareaManager.getInstance().registerDefinition(subModule2,
     CustomerDetailSubModuleController.class, CustomerDetailSubModuleView.ID);
subModule.addChild(subModule2);

// create "SubModule 1.2" and add it to "Module 1"
nodeId = new NavigationNodeId("org.eclipse.riena.example.customerDetail");
subModule = new SubModuleNode(nodeId, "SubModule 1.2");
WorkareaManager.getInstance().registerDefinition(subModule,
     CustomerDetailSubModuleController.class, CustomerDetailSubModuleView.ID);
module.addChild(subModule);
or create a second module within the same module group. For variation we make the second module non closable.
// create "M2 (not closable)" and add it to the module group
module = new ModuleNode(null, "M2 (not closable)");
module.setIcon(getIconPath(ExampleIcons.ICON_HOMEFOLDER));
module.setClosable(false);
moduleGroup.addChild(module);

// create "SubModule 2.1" and add it to "M2 (not closable)"
nodeId = new NavigationNodeId("org.eclipse.riena.example.customerDetail");
subModule = new SubModuleNode(nodeId, "SubModule 2.1");
WorkareaManager.getInstance().registerDefinition(subModule,
     CustomerDetailSubModuleController.class, CustomerDetailSubModuleView.ID);
module.addChild(subModule);
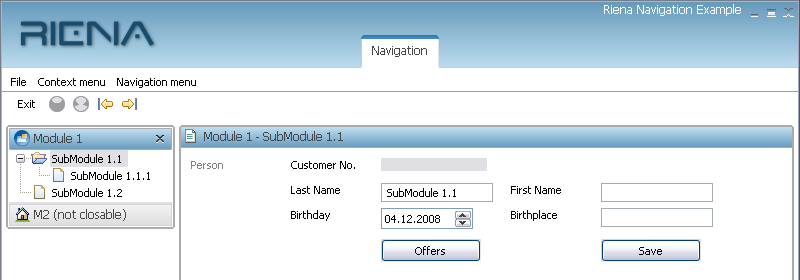
resulting in our final example application:
That's all for the programmatic creation of the navigation tree basics. Now let's have a look how this could be achieved using the declarative way.
Using Extension Points
All navigation structures may also be created in a declarative way using extension points. Just like if using the programmatic approach the application class configured in extension org.eclipse.core.runtime.applications is required to extend org.eclipse.riena.navigation.ui.application.AbstractApplication so the method createModel() will be sent within the start(IApplicationContext context) method. The application class is (except for your view and controller implementations, of course) the only java code that is required to create exactly the same navigation structure as we did before the programmatic way.
Using Custom createModel() method
The implementation of the createModel() method is really only required to set label and icon of the application, we will not add any more code to this method:
@Override
protected IApplicationNode createModel() {
	IApplicationNode applicationNode = super.createModel();
	applicationNode.setLabel("Riena Navigation Example");
	applicationNode.setIcon(getIconPath(ExampleIcons.ICON_APPLICATION));
	return applicationNode;
Creating a Subapplication
To create a subapplication we need to contribute the corresponding perspective extension. This is exactly the same as before:
<extension point="org.eclipse.ui.perspectives">
   <perspective
         class="org.eclipse.riena.navigation.ui.swt.views.SubApplicationView"
         id="subapplication.1"
         name="subapplication.1">
   </perspective>
</extension>
The following xml code shows how to
- define a subapplication node with a certain node id
- assign the perspective we configured
- assign the label for the subapplication handle
Please ignore the assembly element for now, I will explain it later:
<extension point="org.eclipse.riena.navigation.assemblies">
   <assembly
         id="org.eclipse.riena.example.navigation.assembly"
         autostartsequence="100"
         parentTypeId="application">
      <!-- create subapplication -->
      <subapplication
            label="Navigation"
            typeId="org.eclipse.riena.example.navigation.subapplication"
            view="subapplication.1">
      </subapplication>
   </assembly>
</extension>
This would bring up the same Riena application with one subapplication called 'Navigation' not containing any content like in the first step of the programmatic example:

Creating a Module Group
Creating a module group just requires adding the modulegroup element to our subapplication element. There are no attributes required but we will assign a name so we can easily identify it within the PDE:
<subapplication
      label="Navigation"
      typeId="org.eclipse.riena.example.navigation.subapplication"
      view="subapplication.1">
   <!-- create module group and add it subapplication -->
   <modulegroup name="group">
   </modulegroup>
</subapplication>
This does not change anything in the visualization of our example client as we do not yet have any modules within or module group and empty groups are not displayed. Therefore let's again proceed creating our module...
Creating a Module
As you may have already guessed there is also a module element that can be added as a child to the modulegroup element:
<modulegroup name="group">
   <module
         label="Module 1"
         icon="org.eclipse.riena.example.client:/icons/0457_a_a00.png">
   </module>
</modulegroup>
The icon path is prefixed with the bundle name so the generic Riena navigation assembler would be able to find it.
Creating Submodules
As the submodule has a presentation in the work area the associated view needs to be configured using the eclipse 'org.eclipse.ui.views' extension point:
<extension point="org.eclipse.ui.views">
   <view allowMultiple="true"
         class="org.eclipse.riena.example.client.views.CustomerDetailSubModuleView"
         id="org.eclipse.riena.example.client.views.CustomerDetailSubModuleView"
         name="org.eclipse.riena.example.client.views.CustomerDetailSubModuleView">
   </view>
</extension>
The association from node to view and controller is donevia the view and controller attributes where the controller atribute takes the fully qualified name of the controller class.
<module
      label="Module 1"
      icon="org.eclipse.riena.example.client:/icons/0457_a_a00.png">
   <!-- create "SubModule 1.1" and add it to "Module 1" -->
   <submodule
         label="SubModule 1.1"
         icon="org.eclipse.riena.example.client:/icons/file.gif"
         typeId="org.eclipse.riena.example.customerDetail"
         controller="org.eclipse.riena.example.client.controllers.CustomerDetailSubModuleController"
         view="org.eclipse.riena.example.client.views.CustomerDetailSubModuleView">
   </submodule>
</module>
Starting the application would bring up the example appliation looking just like in the programmatic case:
Final Steps
It should now be easy to add some more submodules
<module
      label="Module 1"
      icon="org.eclipse.riena.example.client:/icons/0457_a_a00.png">
   <!-- create "SubModule 1.1" and add it to "Module 1" -->
   <submodule
         label="SubModule 1.1"
         icon="org.eclipse.riena.example.client:/icons/file.gif"
         typeId="org.eclipse.riena.example.customerDetail"
         controller="org.eclipse.riena.example.client.controllers.CustomerDetailSubModuleController"
         view="org.eclipse.riena.example.client.views.CustomerDetailSubModuleView">
      <!-- create "SubModule 1.1.1" and add it to "SubModule 1.1" -->
      <submodule
            label="SubModule 1.1.1"
            icon="org.eclipse.riena.example.client:/icons/file.gif"
            typeId="org.eclipse.riena.example.customerDetail"
            controller="org.eclipse.riena.example.client.controllers.CustomerDetailSubModuleController"
            view="org.eclipse.riena.example.client.views.CustomerDetailSubModuleView">
      </submodule>
   </submodule>
   <!-- create "SubModule 1.2" and add it to "Module 1" -->
   <submodule
         label="SubModule 1.2"
         icon="org.eclipse.riena.example.client:/icons/file.gif"
         typeId="org.eclipse.riena.example.customerDetail"
         controller="org.eclipse.riena.example.client.controllers.CustomerDetailSubModuleController"
         view="org.eclipse.riena.example.client.views.CustomerDetailSubModuleView">
   </submodule>
</module>
or create a second module within the same module group. Again the second module will not be closable.
// create "M2 (not closable)" and add it to the module group
// create "SubModule 2.1" and add it to "M2 (not closable)"
<modulegroup name="group">
   <module
         label="Module 1"
         icon="org.eclipse.riena.example.client:/icons/0457_a_a00.png">
   <!-- ... code from above... -->
   </module>
   <module
         label="M2 (not closable)"
         icon="org.eclipse.riena.example.client:/icons/HomeFolder.gif"
         unclosable="true">
      <!-- create "SubModule 2.1" and add it to "M2 (not closable)" -->
      <submodule
            label="SubModule 2.1"
            icon="org.eclipse.riena.example.client:/icons/file.gif"
            typeId="org.eclipse.riena.example.customerDetail"
            controller="org.eclipse.riena.example.client.controllers.CustomerDetailSubModuleController"
            view="org.eclipse.riena.example.client.views.CustomerDetailSubModuleView">
      </submodule>
   </module>
</modulegroup>
resulting in the same example application as the programmatic way:
This concludes the extension point section of the navigation tree basics.
Assembler Basics
As you have seen in the previous section the extension point contains assembly elements. These elements decribe how a certain part of the Riena navigation tree is going to be 'assembled'. Basically there are two options
- Custom Assemblers provide the user with the option to create parts of the navigation tree structure in a programmatic way without using any additional xml. A custom assembler would create navigation nodes just the way we did within the createModel() method of the programmatic example. A custom assembler MUST implement the interface org.eclipse.riena.navigation.INavigationAssembler
- Generic Assemblers are prepared to use the element structure provided within the assembly element. Generic Assemblers MUST implement the org.eclipse.riena.navigation.IGenericNavigationAssembler interface. There is a default implementation of a generic assembler, org.eclipse.riena.navigation.model.GenericNavigationAssembler, that will be used if no assembler is specified.
When defining the content of any string attribute like eg labels, instance ids etc. variables may be used and are automatically replaced by their current value. There are some predefined variables allowing access to
- navigation node id ${riena.navigation.nodeid}
- navigation node parameter if supplied by the user ${riena.navigation.parameter}
- navigation node context ${riena.navigation.context}
If you eg have a module within your application that would provide one or more submodules to edit some cutomer data and navigation nodes for different customers are distinguished by using the customer number as the navigation node instance id, the module definition could look like this:
<module
   label="Customer ${riena.navigation.nodeid:instanceId}"
   typeId="com.acme.customer.edit.module">
The paramenter after the colon is interpreted as a property of the variable ${riena.navigation.nodeid} instance at the time the module node is built. Nested and mapped properties may be accessed using the appropriate string (see the Apache Commons BeanUtils page for more information).
If your application eg would open the customer edit module only on an existing customer object (eg found in a search dialog), you might want provide the customer within the navigation argument when navigating to the customer edit module. If the customer had a name attribute, we could display the name instead of the customer number in the module label like this:
<module
   label="Customer ${riena.navigation.parameter:name}"
   typeId="com.acme.customer.edit.module">
The navigation node context is not the context accessible via NavigationNode.getContext(String) as this would not make too much sense - that context would always be empty as it can only be populated after node creation. The context in question here is the creation context of the node - simply a map that is created upon creation of the top level node created by this navigation nodes assembler. A copy of the context is inherited to the children thus modifications to the context made in different branches are independent from each other. The navigation node creation context was introduced to enable a more advanced node creation concept: loops.
Loops
Imagine the customer from the previous section has several accounts and you would like to display each account within an individual submodule. This cannot be achieved by the static configuration means we have seen so far, we need something more dynamic here:
<module
      label="Customer ${riena.navigation.parameter:name}"
      typeId="com.acme.customer.edit.module">
   <submodule
      typeId="com.acme.customer.edit.base"
      controller="..."
      view="..."/>
   <foreach element="account" in="${riena.navigation.parameter:accounts}">
      <submodule
         label="Account ${riena.navigation.nodecontext:account.accountNo}"
         typeId="com.acme.customer.edit.account"
         instanceId="${riena.navigation.nodecontext:account.accountNo}"
         controller="..."
         view="..."/>
   </foreach>
</module>
This assumes the customer object we provided as a navigation parameter has an accounts property that returns a list or an array of account objects, each having an accountNo property. For the sake of simplicity it also assumes that the account numbers uniquely identify an account.
But what does the 'foreach' declaration above exactly do? Well, it simply iterates all accounts of the customer object provided as a navigation parameter by the user and
- creates a new context derived from the module context for each account and stores the current loop object under the key 'account' in it.
- creates a submodule for each account using the unique account number as navigation node instance id (and also showing it in the submodule title label)
Consult Navigation Elements Reference for a detailed break-down of each navigation element's attributes and their meaning.
Navigating through the application is in the first instance a business performed by the end user. For this purpose some interactive navigation elements are provided by a riena application: The tabs in the titlebar to switch between subapplications, the navigation area with clickable module titles and possibly a tree of submodules in an activated module.
Aside from this the navigation may be controlled programmatically through the application code. This may be needed, if navigation to an application part is desired, which has not yet been inserted into the navigation tree and so is not reachable for the end user through the navigation elements. Besides of this it may be useful to direct the attention of the end user to a certain point or to provide him with a short cut to some application part which otherwise can only be reached through several mouse clicks.
A programmatic navigation may be started from every part of the application code. For example as a reaction on a tool or menu bar action, after a button click or without a preceding end user action subsequent to a terminated background process. To navigate there, etc. the interface INavigationNode (INavigationHistory) provides the following API methods: navigate(), navigateBack(), activate(), jump(), jumpBack(), historyBack() and historyForward().
On the INavigationNode object, which is the starting point for the navigation, the method navigate(..) is called. The argument of the call is the NavigationNodeId of the target node of navigation. During this call the target node id is used to look for the node in the navigation tree. If the target node already exists it is activated. If not, an NavigationNodeAssembler for the target node is searched, which afterwards creates it and then the node is activated.
INavigationNode node = ...
node.navigate(new NavigationNodeId("typeId", "instanceId"));
Calling method navigateBack() undoes the last navigate to this node i.e. activates the last source node of a navigate(..) - call that lead to the activation of this node.
INavigationNode node = ...
node.navigateBack();
Method activate()
The target node can be activated directly through calling method activate() of the nodes interface INavigationNode. This requires that the node is already part of the navigation tree. So before the node can be activated it has to be created and then added to the tree through calling method addChild(..) on a node that already exists in the tree.
INavigationNode parentNode = ...
INavigationNode node = ...
parentNode.addChild(node);
...
node.activate();
Method jump()
Calling the jump(..) method behaves like calling the navigate(..) method and additionally makes it possible to jump back to the source node (i.e. the node on which the jump(..) method was called) by calling jumpBack() on the target node.
INavigationNode node = ...
node.jump(new NavigationNodeId("typeId", "instanceId"));
Method jumpBack()
Calling the jumpBack() method jumps back to the source node of the last jump to this node.
INavigationNode node = ...
node.jumpBack();
Method historyBack()
Calling the historyBack() method navigates one step back in the navigation history.
INavigationNode node = ...
node.historyBack();
Method historyForward()
Calling the historyForward() navigates one step forward in the navigation history.
INavigationNode node = ...
node.historyForward();
The target of the programmatic navigation may be a node on any level of the navigation tree. After navigating to a specific submodule an activation path to the submodule node is defined. If navigation to a subapplication or module occurs the result is identical to navigating manual (navigation by the end user): The last activated children of the target node are activated again or respectively the first child node, if the parent node was not activated before.


